|
- Learning is Life. - We often get questions about how our intern position at the craft school works, so we put this blog entry together to describe some of the details. 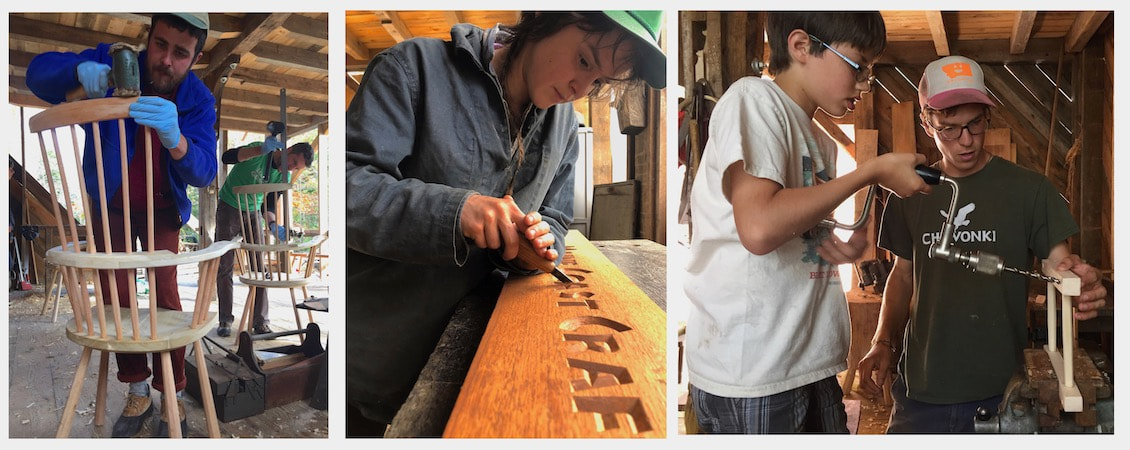 We offer an immersive experience in green woodworking and rural off-grid living at the Maine Coast Craft School. The internship position is an important part of our school and philosophy, and we are dedicated to offering a high quality learning experience for our interns. This position is a work-trade; participants are provided with simple housing, a modest monthly stipend for food and a spot in all of our summer classes, in exchange for their labor and participation in our various out-of-class activities and efforts during a 6 to 8 month period (generally from March or April until October or November). Our ideal intern will be curious and engaged in the whole experience. They will work to make the most of their time with us - whether they are processing and stacking firewood, helping to prepare materials for a class, moving logs, cooking and sharing a meal together, chatting with a drop-in visitor to our school, or learning how to build a chair in one of our craft classes. Intern tasks involve learning from and working with Kenneth on things like the craft school’s buildings and grounds, class set-up and clean-up, obtaining and preparing materials, caring for and organizing hand tools, cleaning the loo, general maintenance, hauling water for the school kitchen, moving heavy things, as well as sweeping and tidying and learning where things go. Interns work closely with Kenneth and they are an integral part of the culture of our school community. 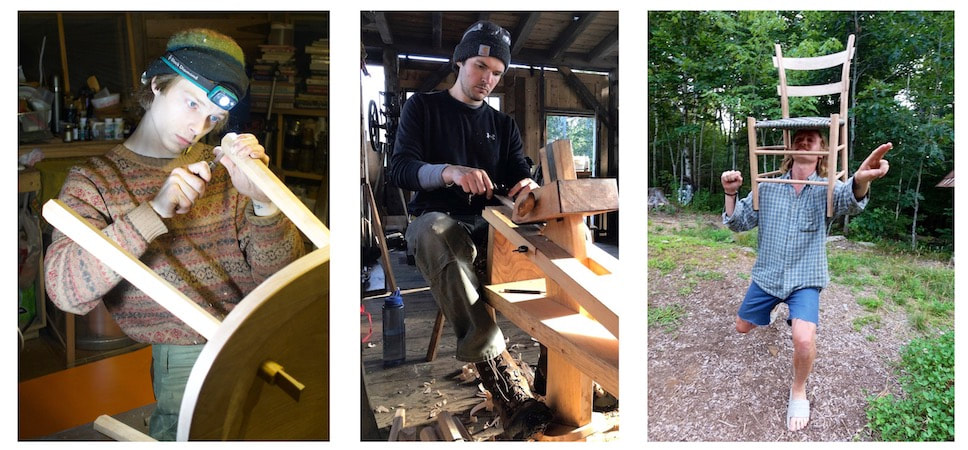 Interns can learn about the craft of teaching too if that is of interest. Kenneth is always pleased to support aspiring teachers by providing opportunities for them to observe his methods of instruction, engage in teaching-related discussions and by working with our students in an assistant role if that is appropriate to the interns’ skills. We calculate roughly two days of intern work is equivalent to one in-class day for our work-trade. That formula takes into account our investment over the years in all the things required to stage a successful series of classes. We will work with individuals to balance the overall work-trade schedule with our requirements around class preparation and time off. During our class season, there is a lively, social atmosphere and we share quite a few meals together. Swimming in the pond, sauna-ing, hanging out around the fire pit, carving or crafting together and making pizza in the wood-fired oven at the school are some common leisure-time activities here. Interns have their own living space, which guarantees their privacy during off hours. On days when we are involved in a class, and also when the intern is at the craft school working with Kenneth, a willingness to participate in and be a friendly representative of our school and our household is truly valued, appreciated and expected. Class-day responsibilities generally involve helping Kenneth get the building open, setting up for the day and assistance with organizing hand tools. There is often a bit of orienting other students towards specific tools or materials when needed, since the intern will have come to know their way around the workshop by the time we start classes. Beyond that, classes are for concentrated learning, and our intern is treated as a full student. We try to ensure that they have the space to be fully involved without distractions of other responsibilities during class hours. 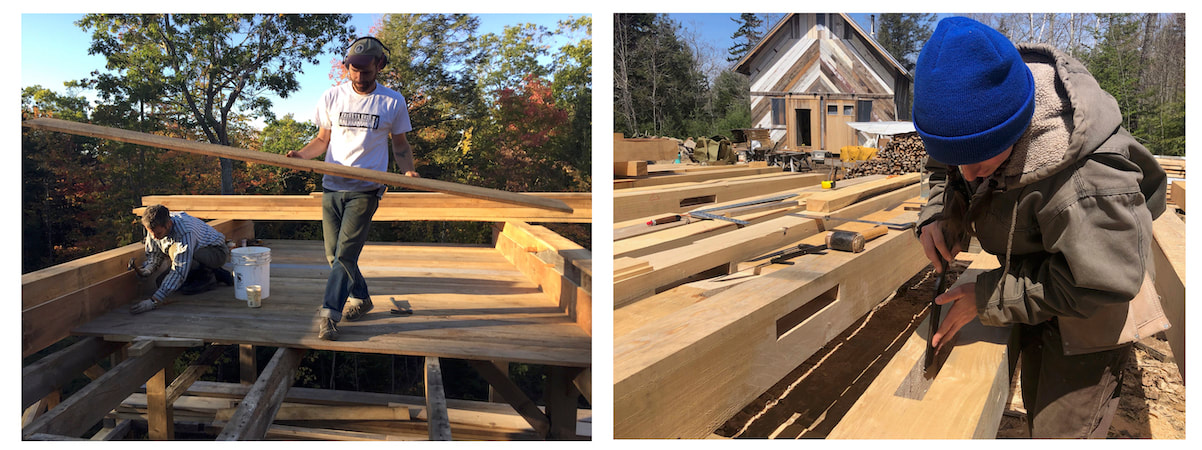 This internship position is modeled on Kenneth’s time as the summer intern at Country Workshops in North Carolina in 1995. Kenneth couldn’t afford to pay for classes at the time, and he needed an accessible way to get practical experience and skills. Work trades and apprenticeships, like the one with Drew and Louise Langsner, provided his foundational learning and living experiences, and he was able to build on the practical skills that he gained as an intern there. Bringing presence of mind and care to every task is one of Kenneth’s hallmarks, and he appreciates working with individuals who possess a strong sense of responsibility for their own learning. Angela’s experiences as a visual artist, college professor, domestic engineer and business owner have been acquired through her numerous paying jobs, several educational institutions attended and by necessity. She definitely feels that learning happens every day, with all tasks and interactions, and she senses that she has a lot to learn. She is happy to share knowledge about the behind-the-scenes aspects of running a business, cooking for large groups, or any of her other specialties, if an intern is keen to learn (although these things are not official parts of our internship position). This exchange is our way to try to make deep learning available to individuals who cannot afford the roughly $10K in tuition. The housing and food stipend amounts to around $3K of active support. It’s often a big stretch for people to take 6 or 8 months away from whatever life they are leading, and we offer as much as we can to support the people who do manage to come live and work with us. We are proud of the range of our curriculum and the depth of instruction in each of our classes. Our interns develop a thorough and compelling portfolio of skills, building a considerable variety of objects during their time here, and we hope that these things will help them find meaningful and fruitful occupation going forward in their lives. 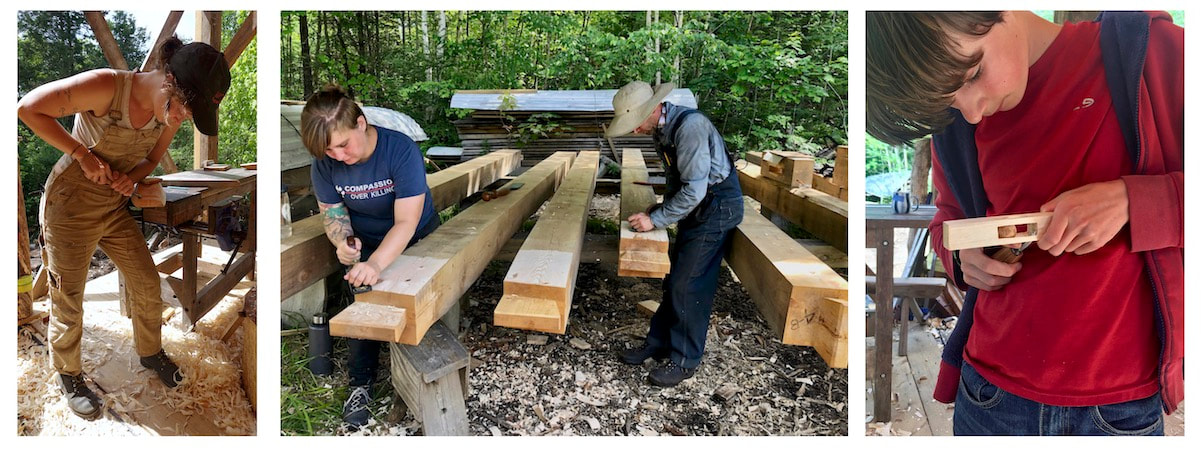 Our experience has shown that an in-depth education in hand crafts, self sufficiency, and a strong, lived example of skilled simple living, like we offer, is exceedingly rare in our culture. We believe that this kind of education can help all people, and we want to share what we can with anyone who is interested. We offer this spot each year, and the process generally begins up to a year in advance as we make contact with and get to know interested individuals. We are always especially pleased to offer our internship position to individuals who are underrepresented in the world of hand crafts and woodworking, and we actively seek to encourage and support them in applying. The kinds of folks we hope will apply for the internship are the ones who are willing to work with us, to meet us where we are, to teach us and learn with us in becoming more present, more kind, and more engaged in our daily lives. We commonly connect prospective individuals with one or more of our previous interns, so people have the opportunity to ask lots of questions and to get a solid sense of other peoples’ experiences here in this same internship position. One way that we use to connect with prospective interns is to have them take a class with us (usually we set this up as a short-term work trade) so that we can meet and work together to get to know one another. To see a list of our classes and class descriptions, you can go to: https://www.mainecoastcraft.com/class-descriptions.html Please be in touch via email if you have questions or an interest in our internship program. Thank you, Angela & Kenneth Kortemeier 260 Old County Road Bristol, ME 04539 mainecoastcraft@gmail.com 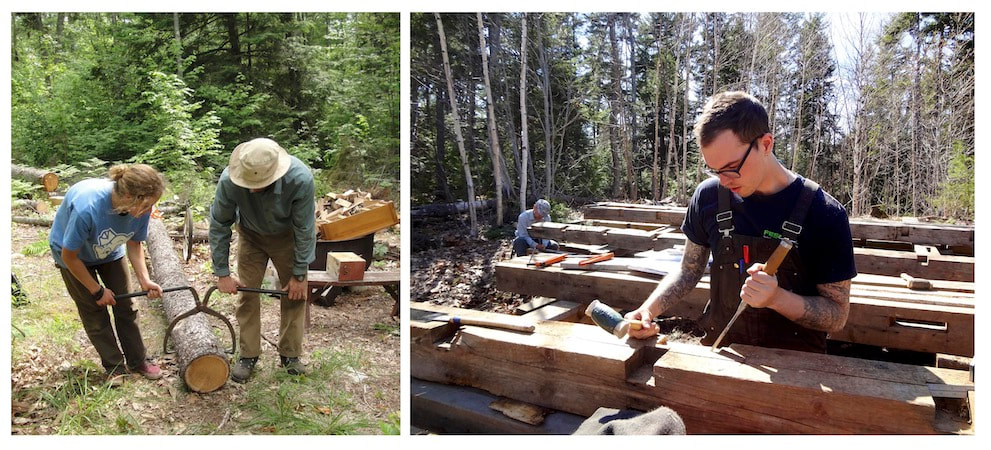
0 Comments
 Once classes wrapped up this past September (2019), we got to work on the foundation for our new Dutch timber framed building (which I wrote about in my last post). Here are some highlights of the process of creating the foundation. Spoiler alert: first photo above is of the finished work. 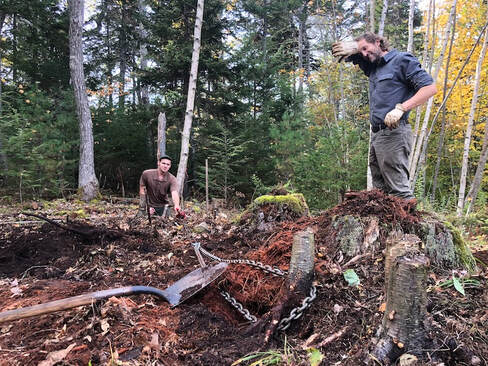 Two friends named Dan helped pull some smaller stumps by hand with a chain and a come along. The trees on the building site, though they had been cut 15 or 20 years ago, were still solid enough to have their roots securely interwoven into the granite ledge under the topsoil. We called in some bigger guns. Our friend Hazel and her excavator made very short work of the stumps, and left us with a big, muddy hole and a pile of burnable detritus which reached higher than our heads. Dan was in charge of fabricating 12 tapered, wooden forms for the foundation piers. He used salvaged wood from Kenneth’s famous POPs (Piles Of Potential). 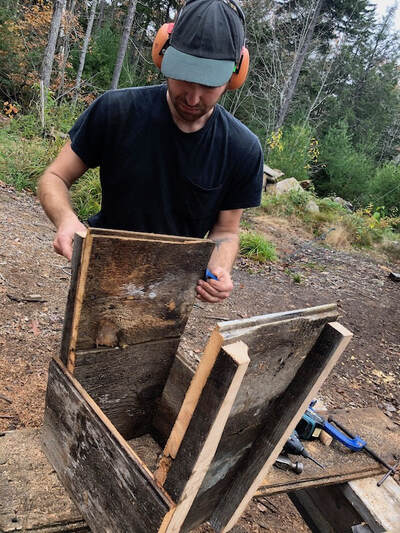 Each tapered, wooden pier form was custom made and then scribed to the ledge in place. The taper is helpful for frost heaves, but mostly we use the taper to provide a wider base of support. 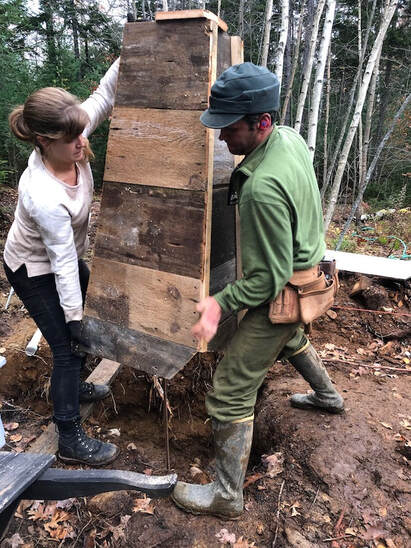 Here, Lily and Kenneth lower one of the tallest forms into place. They were working on scribing the form to the contour of the ledge, so the form needed to be placed, the scribe line drawn, form removed and cut, then placed in the hole again. (Repeat, until the connection was right) It was a custom fit for each of the 12 forms. One corner of the foundation met the granite ledge about 5’ down, the other corners were much shallower, more like 1’ or 2’ deep, so only two of the forms were as large as the one you see Kenneth and Lily working with above. 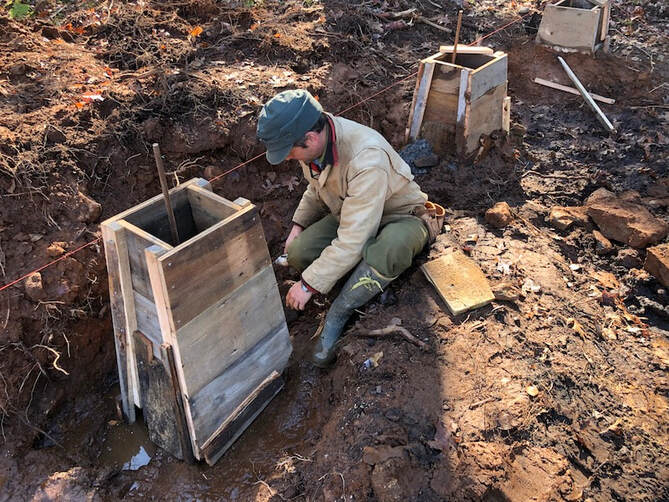 5/8” rebar was drilled about 6” into the granite in the center of each pier to serve as a pin. The forms were positioned and then backfilled with the displaced earth and then gravel. Our farmer friend Ben, below, was instrumental in cheerfully helping with the earth-moving work. 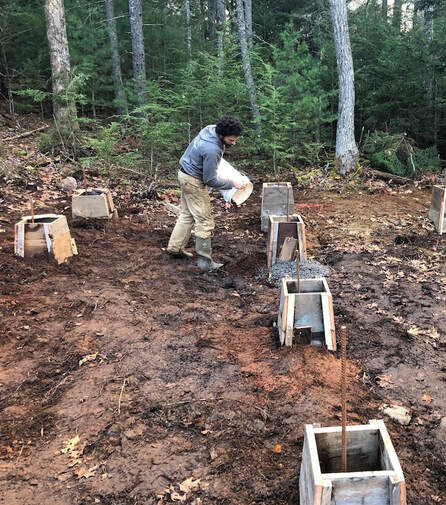  Kenneth, below, grinds the rebar to the appropriate height so that it reaches below the level of the concrete and does not show in the finished pier.  It was a bit much to get all 12 wooden pier forms level on top. Each was a different height overall, and each was buried at a different depth down to the ledge. Therefore in order to be able to guarantee a consistent height for our finished concrete tops, Kenneth “shot” a mark across the tops of the wooden forms with a transit level, starting with the shortest form of course. Then we drove a nail through the wood at the level mark on each of the other piers. The nail was visible on the inside of the form and allowed us to fill each one just right. 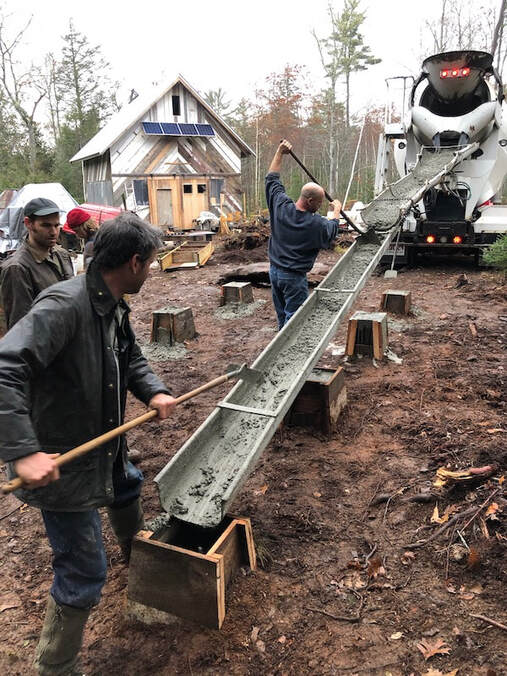 And here’s the concrete. We requested the fiber-mix, which is ultimately stronger. 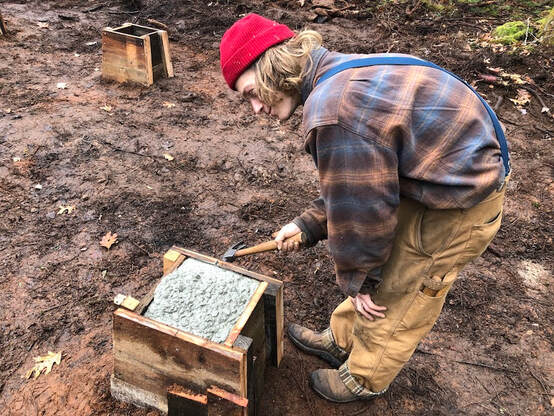 Austin taps the form with a hammer to help move air bubbles up and out of the concrete. The wooden forms were dismantled above grade. We’ll leave the wood to rot below the soil, since digging the piers out again is just too much moving of dirt. We're fond of the wood grain now forever visible on the piers. It reminds us of Kenneth's late friend Huston Dodge, whose life-long salvaging skills provided the boards we used. The final task before winter sets in is to spread gravel over the mud and around all the finished concrete piers, then we’ll be ready to go in the spring. The structure will pop up pretty quickly, now that the foundation is ready and the joinery has all been cut by Kenneth and Amy Umbel during the spring of 2019. This blog entry is basically a re-telling of the story which I documented in a series of posts on Instagram - check those posts if you’d like more information about some of our many helpers during this project. All the best to all of you, Angela Kortemeier 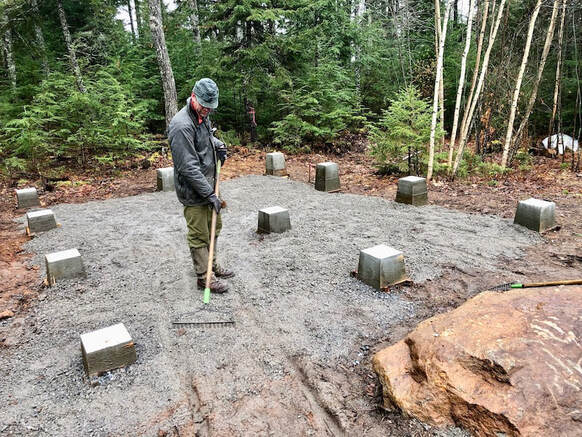 Work began on a new timber framed structure this past winter (2019) here at the craft school. The 16’ x 19’ building will be a comfortable place for sharing lunches and also fika (that’s the traditional Swedish tea break) during our classes. The upper floor of the structure will be a year round home for Angela’s office. 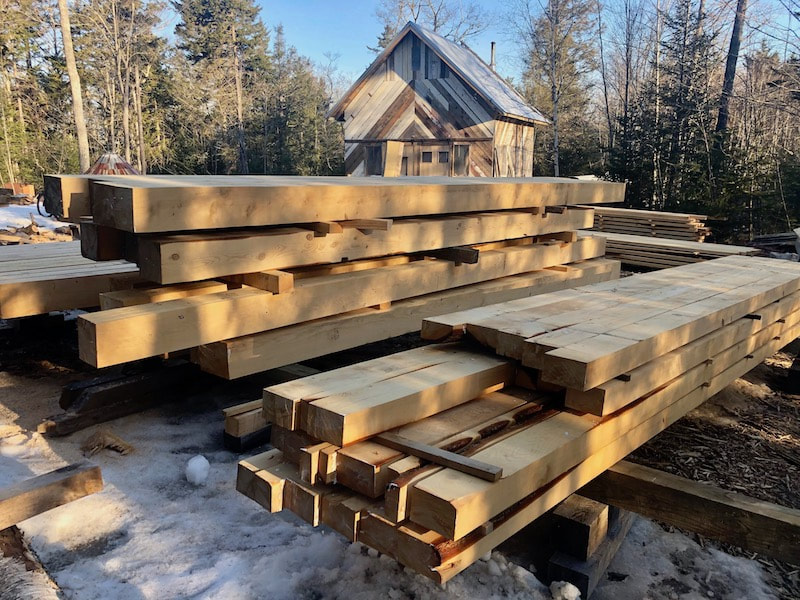 We decided to build another timber framed structure versus some other building style first of all because we really enjoy the process of building this way. We also had Amy Umbel arrive in April to help as our spring intern. She was especially interested in learning about joinery and non-sculptural wood working, so this project suited her hopes for learning with us very well. But the most tangible and practical (and wonderful) reason comes down to our friends/former students Dave and Kim Landry, who donated the timbers, processed and delivered, for this new building. 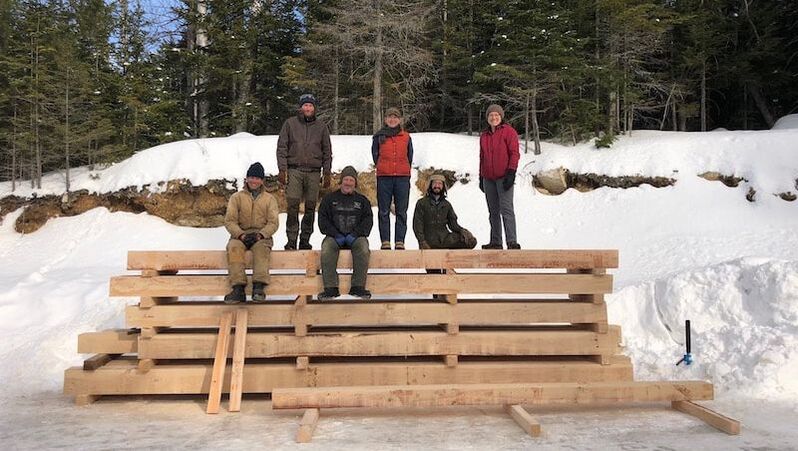 During the first two seasons of classes at the craft school, we shared meals under a large canvas tarp, generally a lovely place to gather. But when the rain and wind intensify during a storm it can be wet and cold, especially toward fall. In fact, it was last September (2018) while Dave and Kim were taking a spoon carving class with Jögge Sundqvist that Dave decided it was time for us to build a more solid structure and offered the means to do so. The Landrys generously thinned some of their acreage in New Hampshire of some very large hemlock trees in January, and we joined them in February to assist at their saw mill to create the posts, beams and other dimensional lumber for the project. 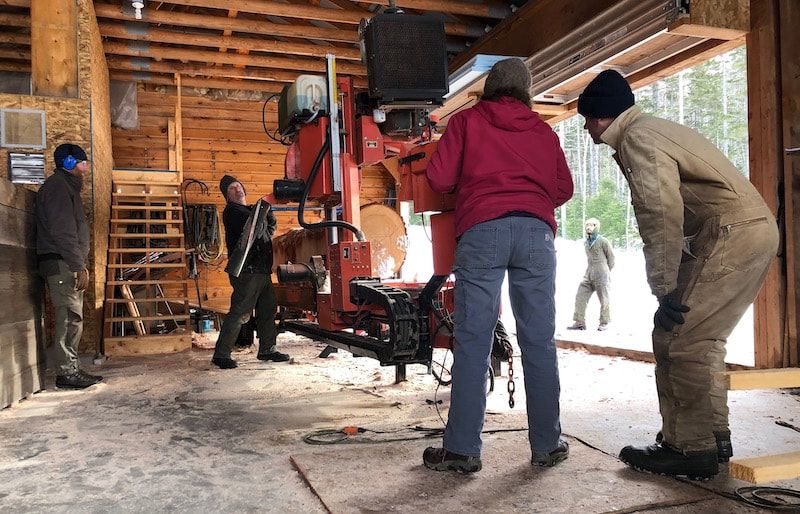 This style of timber frame is called a Dutch Frame. That means it has high posts along the eve walls and the tie beam (or anchor beam) will connect into the posts near the top plate with wedged dovetailed through-tenons. By placing the posts close together and limiting the length of the tie beams to 16’, there is no need for central posts or floor joists on the second floor. To reduce potential twisting and leveraging of the posts by the rafters, we have limited the height of the posts to 12” above the anchor beam. The extra length of post that comes up above the second floor will create a short knee wall. This knee wall will raise the rafters up a bit and make it a more livable space.  Our friend Andrew D. once again generously helped us with the design, as he did for the craft school building in 2016. We chose this type of frame partially because it has multiple bents that are all very similar. This makes cutting joinery with people who are new to timber framing much easier. We knew we’d have lots of people who wanted to participate and learn with us while we were working on this building, so we chose a design which accommodated that. 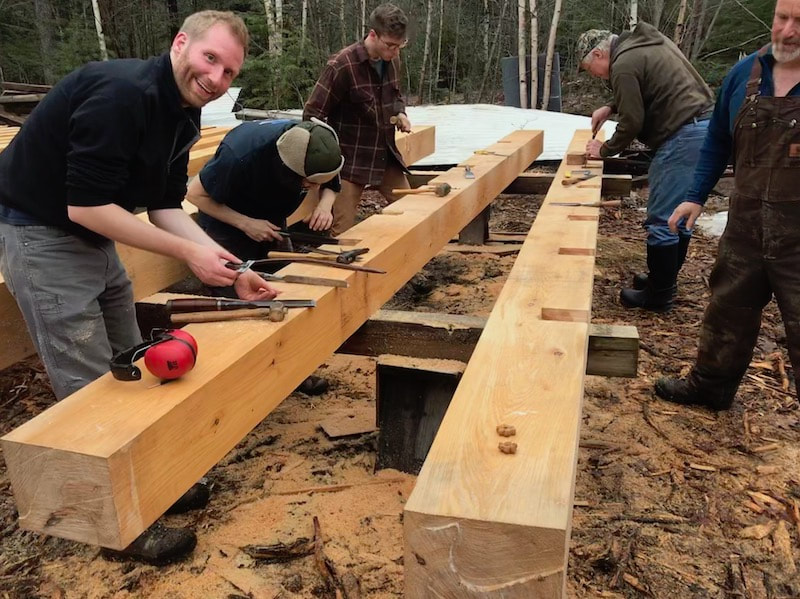  This size & style frame, very common in Euro-American timber framing because of its simplicity, could easily be made into a tiny house and would be a good choice for someone wanting to cut their first timber frame. If you would like to learn more about Dutch frames and their history in America there is an article from Winterthur Portfolio by Clifford Zink - linked here.  There are three basic joints we have used in this frame. The most complex one is the wedged dovetail through-mortise, it’s also the strongest joint for this application by far. The dovetail through-mortise joint is used to hold the 6x8” posts and the 8x9” tie beams together. The tie beams will do double duty and function as joists or carrying beams for the second floor. 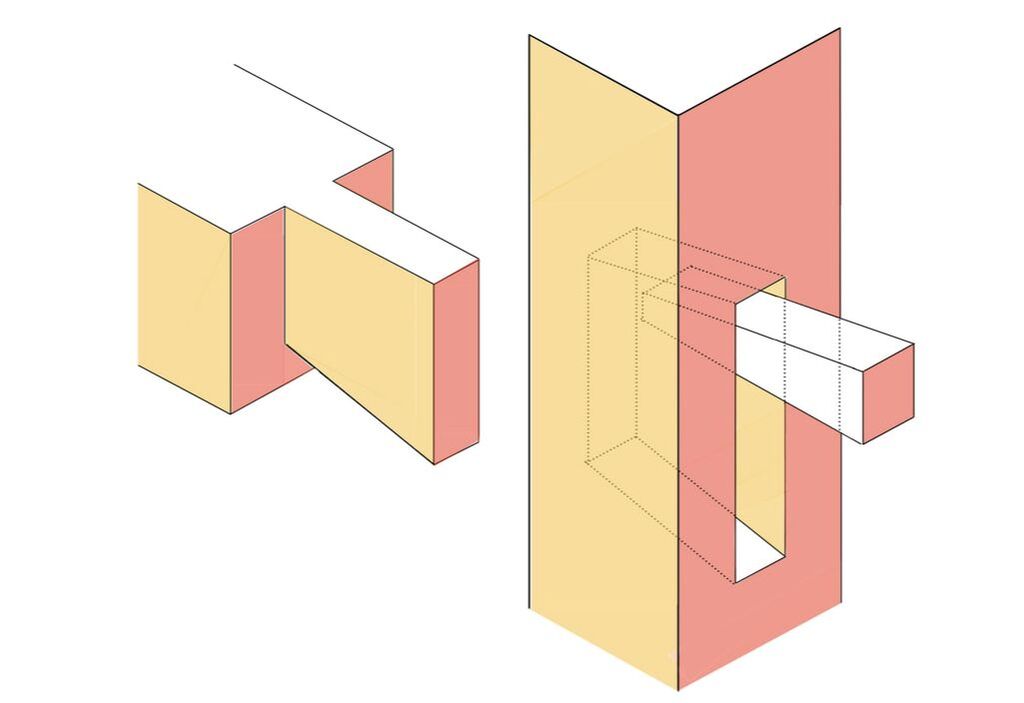 dovetail through-mortise joint For the corners of the 8x10” sill, we have chosen a joint that our friend Micheal Alderson introduced to Kenneth. Michael said he found this joint in an old barn here in Maine and has always liked it because of its strength and minimally exposed seams. Exposed joint seams can introduce rot into the sill, so it’s an excellent, well protected joint. 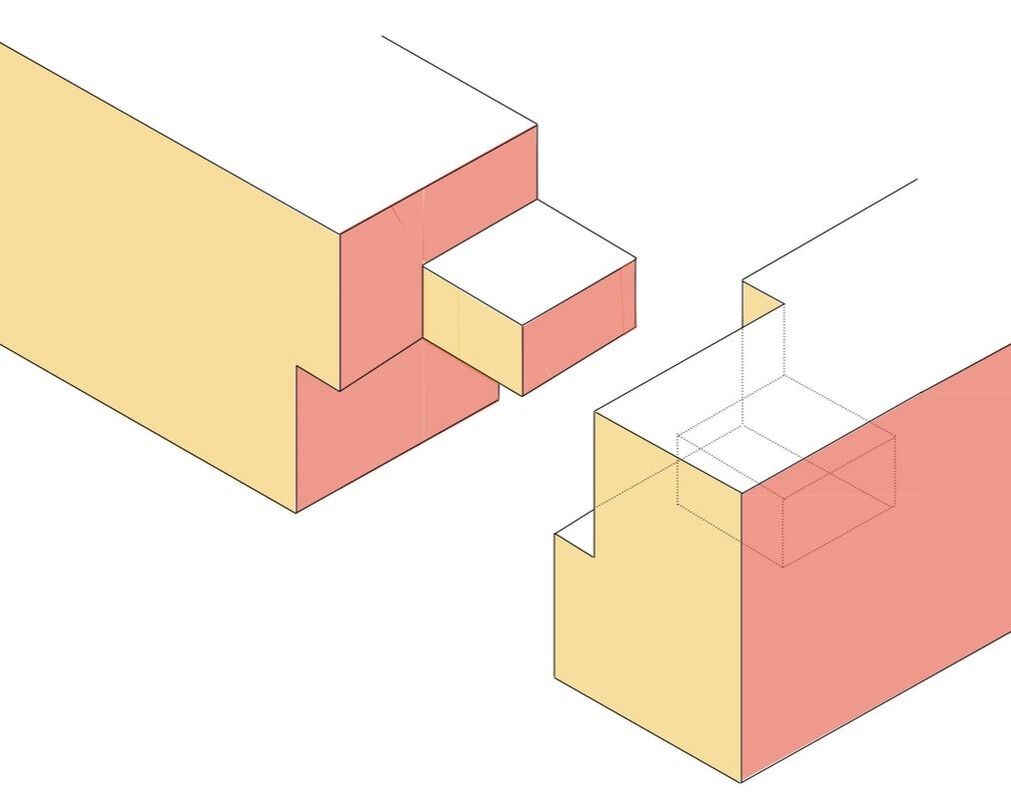 protected corner sill joint For the 4x6” floor joists on the first floor or deck, we have a simple housed joist pocket. This joint is interesting because of the curved “dive” that is cut on the underside of the joist to reduce its thickness as it is let into the sill. This is done because we want maximum stiffness in the joist but it would weaken the sill to take a full thickness mortise. The strength of the joist is a bit reduced by cutting away the thickness, but it remains plenty strong for this application and we retain the stiffness of the joist by keeping it as thick as possible across the central span of the joist. The joist dive is curved to spread out the forces and to prevent splitting the joist at the reductions. Kenneth has seen joists split that were cut with a square notch (which concentrates the forces acting on the joist), therefore he likes the gradual curve to spread weight & force out over a longer distance. 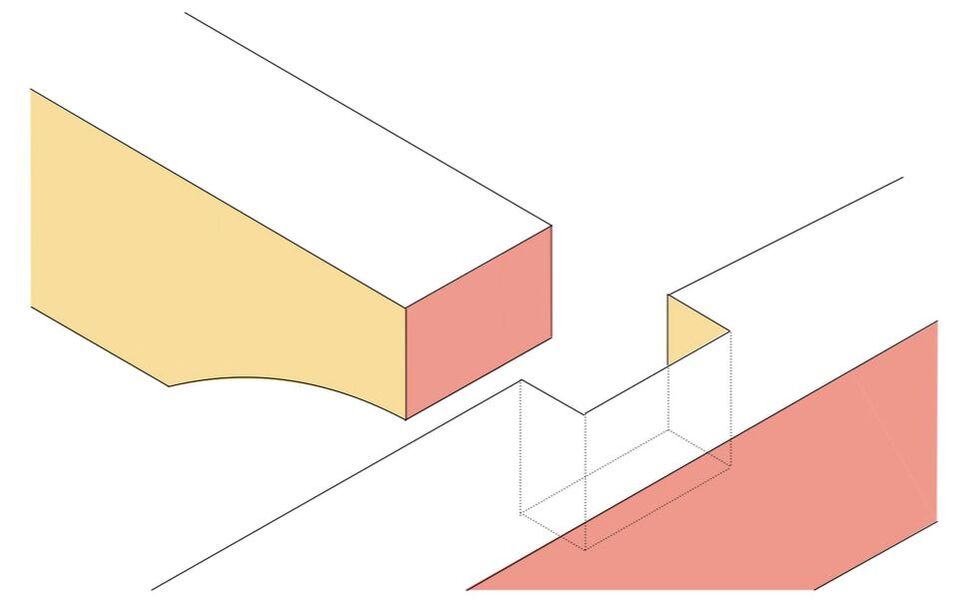 housed joist pocket It has been such a wet spring here that work on the foundation for the building has been delayed. And now it’s time to get the shop organized and ready for this summer’s classes, so we’ve decided to stack and cover the (mostly cut) timbers of the new frame for the time being. We’ll get back to work and raise it next spring, once the ground is thawed enough to allow us to start digging holes for all the foundation piers. Looks like one more summer under the big tarp.   Our school building is coming together in several remarkable ways. The most unusual part of the story involves many of the building materials we are acquiring through salvaging and where those materials are coming from; namely the estate of a good friend who recently passed away, at 99 years old, named Huston. [You might be interested in this previous blog post on tomakeandtobe.com for some of Huston's back story.] Then there’s the community help we have been receiving in cutting the joinery for the timber frame for our new school from generous and skilled friends who are donating their time. Finally there’s the information that Kenneth gleans from the wooden beams, wide old boards and hand made windows we’re reusing. I’ll let Kenneth tell it: - AK “Most of the time when people build something, they buy new materials. This generally guarantees them fairly consistent dimensions, and no nails to pull or rot to watch out for. I really appreciate that our building will have a special story though, and a tangible connection to the past through its salvaged materials, despite the extra effort involved. Our craft school building also feels like a fitting tribute to Huston and his life-long work of collecting and salvaging, he was always enthusiastic to share knowledge with anyone who was curious about traditional wood working. When Huston passed away around Christmas, he had been collecting materials for over 80 years. Since I have the good fortune of having known him, his estate and piles of potential are such a rich resource, available right here and right at this moment, and it’s hard to think about doing this project in a way that wouldn’t incorporate as much as I can of what he left behind.  Lots of POPs (Piles of Potential) at Huston's. From the photograph you can see a bit of what Huston collected during his years of diligent salvaging. He couldn’t really stand to see useful tools and materials get wasted. He was generally unwilling to sell or give anything away though, unless he thought he wouldn’t need it, and also only if he approved of the application and intended use of the items in question. This approval was rarely granted, and he was a great optimist about how many projects he might get to, so he ended up filling acres of his family’s property with pieces of old buildings, tools, wood, etc. It's been challenging to find boards of consistent length, width and thickness at Huston’s.  Dan & Zoe helping with culling & loading boards. Sometimes Huston did a good job of keeping things covered and sometimes not so much. There are hundreds of stacks of boards, generally all of them now have years of organic material piled on top. Sometimes he had covered them with sheet metal - those held up better than the ones which he covered with tarps. Sometimes he had stickered them, these generally had boards which were in much better shape. Usually the top layer or two was pretty well rotted, and then you’d have some good boards in the middle and then as you got closer to the ground you’d find more rot. Sometimes the rot was in the form of mycelium running through the boards, sometimes carpenter ants had gotten in there, but mostly it was water damage and fungus. 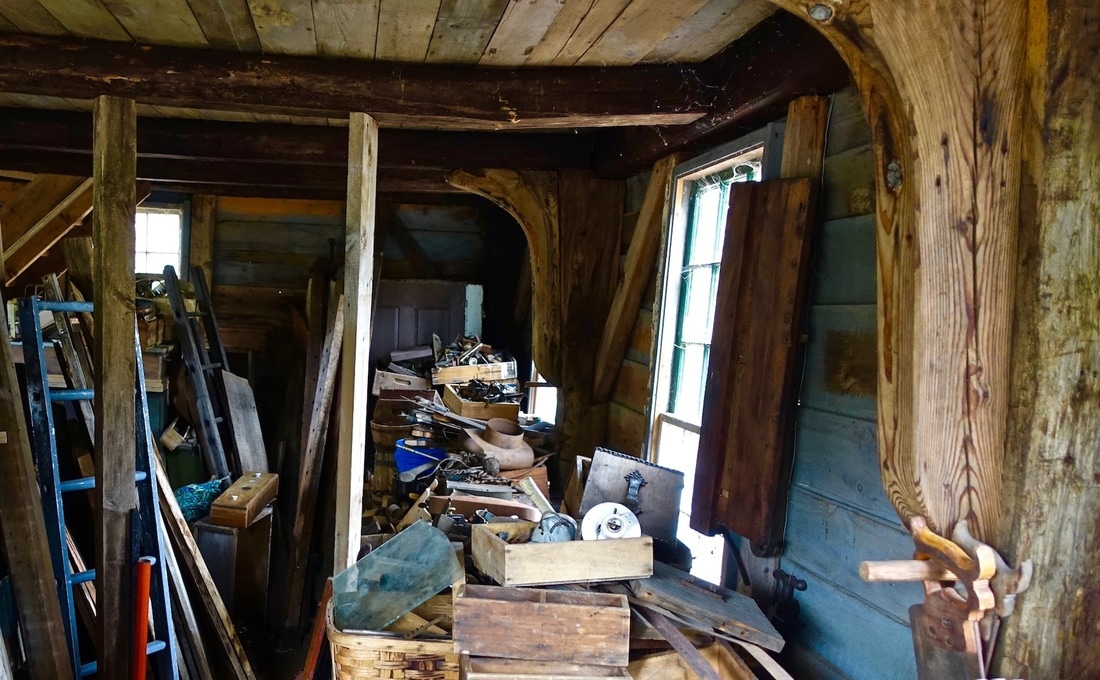 Interior shot at Huston's - notice the knees. Never the less, it’s pretty amazing to think that one person amassed so much stuff in an effort to keep things from being thrown away or wasted, like a little snapshot of how much has actually gone to the dump in our culture. It is a sad thing to me that a lot of Huston’s efforts did not manifest into new projects, and much of what he collected is on its way to returning to dirt. I’m really glad that I can use a few of his materials so that there will be something of his that is tangible and able to continue on into the future, in a way that I know he would have liked. Not all of the materials for our school building will come from Huston's. I have posts, tie beams and studding from a reclaimed building I bought several years ago. We have bought new wood for the rafters and the bottom plate. 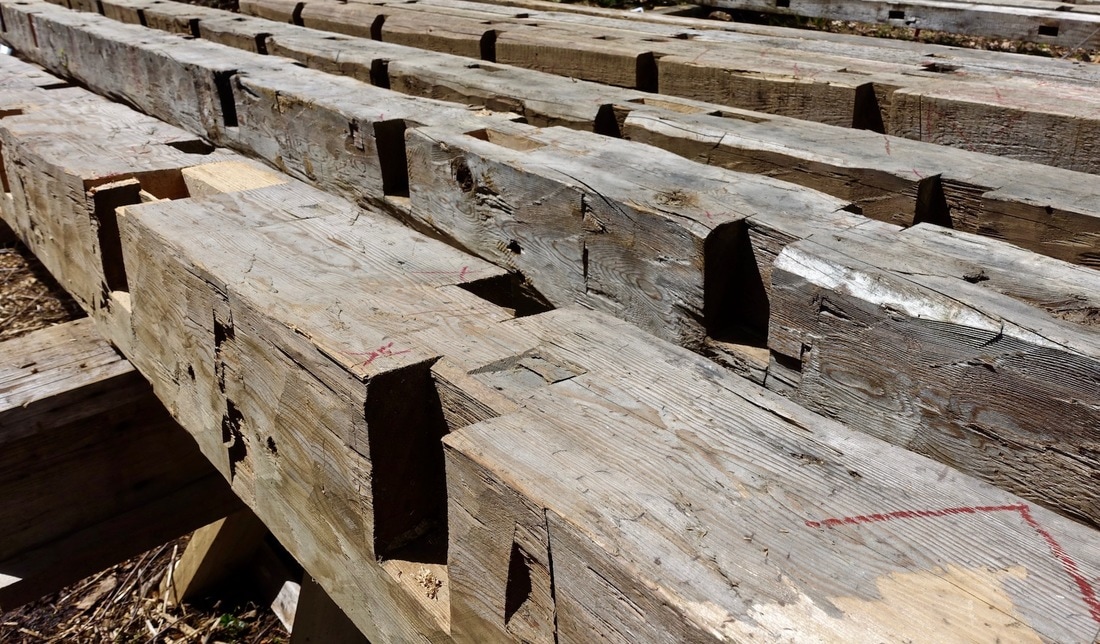 Hand hewn tie beams. Our friend Andrew donated these tie beams which have been a key part of our new structure, I’m particularly fond of them since they are hand hewn, which dates them to be the oldest beams in the building. Hand hewing was often done on-site; people would fell a tree, hew it up and put it into the building right there. The marks that you see in this photo have been made by squaring up the tree with an scoring axe, followed by work with an adze and a broad axe to smooth and finish. These are all old growth hemlock beams with tight growth rings, maybe 1/32” apart. These tie beams have joist pockets that will create the floor structure for the 2nd floor of the building. 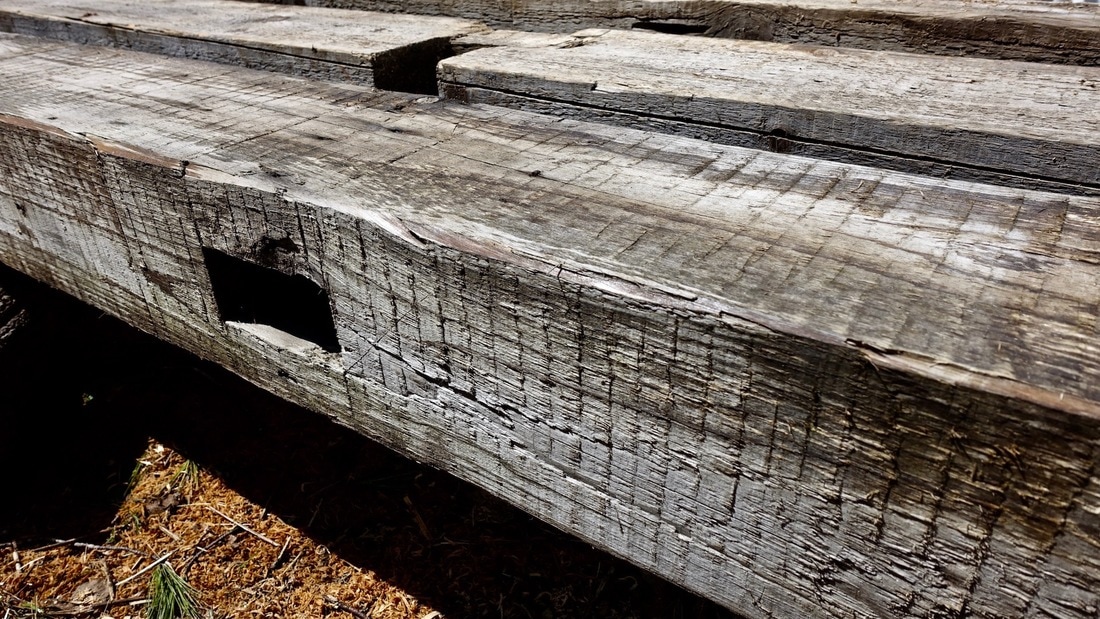 These beams were cut with a water-powered saw mill. This photo shows beams that were sawn with a water powered saw mill. Huston called these up-down saws. They were basically a big frame saw. Think of a section of a band saw blade (one that is not connected to itself in a circle) locked into a frame. This frame is attached to a series of cogs and a track, and every time the saw retracts after having sawn down through the wood, the log is moved forward one increment before the saw blade comes down again. So you get those very regular marks from the saw, as well as distinct little marks from the cog as it moves the log along. Most of the siding boards we have were also sawn with up-down saw mills that would have been water powered. Circular saw mills didn’t really come into this area the until the late 1800’s, before that it was all water-powered saw mills. A circular saw of course leaves round saw marks, you would have seen those more after the Civil War, when they became more popular. 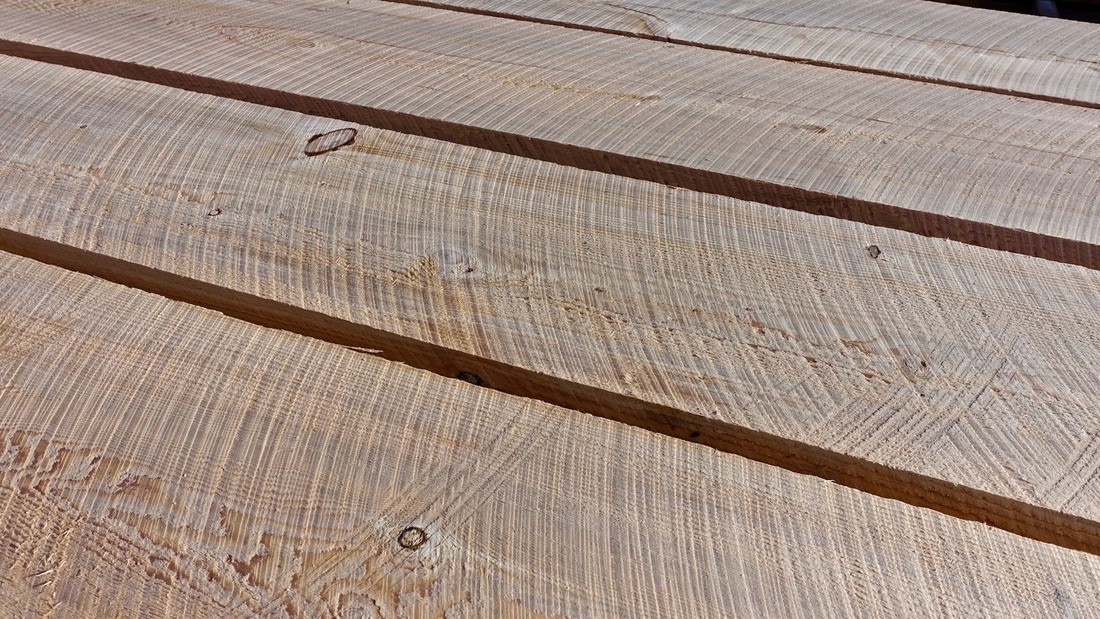 Modern, circular saw marks on new beams. Here’s a shot of our newer beams, the ones we bought for the bottom floor system, with modern circular saw marks. We didn’t have any of the first floor system from the building which I had bought, I assume it had all been rotted. We’ll be using new hemlock for the floor structure of the ground level as well as the roof rafters. This new, 2nd growth wood ultimately has a much lower weight and density, with wider growth rings. It's still all very heavy right now since it’s so freshly cut and full of water. 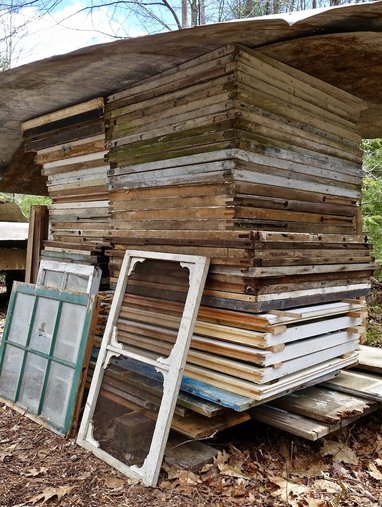 Window sashes. All these windows are from Huston’s. There are a variety of sashes here, the bottom white ones are a little bit thicker, they’re solid wood but they’re machine made. The thinner ones above are all handmade with lovely through-cut mortise and tenon joinery, they are hand-planed with special moulding profile planes. Huston actually had all the wooden moulding planes for making wooden window sashes. These windows will all need to have frames made and be reglazed. The wood will need to be treated with linseed oil and some of the glass needs to be replaced. All the windows have 9 over 6 lights, that is 9 panes of glass in the upper sash, above 6 panes in the lower sash, which you see on historic houses around here. 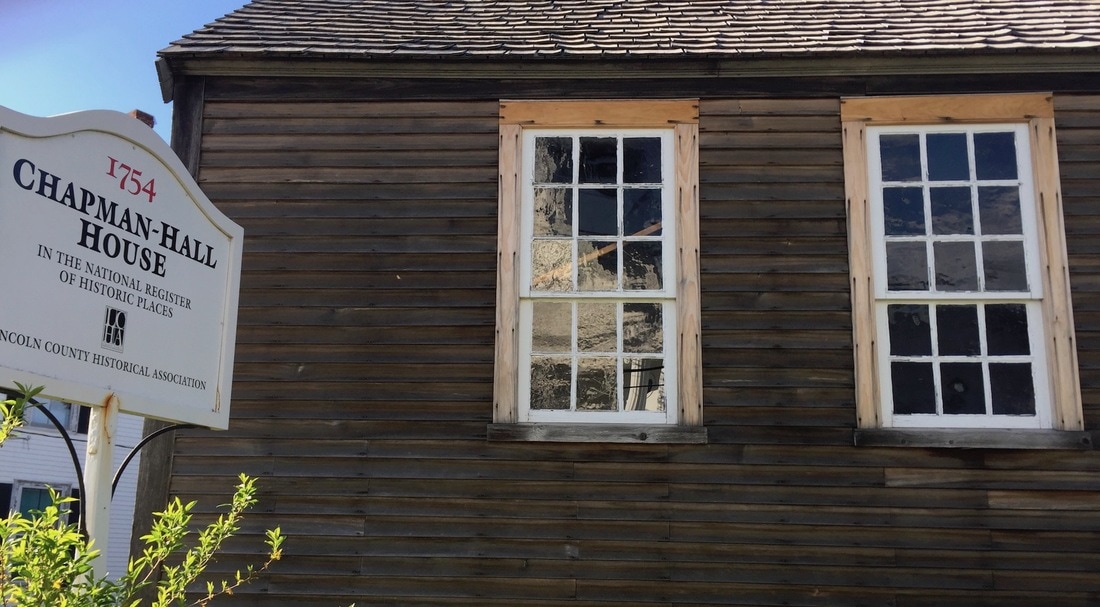 An historic house in Damariscotta, Maine; the Chapman-Hall House, built in 1754. Notice the 9 over 6 lights. Our new/old windows will all need to have frames made and be reglazed. The wood will need to be treated with linseed oil and some of the glass needs to be replaced. 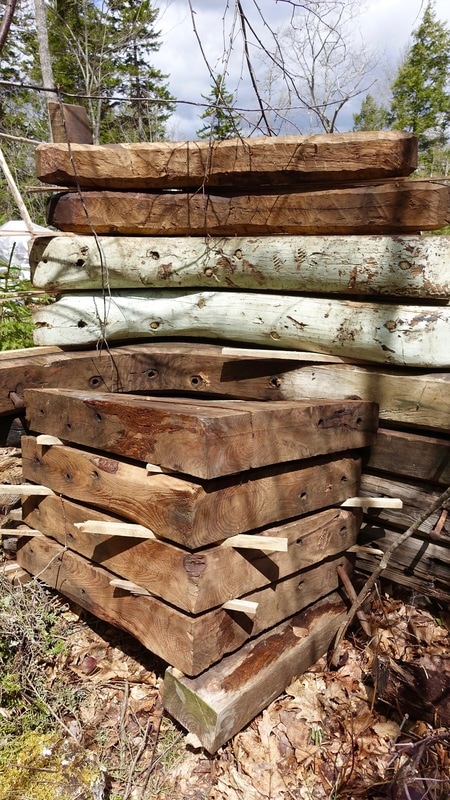 Larch or tamarack knees. These are grown braces that we’ll use to place in the building to prevent our timber frame from racking. Some of the limbs of these knees are over 3’ long. They’re pretty massive. The four posts in the middle of the workshop space, upstairs and down, will get knees to connect them to the second floor structure. You’d be more likely to hit your head on a brace, which is connected with 45 degree angles from the posts to the tie beams, and therefore intrude into the room a lot more, so we’re happy to have these beautiful knees instead. There were a lot of ship builders in this part of the country, and knees were used on ships to save space inside, so I think that some of those folks must have lent their skills to sawing knees for buildings as well as boats. 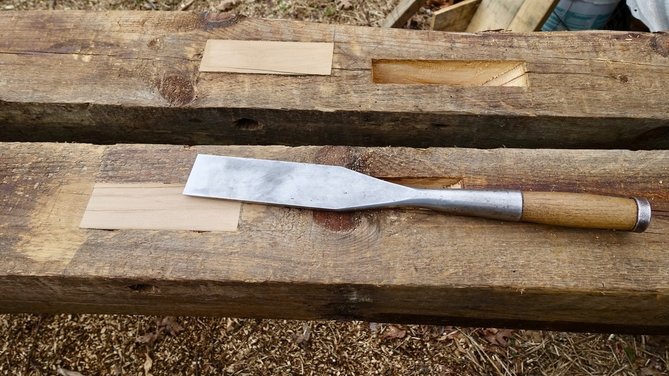 Filled mortises. Here I have filled an old mortise (one that we won’t be using) with a plug of wood. That’s so we won’t have so many voids in the post and it will be less confusing during assembly if we have mortise pockets only where we need them. 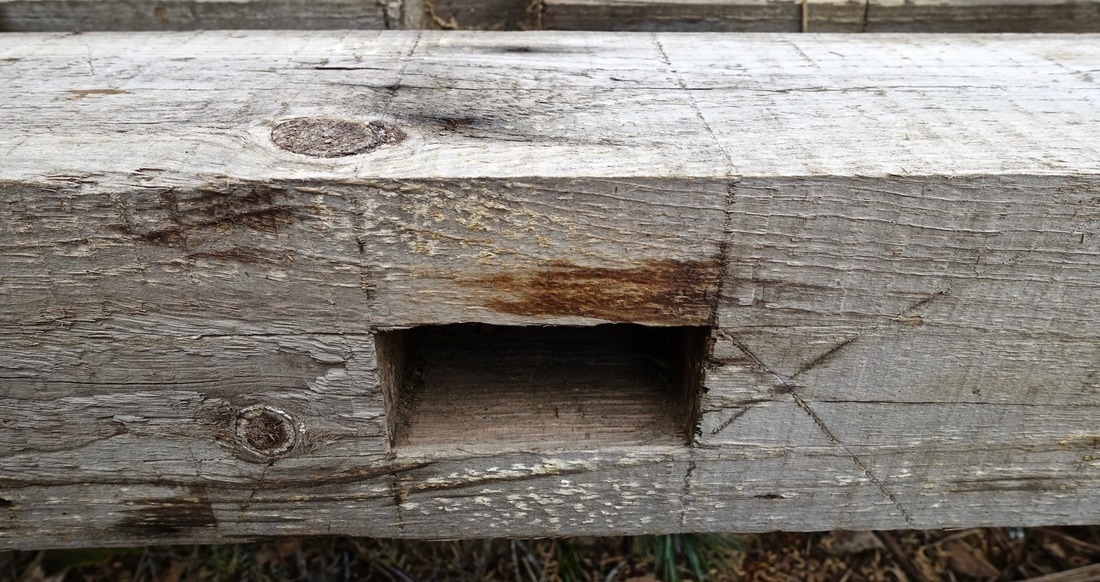 Layout lines from the 19th century. This photo shows a beam (clearly cut with a water powered saw mill) with an old mortise. The layout lines are interesting, the X shows that this is a place where the wood needed to be removed for a mortise. Especially interesting is that we have been re-using a lot of these old lines for our new layout, someone back in the 19th century often marked 2” in from the edge, just where we are needing a mark today. Angela asked me how I know what the different marks mean and how
I can estimate the ages of some of these elements. Huston, of course, would point things out to me when I visited and talked with him, but I have been doing work for a few years with Michael Alderson Restorations. Michael restores timber framed buildings in this area, occasionally with enough attention to detail to recreate a period correct frame. That is, if a structure had been repaired with newer wood, Michael’s team will remove those beams or boards and find vintage material to replace it with, so that a truly old house will be restored to the way it had be built before the Civil War. We had a lot of practice identifying the different ways which a timber frame had been sawn and worked." - KK 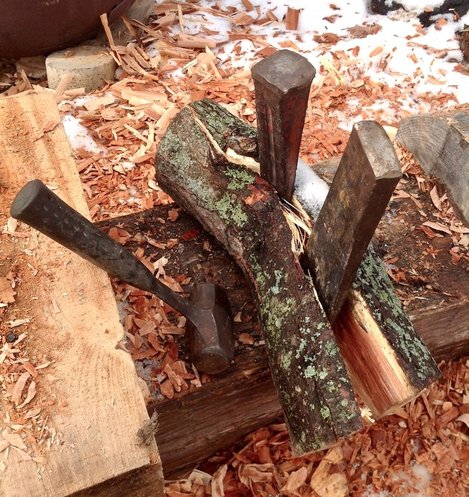 I think there’s a lot that would be helpful to say about identifying and acquiring good wood for carving. How does one start the process of transforming a living tree into something like a Windsor chair? Exactly which tree? is my first question. It’s an elemental question, and generally the first step in making something from green wood. When I watch or help Kenneth fell a tree and witness that bit of the forest become a spoon or a chair (or recently a ladder up to our son’s room) I find it to be a huge and magical metamorphosis. From a raw material to objects that most people would need to get their credit cards out for. Kenneth has a deep and natural knowledge of woodcraft from many years of working with wood, spending lots of time in the forest, and from being something of a wood hoarder. He generally jumps right into what wooden things to make and how to make them. His choice of wood and how to acquire it, from my vantage point, looks very fluid and easy, he’s generally already got wood in his hands, all the time. But as I said, I’m realizing that there’s a need to detail this vital step of the process: where does one find green wood? And what kinds of wood are best? This moment in the process of green wood work is a very direct connection to the forest. Being able to identify trees and shrubs, and then utilizing that knowledge in making useful and beautiful things is an empowering and enlightening endeavor. I think it speaks to our hunter-gatherer, forager selves and helps make the world a friendlier place, in the same way that having a garden can connect us to nature and help us feel safer and more competent. Therefore I have asked Kenneth to give some specifics and background on how, where and what he chooses for green wood carving. Since he was born and raised in Atlanta, he’s got some good, applied advice especially for urban carvers. - AK  where to look for wood “I have found that here in Maine, there’s usually more wood around than I have time to carve. I am particularly interested in foraging for wood that is already down and bound for the wood stove or to be discarded. I’m always surprised how much wood is available if you know where to look — it’s possible that one would never need to cut anything from a living tree and still have an excess of wood to carve. Even when I lived in the city in an apartment, I found wood from people trimming or pruning trees and bushes, cutting things back in their yards. A lot of decorative shrubbery is good for spoons and small carving projects. City parks can be good places to look, when the gardening staff are out pruning trees and shrubs. You can often find branches broken from a larger tree, especially if you head out after a big storm. You may find downed limbs or even whole trees if there’s been a lot of wind. A tree that’s blown over will yield lots of potential spoon blanks from its crown. An orchard requires annual pruning, so they are excellent sources for fruit wood. Most pruning is done in the late winter or early spring. 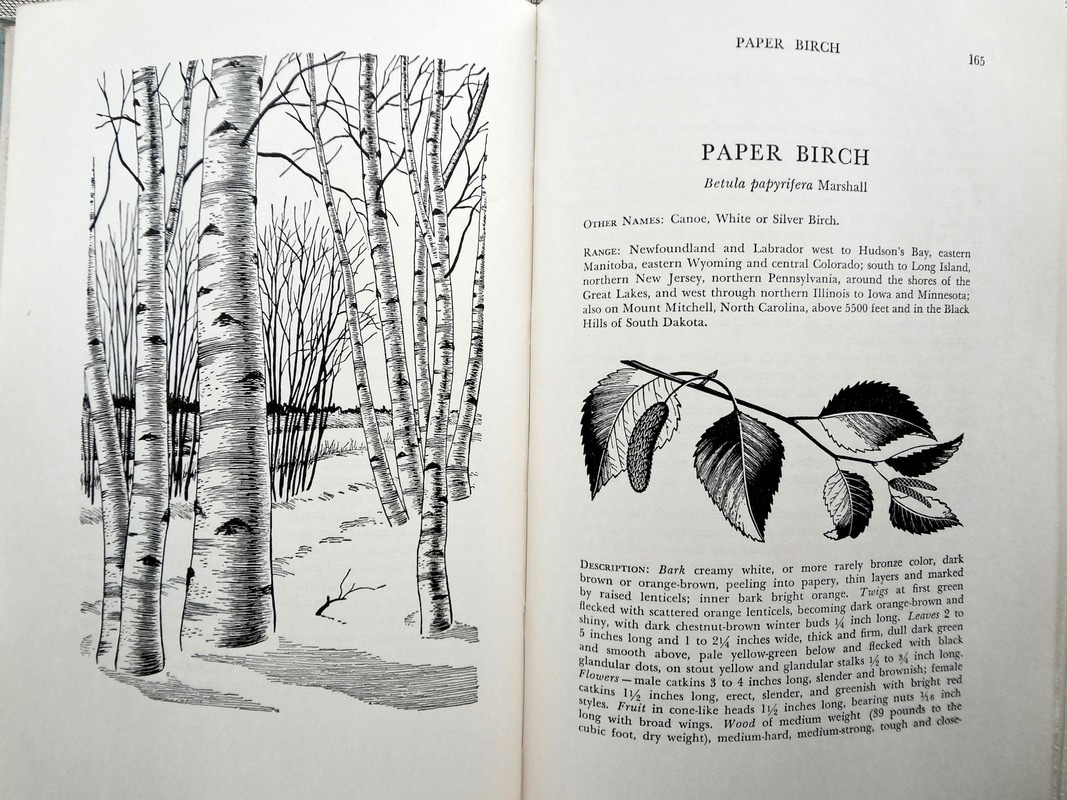 from A Natural History of Trees by Donald Culross Peattie Arborists, gardeners and landscapers are all great resources to connect you with wood and it’s definitely worth making an effort to connect with people in these lines of work. You’ll get to know some new people and you may find yourself flush with green wood without ever needing to cut anything from a living tree yourself. I have occasionally gone to the local transfer station/dump — at ours there’s a specific area where yard waste is collected, usually in the springtime that’s a good place to look for woody shrubs and branches that can make good spoons. This is where I find trimmings of overgrown lilac which is one of my favorite spoon woods. You’ll be able to put something to use that would be thrown away or burned. I sometimes carry a small folding saw with me when I’m out and about in the world, I keep my eyes open for downed branches or trees or piles of brush on the curb. If I’m on a walk in the woods I might keep an eye out for a curved branch that I really like. If you do find a living tree to glean from, be very conscious of the tree’s health; don’t just go lopping of branches without being educated about proper pruning techniques and seasons. And of course be considerate of private property — always ask first.  you can use green firewood for carving some specific species to look for As a general rule, if the tree or shrub produces fruits or nuts, even non-edible ones, it’s generally going to be a good choice for carving. The wood should have a uniform density and tight, fairly consistent grain and a solid pith (that’s the center point of a branch or limb). I grew up and have spent most of my time on the east coast of the United States, so apologies to those who live in different regions — it’s possible that the varieties I list do not grow where you are. The general fruit or nut rule applies to any region though. Some good species here in Maine are lilac, apple, beech and hornbeam. These four are some of the harder, more advanced woods for carving around here. For starting out or if you are feeling like your hands need a break, try white birch or red maple. In Southern Appalachia the rhododendron and mountain laurel are fine for carving. “Spoon wood” is actually a regional name for Mountain Laurel. The black birch, tulip poplar, cherry, walnut, and the American holly are all good. In the magnolia family, the Southern or Frasier are good choices. Any fruit trees, such as cherry, apple, peach, pear, dogwood, or mulberry are great choices. The ideal carving woods are ones that have a consistent density and close grain, rather than open or ring porous grain. Such consistently dense woods will allow you to carve more detail and achieve crisp facets and polished looking tool marks. birch (good for carving) red maple (good for carving) striped maple (not so good) Wood that is more porous, with different densities between the early and late growth rings can be challenging to carve because your knife will jump a bit between the soft and hard rings as you’re pushing your knife along. It’ll be hard to make nice, consistent cuts. If you carve a spoon out of some kind of very porous wood those pores might wind up on some of your edges. If so, those edges are going to be brittle and problematic, they’ll appear to have a rough texture. The surface of your carving will look rough and your cuts will lack definition. It will also be difficult to get a slick surface when you oil and finish your project. An example of wood that has inconsistent grain density between early growth rings and late growth rings is Southern Yellow Pine. Examples of woods with more consistent densities are Bass wood or White Birch. 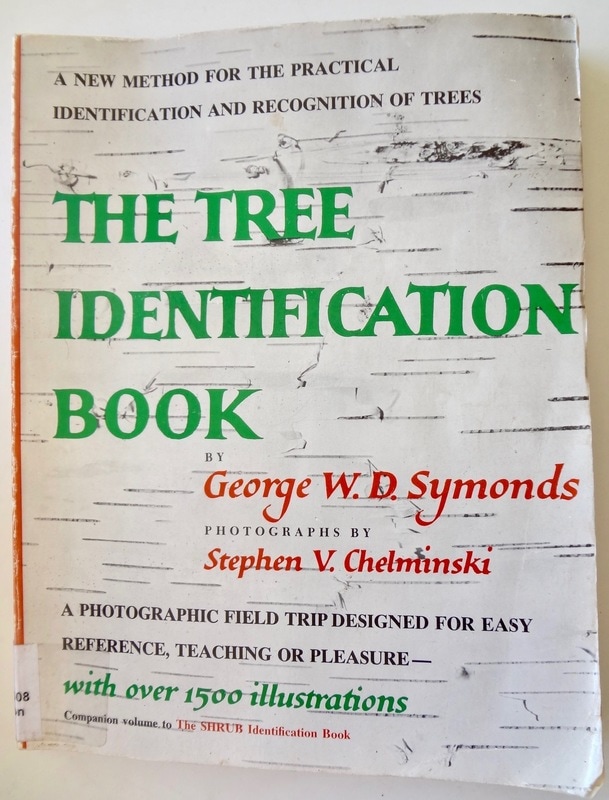 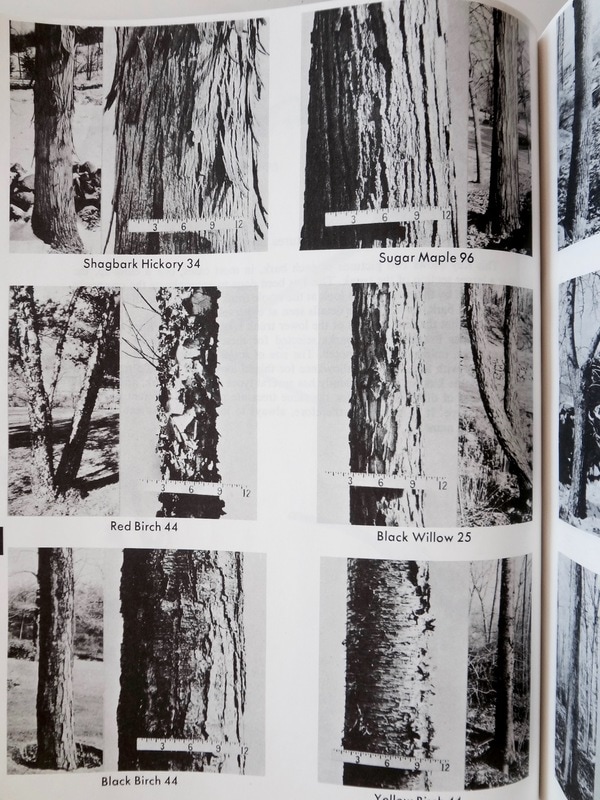 The Tree Identification Book by George Symonds. Once you find wood, here are some things to notice and consider green wood: We’re mostly talking about using what’s called green wood versus dry wood. It’s ok to carve items from dried wood, but it’s generally easier to carve green wood. Green wood just means that it still has moisture in it, that it was freshly cut. You can cut a section of wood and then freeze it to help contain the moisture and greenness. Keeping a chunk of wood in the refrigerator, or leaving it in the snow or outside if it stays below freezing are good ways to preserve the moisture in your green wood until you can get around to carving it. Place green wood in a plastic bag to help hold the moisture, even if you’ve got it in the refrigerator or freezer (think freezer burn). I have put wood in a flowing stream or pond and kept it submerged with rocks as weights. This works in a pinch for a short period of time but eventually it will begin to rot and discolor if left underwater for more than a handful of days. If you cut a fresh branch and then let it sit in the sun, your wood will start to dry out and often that will cause it to develop cracks or checks. So if you have found some green wood, it’s better to either go ahead and carve it as soon as possible. Otherwise put it in the refrigerator or freezer until you can get to it. Wood can be kept for years wrapped in plastic in a freezer. I like to re-wet the surface of the wood before wrapping it in plastic to give it a layer of ice on the surface, I think it is extra insurance against drying out. 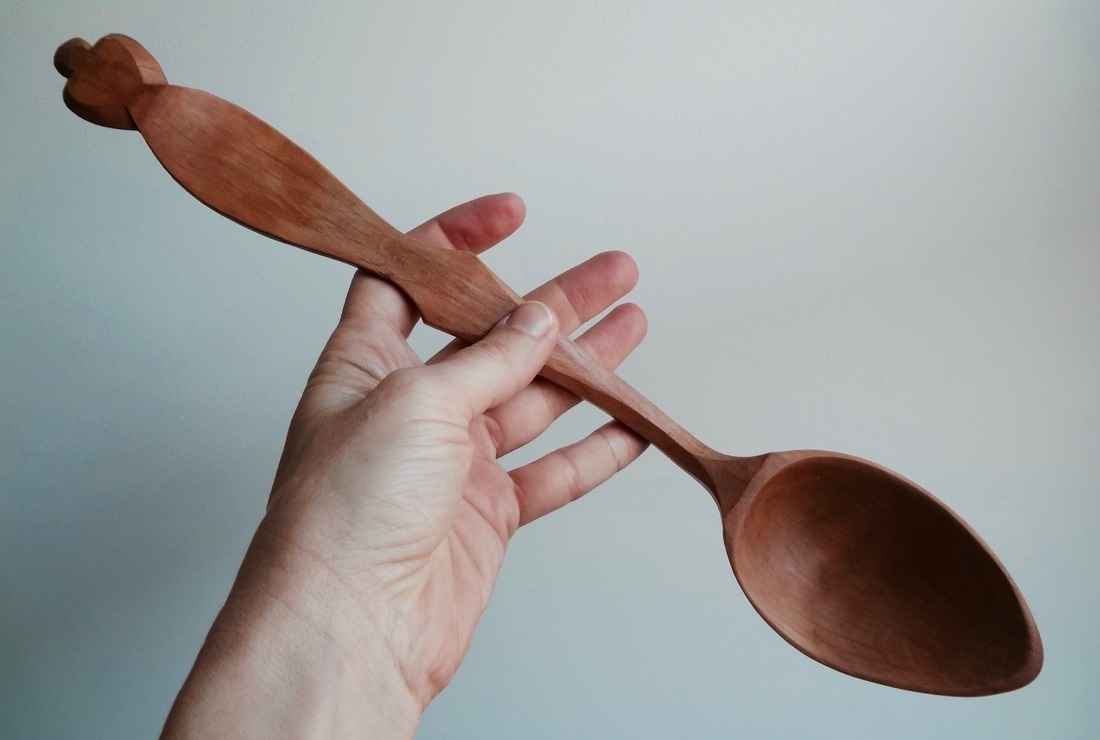 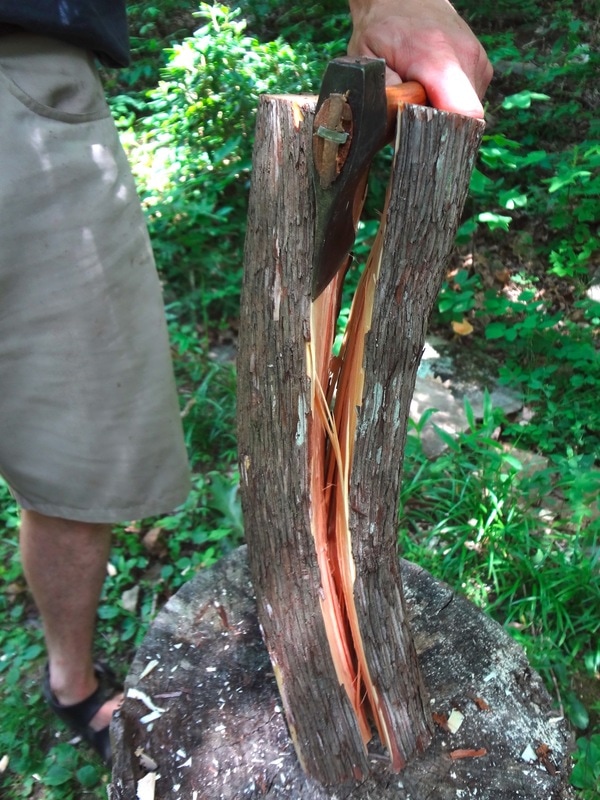  The spoon of mountain laurel was carved from 1/2 of the branch at center. The ladle took a much larger branch. dimensions: The size of the tree or branch will of course dictate how big your project can be. I’ll list some general guidelines — Chopsticks only need a branch or shoot about 1/2” to 3/4” in diameter, by about 12” long. For a serving spoon you need a limb that’s not much larger than about 4” in diameter. You can get away with a smaller diameter for eating spoons, maybe down to 2” in diameter. If you want to do a ladle you need to find something with a larger diameter. crookedness and imperfections: Straight grained wood it is fairly easy to find, you can often just get a chunk of firewood and split out a section for a spoon or some other project. I personally think that more interesting looking spoons are usually made from curved branches, so keep your eye out for curved wood and give it a try. You’ll want to keep and eye out for knots and other imperfections that might make it challenging to carve your spoon. Aim for wood that doesn’t have a lot of knots in it — if you’ve found a piece of green wood you want to check for deformities in the bark that would show where hidden branches have grown over. You might find that just the top part of a limb has knots and hidden branches while the bottom doesn’t, so you might be able to use just half of it. I’ll get into more information about spoon design, layout and probably something about steam bending wood for curved spoons in a future blog entry. For now I’m hopeful that this will get things rolling in the right direction for budding green woodworkers.” - KK 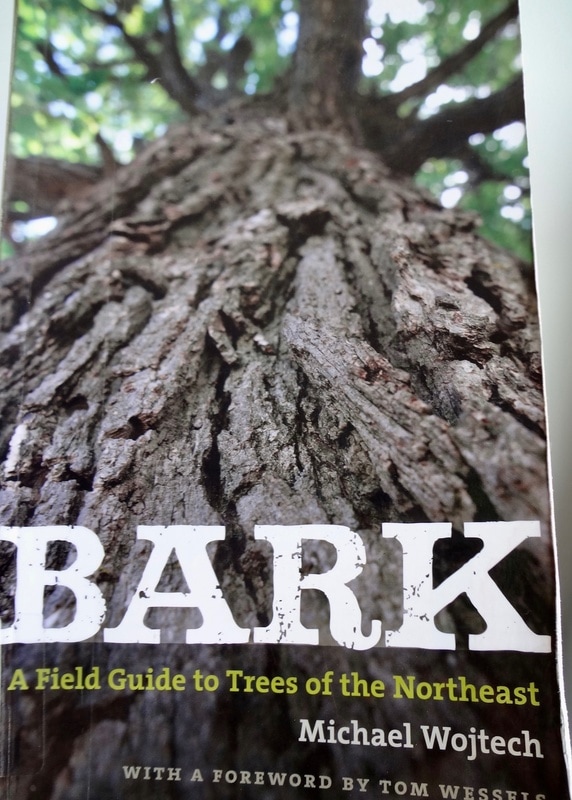 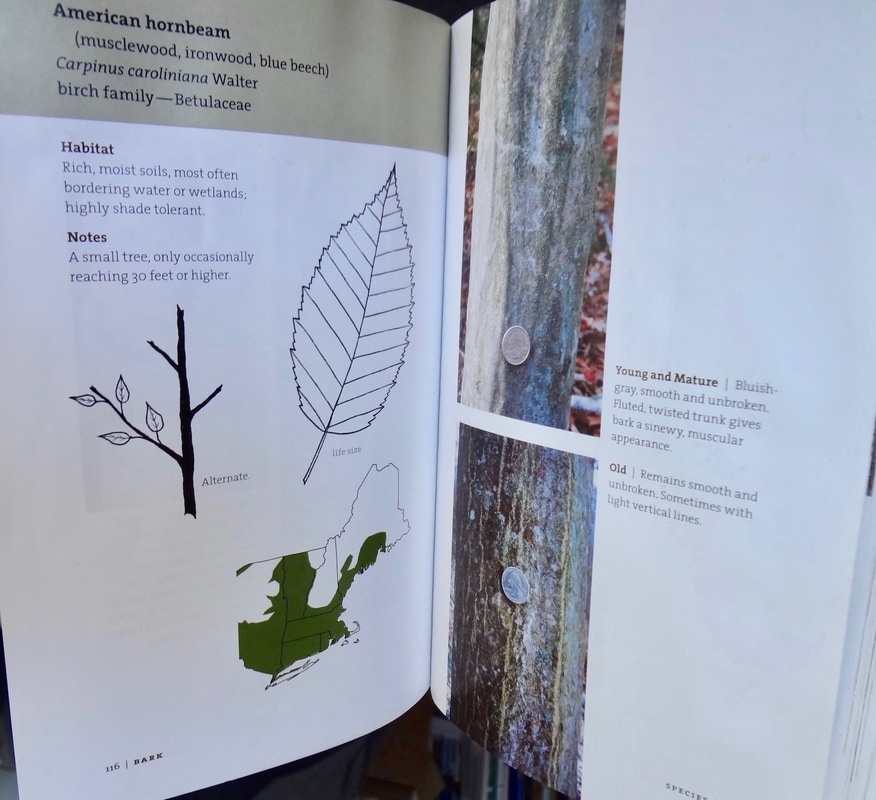 Bark, by Michael Wojtech. A great book! A bit more from AK -
tree identification: If you don’t know much about the trees and shrubs in your area yet, it just takes a little time and attention before you’re soon able to identify several different species without a doubt. Take some time to look carefully at leaves and bark, flowers and fruit, nuts or seeds. You’ll might have more luck with this endeavor during seasons when the leaves are out, but there’s always something to work with and study throughout the year, like bark or the way the tree orients or structures its branches. (Especially if you try the first book on the list below!) You’ll find that you pay attention to the changing of the seasons in a new way as you try to figure out what species a familiar tree might be. Ask local people for information, get a tree identification book from the library, or look on the internet for information. I found an abundance of tree identification books in our small library and used book store, it was a little overwhelming how many different ones I found without much effort. I have included photos of some of the ones I liked, and here is a list of their titles: Bark, A Field Guide to Trees of the Northeast by Michael Wojtech University Press of New England, 2011 - how to identify trees based solely on bark. Kenneth loved this book. A Natural History of Trees of Eastern and Central North America by Donald Culross-Peattie Houghton Mifflin Co, Boston, 1950 - Glorious illustrations by Paul Landacre. Eyewitness Handbooks - Trees, by Allen J. Coombes - Some nice color images and lots of information, nicely laid out. The Tree Identification Book by George W. D. Symonds - Good, clear black & white photos, lots of visual information. 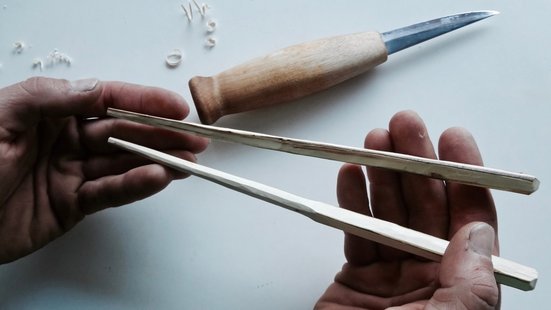 Most of you who are currently subscribed to our blog & newsletter are perhaps a bit beyond your first carving project, so this entry might be something you’ve already mastered or can easily and quickly do. So it may be that this article is a chance to introduce someone to hand work who you think might really take to it. A golden opportunity to turn somebody on to what we think is an essential part of being human, but which most members of our current culture are missing out on — that is, working with our hands, tools and wood. The more people who take the time to practice hand skills, the better, saner and happier our world will be. All you need is a sloyd knife, some short lengths of wood and an hour or so to get started. - AK “Chopsticks are an excellent introductory carving project because of the minimum of tools and materials required. It’s a quick, accessible place to start with an immediately useful end product. We’ll practice important, basic carving skills like creating even, flat and tapered planes, which will ultimately be used in any and all three-dimensional carving projects in the future. Making chopsticks introduces various knife grasps or grips, and there’s the chance for some decorative carving as well. The only tool needed is a sharp knife with flat bevels, I prefer a sloyd knife such as the Morakniv model #120. A small pruning saw is helpful but not required. There’s something really universal about carving a sharp little stick -- most people have probably carved hot dog sticks or spears, maybe when they were children. Those pointed sticks might have been the last or even the only thing they ever carved. This project is a good place to pick up the thread and continue building upon what used to be universal, essential human skills. So, for chopsticks, we’re still making a pointed stick, but it’s a meticulously thought-out pointed stick, and it’s also tapered, which gives some nice challenges. A friend told me that Jarrod Stone Dahl was using chopsticks as an initial carving project at Greenfest last year. Drew Langsner has students carve butter spreaders, also a comparably simple project, before endeavoring to do spoons in his classes. I would suggest chopsticks first, a Shinto fox head second, a butter spreader next, and then a spoon. That’s been working well for beginner students at the workshops I’ve been teaching this winter. It’s a good first project too, in terms of finding appropriate wood, since it shouldn’t be terribly difficult to procure a few lengths of what you need wherever you live.  WOOD: Choose wood from flowering ornamental, fruit or nut producing trees, something that has tight grain such as apple, pear, peach, walnut, mountain laurel, yew, Bradford Pear, etc. Here in Maine we’ve got great old apple and pear trees everywhere which need pruning every year. The new growth (called suckers or water-sprouts) that shoot up from older, established branches is ideal. Trees which have been cut down but which still have life in their roots will also send up straight new sprouts from their base or roots. These tightly spaced and crowded, fast growing branches are straight, often about the right diameter to start with when they are young, and since they are competing for sunlight, the bottom portion of whips usually doesn't have a lot of outgrowth, so they’re basically clear of knot holes and multidirectional grain. 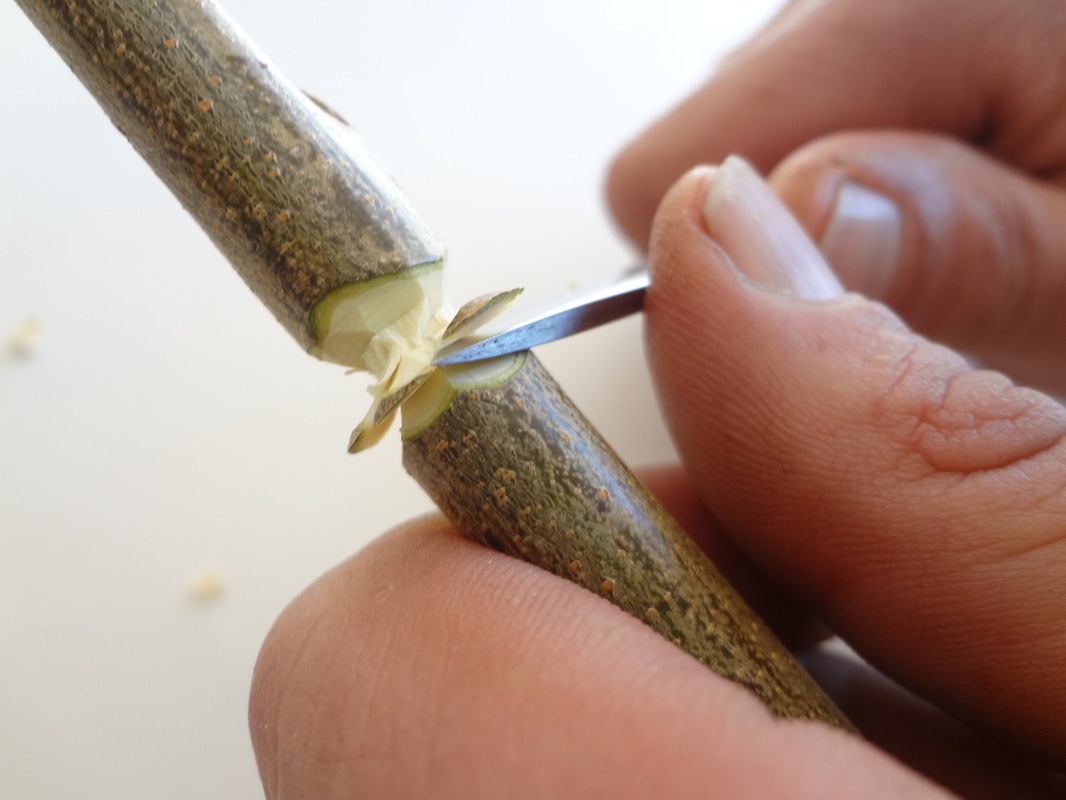  If you don't have a saw, you can use your straight knife and the “Rose petal cut” to remove the sprout from its base. Please note — take some time to research tree pruning if you’re not familiar with how to do it properly. Be considerate and careful and don’t do any harm to trees or private property. Your wood needs to be straight grained and it’s also best if it has a solid pith. Some species, ones that are usually not fruit or nut producing trees (like Striped Maples), have a punky or spongy center in their shoots. These are less ideal because the soft pith will allow a weak point at the tip of your chop sticks. If larger chunks of hardwood happen to be more available to you and you know about riving, you can rive out an appropriate piece of wood from some straight grained hardwood. You’ll need an additional tool called a froe, plus a club or something for driving the froe into the wood to be rived. A heavy bladed knife can be substituted for the froe in small diameter riving blanks. Straight grained green wood (or wood that is freshly cut and has not dried out) is easiest to carve and is a great material for a brand new woodworker to start with, but you could use straight grained air dried wood for this project as well. It’s a fairly small amount of carving and so dry (and thus harder) wood is fine too. 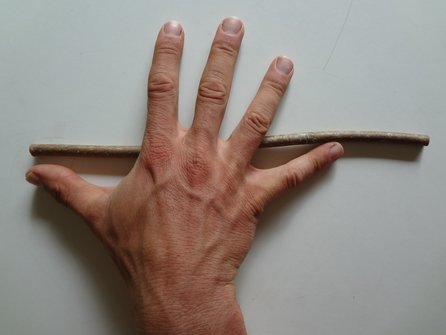 Your chopsticks are custom fit to the size of your hand. Determine the length of wood needed by stretching out your hand and fingers as wide as possible — the distance from the tip of your thumb to the tip of your pinky finger diagonally across your hand is your ideal chop stick length. In terms of thickness, I like to start with wood that’s 3/8” to 1/2” in diameter, if it’s from a shoot or sucker. If it is riven, then it should be square and as close to 1/2” x 1/2” as possible. KNIFE: You’ll need a straight, sloyd type carving knife, one that’s been ground with a very flat, single bevel. An average jack knife or pocket knife usually is sharpened with a secondary micro or rounded bevel at the leading edge, so those kinds of blades are not ideal and will prove a challenge to control with precision. Any derivation from flat in the leading edge of your knife blade will make it more difficult to register the knife against the wood and you’ll likely make imprecise cuts, resulting in shallow divots in your work and an inability to control the depth of your carving cuts. The Swedish knife manufacturing company Morakniv has two basic knives that will work well. They are the #106 and the #120. You’ll develop control when you practice carefully and consciously registering the flat of the knife against the wood as you practice making long, smooth cuts along the length of the chopsticks. This is basically the premise of this exercise — to perfect your control of the knife blade and to consistently register it against the wood, creating long, even cuts and therefore precise planes, shaped just how you wanted them to be shaped. CARVE: You’ll carve your chopstick to have a long, square, tapered shape, from full width, about 3/8” or 1/2” square at the wide end, to about 1/8” square at the other, smaller end. If you are using a water-sprout or shoot, notice how you can see the pith or center of the wood at each end of your billet. You’ll carve flat, even planes toward this pith as the center or focus, first and especially at the narrow end, eventually with four square planes oriented evenly around it. If you’ve got a riven billet you could draw a center point onto the small end. Start by choosing one side and work with your knife to make it as flat as possible. You’ll practice running the knife down the length of the billet in such a way that you get as long and consistent a shaving as possible. It helps to look at the way the shaving is turning out just as much as you are assessing the surface you’re going to be left with. Concentrate on registering the knife’s bevel so that you have enough control of the knife that you can make long even shavings and flat, consistent facets. Bring your first flat tapered side to within about 1/16 of the central pith at the narrow end. It might not take long if you have chosen a length of wood that is close to the finished, final size. If you have, you might do very little work to the wider end of the stick. If you have an oversized stick you might have a lot of work to do and get a lot of practice making good shavings. Once the first plane is finished, flip the billet over and repeat the same process to make a flat, tapered plane which is parallel to the first side. Go from full 1/2” - 3/8" width at the wide end down to 1/16” from the pith at the narrow end, so that you end up with an 1/8" thick rectangle at the smaller end. 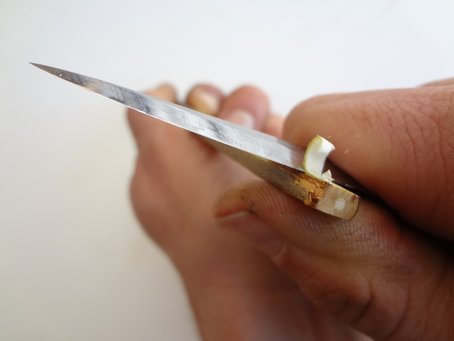 The two planes should now be parallel to each other, straight and flat. The smaller end should measure 1/8” between the two planes, with the pith centered between them. As you carve these two planes, keep checking or sighting them to make sure they are flat and parallel to each other. This is done by holding one end up to one eye and looking down the length toward the other end, noticing if it looks straight or not, then carving away any high points until you deem it is flat. 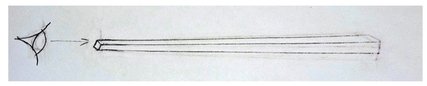 There is a tendency to do short, shallow or scallop-shaped cuts, where the knife comes in and out of the wood quickly. This will produce shavings which are more like chips, as opposed to nice, curled ribbons. It will also leave behind a surface that is scalloped and dished. Remember that for this project we are practicing making surfaces as flat as possible. Strive to make shallow, long cuts, ones where you don’t take off too much material at once. Carving deep cuts will bring about fatigue and can be dangerous since there’s more force and muscle needed to cut through a thicker shaving. Deep cuts will lead to less control and precision in all aspects of carving. It is helpful to skew the blade as you slice it through the wood. This means starting the cut either at the hilt or tip of the blade and pushing the knife across the work at the same time as you draw or push the blade down the length of the wood. Cutting efficiency is increased when the blade is sliced and/or skewed through the wood. To illustrate this, imagine pressing a sharp blade into a tomato without moving it side to side. As you know, the sawing motion greatly increases the efficiency of the cut. The same principle is true when cutting wood. 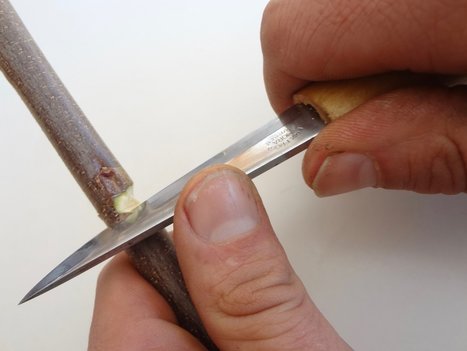 thumb on the back of the blade GRASPS: There are several grasps, or ways of holding the knife and your work that you can use. One is to push on the back of the blade with the thumb. 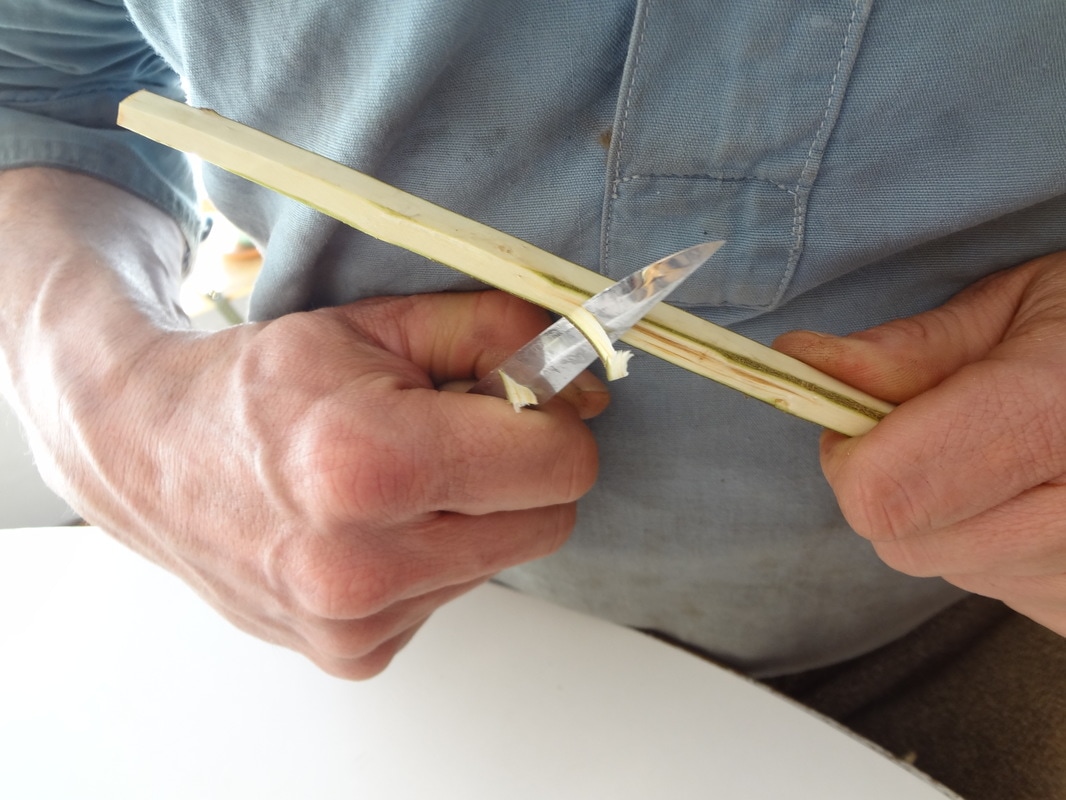 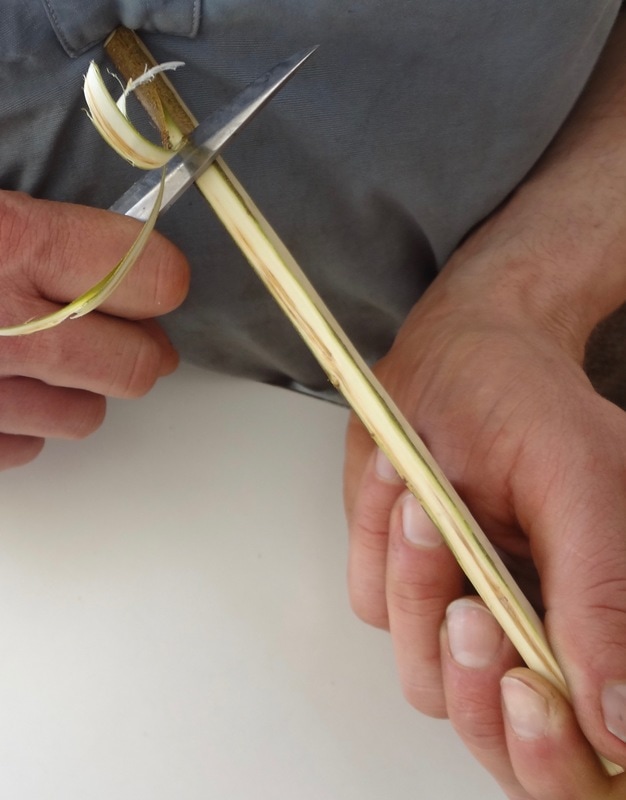 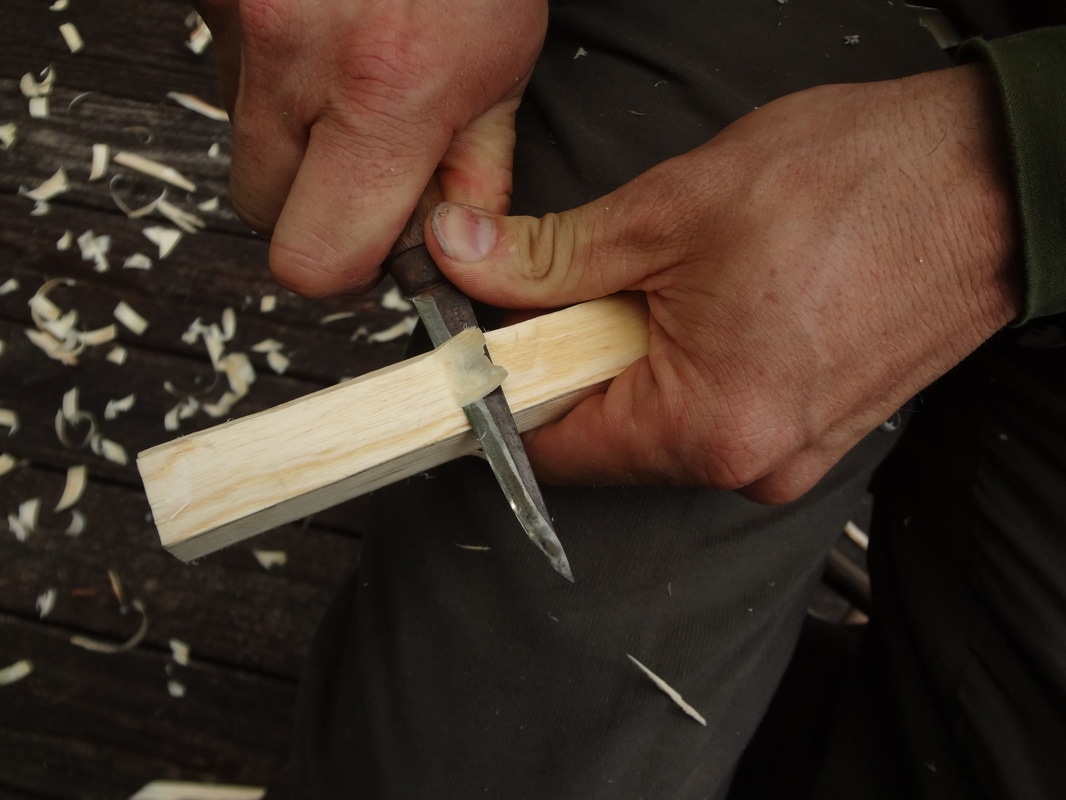 Then there’s the 'can opener' grasp, where the hand holding the work kind of crab crawls up as you’re making a cut. There's the 'cutting from the shoulder' grasp. And the 'spreading' or 'opening the chest' grasp. (We're working on a blog entry all about grasps, coming soon.) MORE CARVING: When your first two opposite sides are done (flat, tapered and parallel), you can start working on the 3rd and 4th sides, following the same procedure in making smooth, long cuts and shavings, creating flat planes that are tapered and parallel. 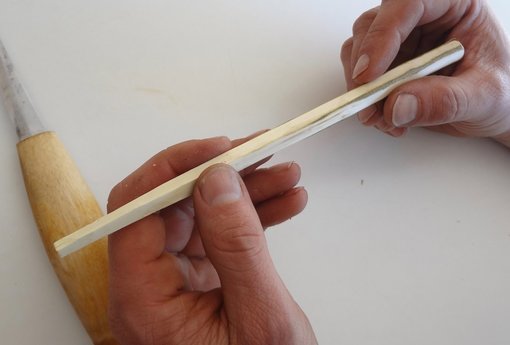 You want to finish with good, square ends, final size should be 3/8” or 1/2” on the wide end, 1/8” at the small end. Make sure the ends are not parallelograms or trapezoids, but actually square. If you like, your chopstick can be complete at this point. Let your chopstick dry (usually it takes just a day). Wrap it in a thin cotton cloth such as a bit of t-shirt material. This will slow down the drying and help prevent checking. Finish it with tung oil if you like and you can use it for cooking or to put your hair up. If you have carved a mate for it you can eat dinner with them. 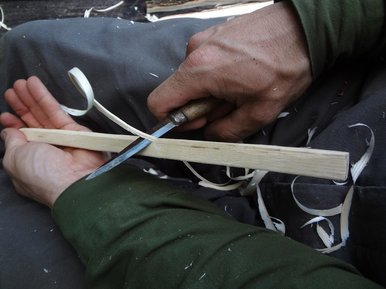 cutting the arris/octagonalizing Or you can go a few steps further and do additional carving if you’re interested in more practice, detail or decoration. I personally like to do some extra carving after I have dried mine. Generally the top 1/3 (the wider end) of the chopstick I’ll leave square, but the bottom 2/3, at the narrower end, I’ll carve into an octagon for a more rounded and refined shape. To do the octagonalizing, run your knife down the arris (this is the corner or the edge formed by the meeting of two flat or curved surfaces) of your tapered square. 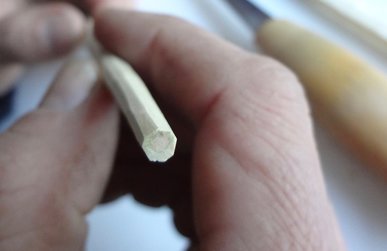 Just as with the flat planes earlier, keep your shavings long and thin. Try to keep the width of your faceted planes even and consistent with one another. The use of indirect lighting from a window or table lamp will help to highlight the facets and arrises. The depth of the cut is what determines the width of the facet, in order to make them wider apart take a deeper cut. If you go too deep on one side, you will need to work around all the facets to make up for the over cut and to make every other facet consistent. You can use stop chamfers to transition from the square part of the chopstick to the octagonalized section. The chamfer kind of rolls out and up in an arc toward the corner of the (original squares’) arris.  a stop chamfer FINISHING: Once you have the lower part octagonalized and the upper third is still square, your more detailed chopstick is basically done other than the ends. The narrow end probably just needs to be smoothed and rounded, as that is the part of your utensil that comes into contact with food. The wide end could be treated with a sort of finial or something fancy if you like, or it can be smoothed and rounded or maybe faceted for a simpler finish. Make yourself another one and you’ll have a pair ready to go. (check out the blog entry about oil finishing spoons. [link is here] You can use the same process for all your carved wooden utensils) You can get a lot of carving practice through making more chopsticks, they make great, quick gifts and you can really hone your most essential carving skills, skills you’ll use any time you carve three-dimensional items such as spoons, bowls or chair parts.” - KK 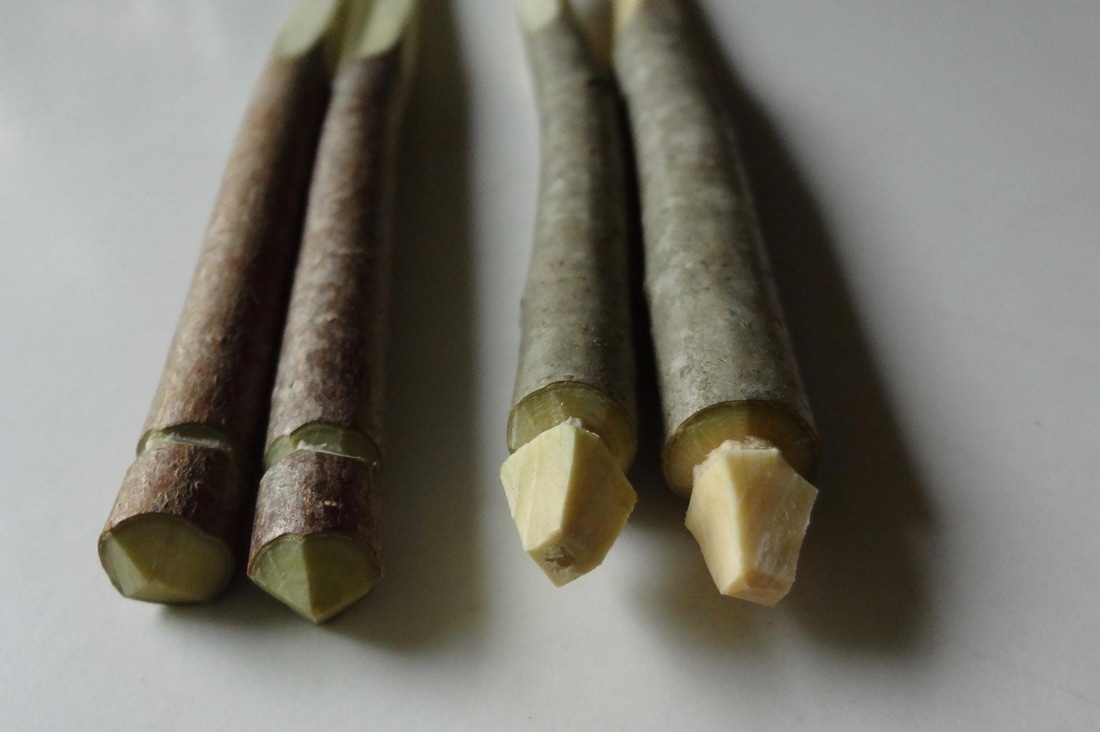
Recently I came across a photocopied article about wheelbarrows which our friend Fritz had sent us a couple of years ago. And then last month, our friend Richard sent us a link to a fabulous online article about Chinese wheelbarrows. Both articles seem well worth sharing. We have quite a few wheelbarrows at our place. Most notable are the three that Kenneth built of wood and bicycle parts, which I will include photos of here. And there are two or three additional wheelbarrows, I think all of which were salvaged from the dump, but it’s hard for me to really know. In any case, the salvaged ones are mostly antiques and were acquired either as models for designs or for their parts. They are not the ones in heavy rotation. We use our wheelbarrows almost daily; for moving things up and down our long, unpaved path from the cars, for hauling water from the well to our house or the sauna, and for the annual springtime wood splitting and stacking. The barrows with the wheel up front are ideal for bringing tree rounds out of the woods - the one with the fat tire is especially adept at making it over fallen limbs and logs. There is a lot to say about wheelbarrow design, use and construction. We will definitely come back to fill out the topic with additional articles as we have the time. But for now this introduction is a good place to start the wheelbarrow rolling. — AK This first article is reprinted from the July/August 2011 edition of the Nova Scotia periodical, Rural Delivery, which covers life in rural Atlantic Canada. (Apologies for replacing the article's drawings with our own photos...) Whimsy and the wheelbarrow by Olivia Finley This spring marks the first anniversary of the passing of my dear companion, Whimsy. She was wood and iron and long ago someone loved her well enough to paint her fiery red. Whimsy the wheelbarrow served me well for many years; she was my superpower, my cool hidden ability. She made me stronger. Though parts of her persist in the augmented wheelbarrow waiting patiently even now outside our front door, Whimsy whole was wholly irreplaceable and so I find myself thinking of her again as winter gives way at last. Although I would not be so romantic as to call my introduction to Whimsy love at first sight, I will admit that I coveted the wheelbarrow from the first. We were house hunting when we found her. Our family having outgrown the little flat in Lunenburg, Nova Scotia, we were looking to settle out of town on our own piece of workable land. We were not long in finding what we sought: four and a half wooded ares stretching down the County Line and a little old house that boldly dared us to call it home. The instant I emerged from the car I felt that this was a good and fertile place to plant our sprouting selves. We toured around, not so much to see if we would live there but instead to imagine it all when. My son would live here, he told us, if we could keep the old organ that had been tucked away in an upstairs bedroom. My daughter was captivated by a sea chest stuffed with quilts and my explorer husband discovered a treasure trove of rusty home-steading equipment. Hoes, hatchets, and the like were strewn all around the property’s two small outbuildings. It was here, tangled up in grapevines as thick as our wrists and half swallowed by wild roses, that we found my wheelbarrow. Just a glance told us that the cart was still solid where it counted, still ready to roll even as its advanced age. I remember looking around at the property again then, turning slowly and taking in the rolling lawn and the thick woods before looking down again at the wheelbarrow. I saw the rocks already run over on its iron wheel and I saw the scars across its boards from countless loads carried. I thought, and maybe even said out loud, that if the wheelbarrow remained here then I could too. The usefulness of a wheelbarrow is more than obvious — it is built into our nature. Its simple iconic image, a single wheel and two well-placed handles, strikes a universal chord, representing our struggle and our enduring ingenuity. Every human being at some time finds themselves in need of precisely the services that a well-suited wheelbarrow can provide. There have always been and will always be loads that need carrying and cumbersome objects that need moving. A good wheelbarrow is also a workbench, a seat in the afternoon sun, the solution to a problem. The wheelbarrow is truly the innovation of “everyman”. 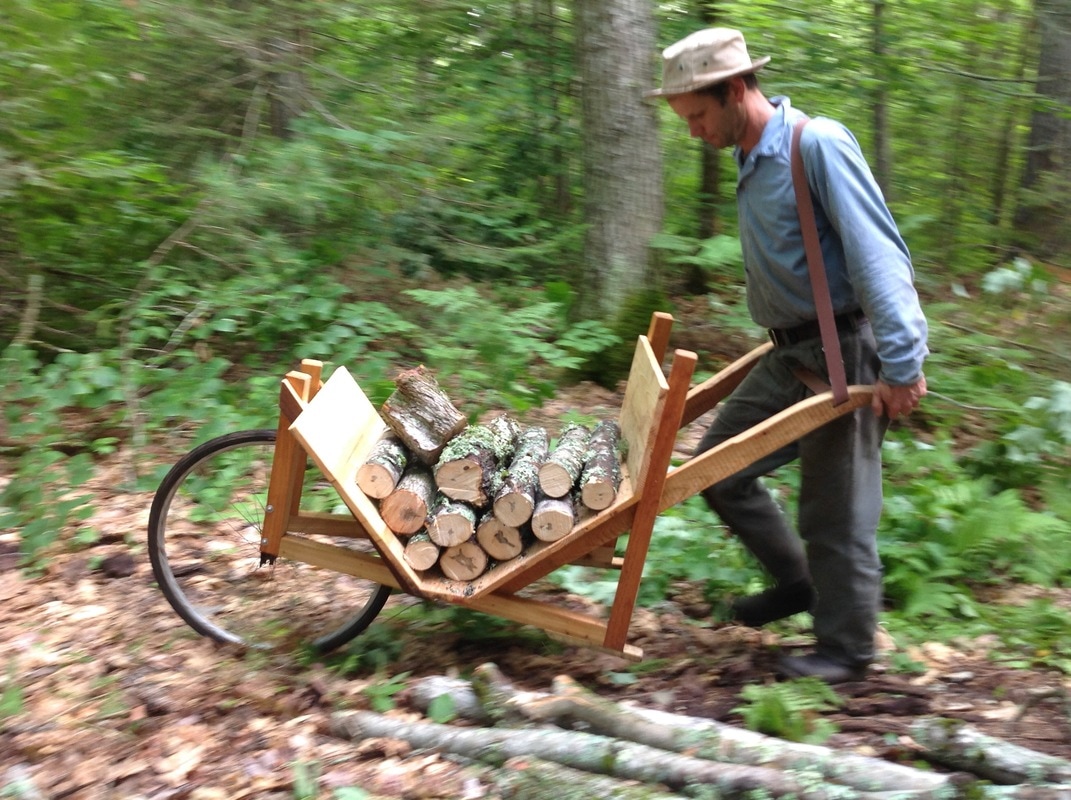 The wheelbarrow was invented independently at different times all across our motley globe and stands as a perfect illustration of the phenomenon of independent invention. It seems that there are as many different wheelbarrow designs as there are people who have pushed them. Prime Minister Chukka Liang (197 - 234 AD) of China has long been credited as the first inventor of the wheelbarrow. As the story goes, in 231 A.D. Liang’s infantry used one-wheeled carts called wooden oxen to transport supplies to injured soldiers along narrow, rocky embankments. The Chinese wheelbarrows had their wheels placed centrally, allowing for an even distribution of weight which would have been especially nice over long distances. That all makes good sense. So does surmising that wheelbarrows were used in Ancient Greece to move building materials around construction sites The evidence is lacking but only because no one has really looked. Perhaps we have just not feel the need to physically confirm something we know intuitively to be true: the wheelbarrow must be as old as humankind, however could we have gotten by without it? Whimsy was a western wheelbarrow, her trademark single iron wheel rolling along at the head of the load. Wheelbarrows like her appeared in Europe around the 11th or 12th century. By the 15th century, wheelbarrows of the sort with which we are all familiar were in wide use. The popularity of the one-wheeled cart has not since waned. Nearly a millennium after it first proved its mettle, the humble wheelbarrow remains an essential to anyone — man, woman, or child, in any walk of life, anywhere in the world. The omnipresent wheelbarrow has become so banal that we take its millennia of service for granted. Were it not for my own Whimsy and the notability of her absence on the property this summer, I likely would not have considered her kind much past my list of chores. What was Whimsy precisely that her presence should be so missed? I have wondered. She has been replaced and yet she was irreplaceable. She was built by hand based on a timeless, well-worn design and yet the quirks of her construction were the result of her relationship with this particular piece of land. Whimsy was the best wheelbarrow for this property because she and it had grown together like old wood does.  Whimsy came to grief last spring under a heavy load. The fault was mine and I paid for my foolishness both with Whimsy and with my own flesh and blood. I had been set to use Whimsy for her intended purpose, working on the property, and had every confidence she would perform as she had always done. With what I now know were too many bags of cement, I thought it best to do a “test lift” to check whether Whimsy and I could indeed handle the load before we started rolling. Grasping her handles firmly, I raised Whimsy gently up onto her wheel. Almost instantly the wood of her right handle split, letting loose the load in my direction and, what was worse, driving the sharp stake-end of the broken handle straight into the meat of my shin. I knew that the wound would require some stitches but my first lucid thought was for Whimsy; her injury was career ending and I could already feel the regret for her broken handle in the pit of my gut. I have since healed well enough, but Whimsy never did fully recover. My carpenter husband salvaged her iron skeleton and her big single wheel and so there is still something left of the real Whimsy. Her spirit endures. This might sound indulgent but anyone who uses hand tools or hand-built gear is familiar with the eccentricities of such things. My new wheelbarrow is not Whimsy but it is strong and solid and dependable and I will come to know it too. As I think about wheelbarrows and about Whimsy I can’t help but remember the poem by William Carlos Williams. Like the wheelbarrow, through its simplicity and immediacy Williams’ poem reveals something universal, illuminates a little piece of what it means to be human in this world. We are all mortal, even centuries-old wheelbarrows, but our spirits are timeless and will endure in our life’s work and in the contributions we make to the work of others. May the spirit of growth be with you and your wheelbarrow as you head out this season. - Olivia Finley  And now a link to the very informative and interesting article about
Chinese wheelbarrows from the British online magazine called Low Tech Magazine. It's long, detailed and marvelously illustrated. Well worth the time. Check it out HERE. It’s been just over three years now since our friend Bill Coperthwaite died in an automobile accident.  He was such an important, creative force in our lives and in this world, he was Kenneth’s mentor during the short years we knew him and his ideas and words continue to inspire us still. We appreciate the memories of him that pop up unexpectedly, and we foster any connection to friends or situations that remind us of him. Like this one - the annual Dickinsons Reach Calendar. 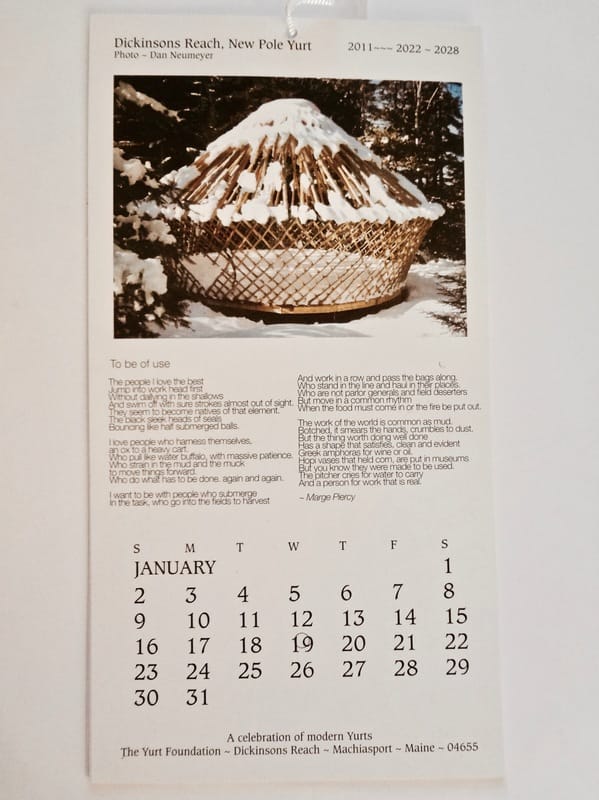 Bill produced and sold a calendar each year, the proceeds of which made up a majority of his annual income. He lived on very little, about eight thousand dollars a year. He led yurt building workshops, sold plans for building his yurts and one time he raised money for a trip by selling spoons which he carved, and he wrote a book, “A Handmade Life”. But overall, and fiercely, he chose to live on far less than the average American. One of his sayings was, “Tell me what you need and I will tell you how to get by without it.” 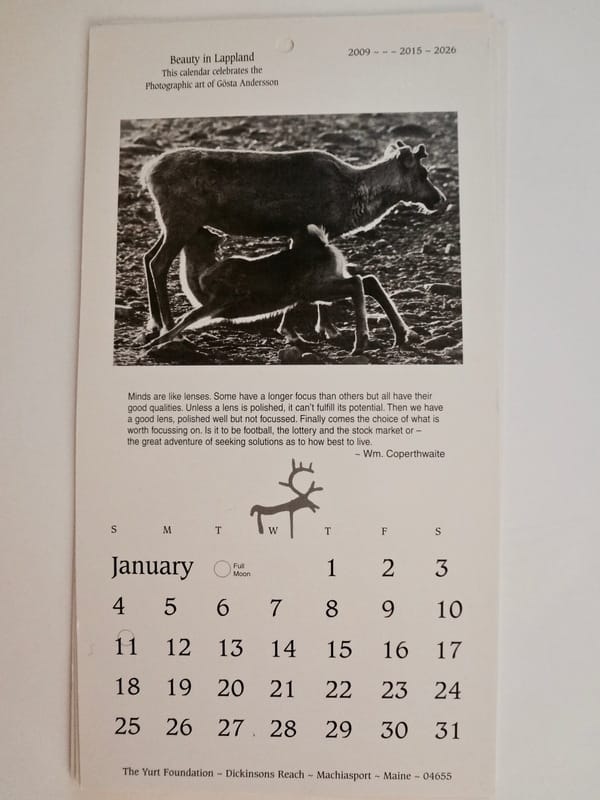 Bill had a very large group of people he corresponded with, all via letters. He had no phone and no computer, he did not have an email address, he loved writing and receiving real, paper mail. He would send out a letter to his entire mailing list each fall with a request for support and in exchange he’d offer his yearly calendar. Bill’s first letter was sent in the fall of 1973 to friends and supporters, it advertised two yurt plans and offered workshops, and it also included a list of recommended books. The first calendar was made a year later, illustrated with sketches of various yurts. It was printed on heavy brown paper and packaged in a cardboard tube. Sadly, I don't have one of those to show you. 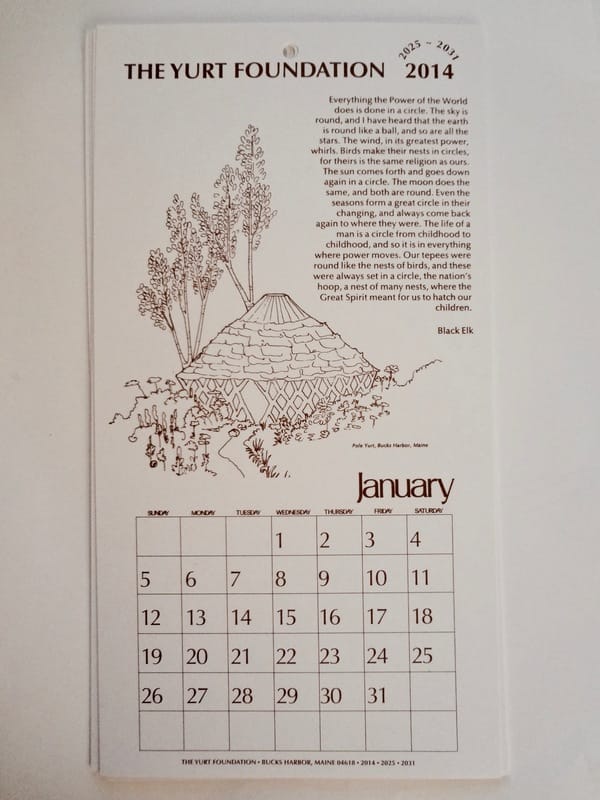 In successive years the paper and format of the calendar changed a few times, the most recent calendars were 11.5” tall by 6” wide, and some were printed in color. Bill always included favorite poems, quotes or sometimes sayings of his own, plus a number of book recommendations, his favorites from the past year. He would choose a theme for the calendar’s drawings or photographs - for instance, 2003 was a series of photographs of his yurts, and 2009 was ‘Beauty in Lapland, a celebration of photographic art by Gosta Andersson’. Or 2011 was a celebration of modern yurts. One year he chose illustrations by his favorite artist, Barbara Cooney. One of my favorite details of the calendar was that Bill listed several years for which they could be used (truly a thrifty guy). So it turns out that I can use my 1995 calendar again this year. 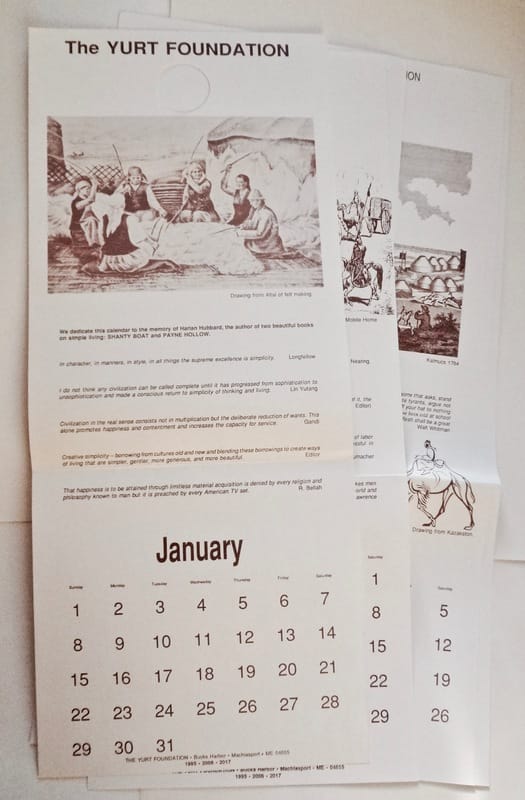 That’s the history of the calendars, and now for the way forward. Bill considered his group of closest friends to be his family, thus he entrusted his legacy and his land near Machiasport, Maine, to five dear friends. They are continuing to keep many of Bill’s ways of life and his philosophy alive. One of their tasks is to care for Bill’s remote homestead, called Dickinsons Reach (after his favorite poet, Emily Dickinson). They have just printed their second Dickinsons Reach calendar, proceeds from the sale of which will help to preserve and care for Bill Coperthwaite’s legacy. This year's calendar is luminous with those golden, quiet moments which embody the time I have spent at Dickinsons Reach. Margaret La Farge's paintings are gorgeous; they speak the truth of Bill's life of beauty and simplicity. All of the images are scenes from Dickinsons Reach. Consider joining the mailing list and supporting the Dickinsons Reach group's important, relevant and very interesting work. Below is this year’s letter with some links to more information. - AK  Sorry to Miss You – Margaret LaFarge The Dickinsons Reach Calendar for the Years 2017 ~~~~~~~~ 2023 and 2034 A celebration of Dickinsons Reach through the art of Margaret LaFarge Greetings from Dickinsons Reach Community, the far flung community of people that Bill Coperthwaite assembled during his life. We now work together – to care for Dickinsons Reach and to support excitement in simple living, meaningful work, beautiful creating. The 2017 Dickinsons Reach calendar will celebrate the art of Margaret LaFarge, who spent many hours with Bill in his home and has captured the spirit of the place in her paintings. The past year at Dickinsons Reach has been a busy one. Many friends and new acquaintances have walked or paddled in, and some stayed for a bit in the guest yurt. We continue to encourage visitors to be respectful and tidy, and to that end we are now implementing a reservation system for those who would like to stay overnight. Please contact us at dickinsonsreach@gmail.com if you are planning a visit and want to schedule a stay in the guest yurt. We are also establishing a Homesteading Residency – 4-6 weeks at Dickinsons Reach for self-directed learning, discovery, service and creativity. We want to offer this amazing place as a setting for individuals, families and small groups to deeply explore nature, ideas and skills. We hope this opportunity will provide residents with encouragement on their life journey, time and solitude to explore ideas and skills, the joy and challenge of living with less, and the fulfillment of living in a healthy, wild place. We are pleased to announce that the first resident will be arriving at Dickinsons Reach in late November, 2016! Please write for a full description of the residency, or visit our website: www.insearchofsimplicity.net And, in place of Bill’s customary list of books, we remind all that Bill’s library has been catalogued: http://www.librarything.com/catalog/Dickinsons_Reach Hope is the thing with feathers That perches in the soul And sings the tune without the words And never stops - at all. ― Emily Dickinson $65 will bring you eight calendars $55 will bring six; $15 brings one Checks payable to Dickinsons Reach, LLC please. Mail to: 7 Page St, Brunswick, ME 04011 Proceeds from the calendar will go to support the land and buildings at Dickinsons Reach, to preserve this place for future visitors and inspiration. We encourage you to be in touch as you consider your own response to Dickinsons Reach, and the remarkable man who gave this gift to us all. 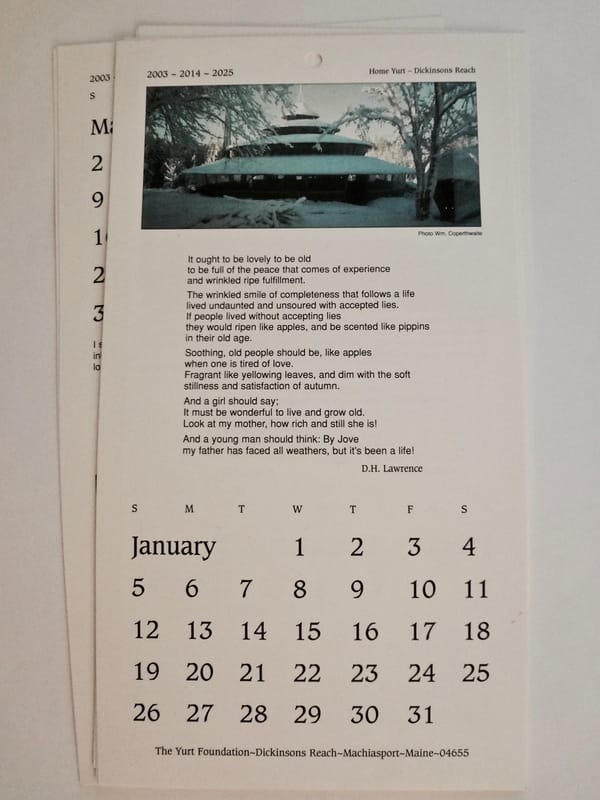 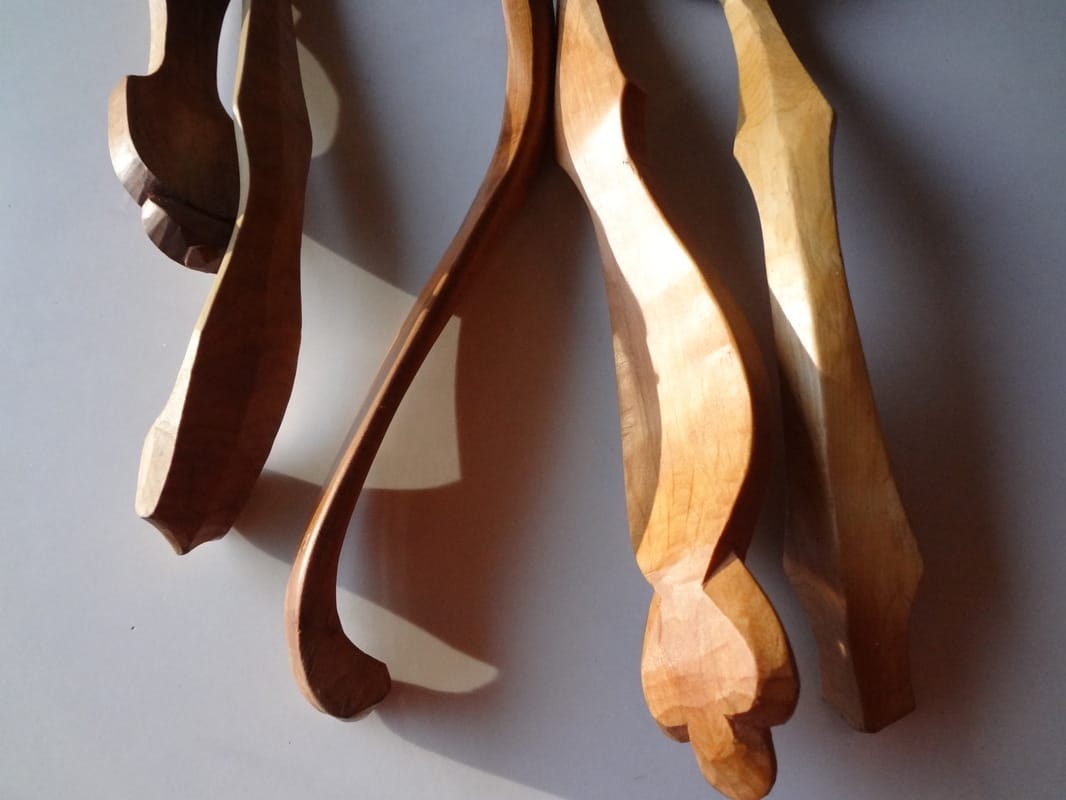 In the last blog entry Kenneth detailed how he finishes his Windsor chairs. This one is all about finishing his beautiful wooden spoons. We publish it here as an addendum to our workshops, where there is time to learn to make green wood items, but rarely time enough to do the oil finishes that will protect and preserve them. These blog entries are a guide to give complete information to our students and others who are looking for details of how to finish certain handcrafts. - AK I prefer to use raw tung oil on spoons, as opposed to the polymerized oil which is the finish I use on chairs, the polymerized is a bit more expensive. It is available from Lee Valley. Many people like to use raw linseed oil on spoons and bowls, I like the tung oil because it hardens off to a more durable and hard protection for the wooden ware. Jögge Sundquist told me that he likes linseed oil over tung oil because he says he doesn't like the way the tung oil smells. I don't think he has used it with the Citri-magic which has a lovely lemon or orange smell. Linseed oil is also a more traditional finish for wooden ware in Scandinavia. You can use polymerized tung oil if that’s what’s available, and I occasionally use it for a touch up on spoons, it is a finish that builds up layers fast. It is expensive to get enough to soak the spoons in it. For my standard spoon finishing, I cut the tung oil 50/50 with a citrus based solvent called Citra-magic, which makes the tung oil dry faster and allows it to penetrate better. Plus I think a natural solvent is a more pleasant way to thin the oil, and it smells really nice, like oranges. (I buy Citra-magic in bulk from the Shelter Institute here in Maine, or the Milk Paint Company also sells it.) There are citris based household cleaners that might confuse you so make sure it is a solvent and not a household cleaner. For my soaking mixture, I mix half raw tung oil and half solvent together in a large jar. I will soak any smaller items like spoons or butter/jam spreaders overnight with the jar’s lid on. If the item I’m finishing is too large to fit entirely into the oil I’ll drape a plastic bag over the top. Then I’ll invert the piece - I’ll do the bowl one night and then I’ll flip it around and do the handle the next night. 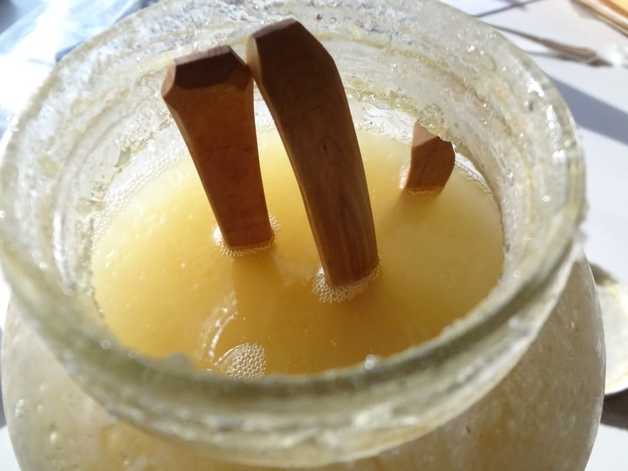 This overnight soaking is just for the first time, a really deep soaking, for when I’ve just completed carving a spoon and the wood has dried and I’m going to oil it for the very first time. I’ll do the overnight soaking once on the whole spoon, then when I remove it from the jar I use a small rag from a cotton T shirt to wipe off as much oil as I can. Then I take a second, dry rag and wipe off all the remaining oil with the dry rag. You want to rub it with a dry rag until there’s no more oil on the spoon. There actually is some on the surface, but you can’t really wipe off any more of it. important safety reminder: I always put rags that have tung oil on them into our wood stove, because when the tung oil oxidizes it gives off heat and if you have just the right conditions it can actually self combust. Because of this, I put my oily rags in our wood stove as a safety measure. You can also put them in water or put them outside, spread out (not wadded up). It’s mostly when they’re compressed and wadded up that they heat up, but if you spread them out the heat usually dissipates and they won’t catch fire, but either way they should NOT be left around the house or the shop. They can burn your house down.  make sure to dispose of oily rags properly! After the first application of oil has dried overnight, I like to wet the entire spoon down with water, which raises the grain of the wood. After that dries, I give the surface a light sanding to remove all the wood grain that has risen, either with 600 grit wet/dry sandpaper (you can even do a wet sanding with the oil to really finish it off nicely), or with 0000 synthetic steel wool. I will give my spoons just a light sanding between each coat of finish. You want to be careful not to sand through the finish as you build those coats, so don’t sand too aggressively or you might go back down through the layers you’ve been trying to build. After the initial soaking has dried, after raising the grain, drying the spoon again and after the light sanding, I’ll dip a rag in the oil/solvent mixture from the jar, wipe the spoon down with it and let it sit for 10 or 15 minutes. Then I wipe it off and repeat the process with the drying, light sanding and the rubbing/polishing.  You can get away with just one or two layers of finish, but when you start getting up to 3 to 5 coats it really starts to build up a smooth surface and that’s the kind of finish that I appreciate. I like the built-up tung oil surface because it makes the spoons perform and look better over the long run. Using and cleaning wooden spoons seems to go a lot easier when they have a nice slick finish on them. The water will literally run off the spoon when you wash it. The other day I was at the Shelter Institute and a gentleman was talking to me about how he’s been finishing his spoons using mineral oil, but he wasn’t super happy with his results. An important thing to know about mineral oil is that it never actually hardens off. What happens is that it’s always washing off the surface, every time you wash the spoon with soap and water or get it near hot water, the finish washes off the surface and then the wood becomes dry, and it will look it too. It really changes the way the spoon looks and feels against your skin. The pores of the wood and any indentations or marks from carving will tend to hold food and dirt if it’s got this kind of soft surface. It’s like putting olive oil or something similar on the wood. I’ve found that the tung oil finish holds up much better than mineral oil or similar kinds of oils that don’t actually harden off.  The idea of toxic finishes on spoons and bowls is a big concern for people, of course. (I really appreciate the Citra-magic for that reason, it’s nice to know that I’m not putting anything with strong chemical dryers on my spoons.) My understanding is that almost any finish, when it’s totally cured and dried, is going to be nontoxic and inert, especially if you wash your spoon with soap and water after you’re completely done finishing it and after the finish is fully cured. When your wooden ware is in daily use, the finish has to be reapplied occasionally, not all that often, but it does seem to wear over time so I do reapply the finish periodically. It’ll just build up more and more and your spoons will benefit from more protection. I think you’ll find with a finish that hardens off like tung oil does, you’ll be able to build up a surface that doesn’t require maintenance as often. some thoughts about containers - I have found that a large jar is the most durable, reusable and easy to seal container for the tung oil finish, but there are other ways to hold oil finish for spoons. Drew Langsner (at Country Workshops) was using a tray which he had made out of a big rectangular olive oil can by cutting the top off and leaving a lip about 4” high. He would pour his oil in there (he also uses tung oil), set spoons in it and then place a weight on top of the spoons to push them down below the surface. Once he was done soaking the spoons or butter spreaders, he’d pour the liquid back into a jar to re-use it later. If you don’t happen to have a jar or a can that’s large enough to do a really big spoon, I discovered an alternative this past summer which may help. You can use a large plastic bag instead and fill it with the tung oil/Citra-magic mixture, place your item to be oiled in the bag, squeeze the air out, seal it up and just let it soak there for a day or two. Then you can pour the finishing liquid out into a jar when you’re done in order to store it longer term. Unfortunately you’ll end up wasting some because you can’t really get it all out of the bag. But if you squeeze all of the air out of the plastic bag and seal it up, free from air, you can re-use your plastic bag quite a few times. 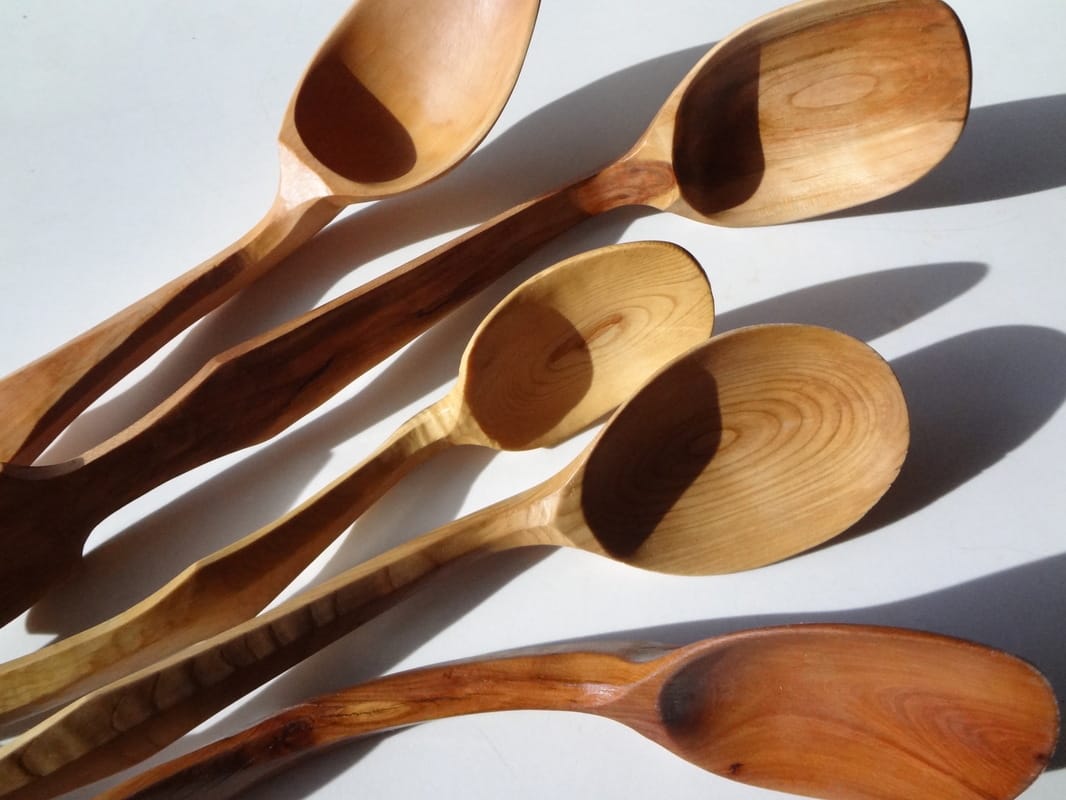 And finally, here’s another type of finish I like a lot -
I used to finish my spoons with a polymerized linseed oil finish called Tried and True, there's one that has beeswax in it, it’s the ‘original’ Tried and True finish. I would coat the spoon with that, then I’d put it in the microwave for 5 to 10, maybe 15 seconds on high, until the spoon was really warm. The microwave would heat the spoon up from the inside and draw the oil and beeswax mixture into the wood. I used that finish on a lot of spoons. But now we live off the grid and we don’t have a microwave, so I switched. I think the finish soaks in better with the overnight method, and the tung oil creates a harder, less permeable finish on the wood as compared to linseed oil and so that is now definitely what I prefer.” - KK Finishing a handmade rustic welsh windsor chair 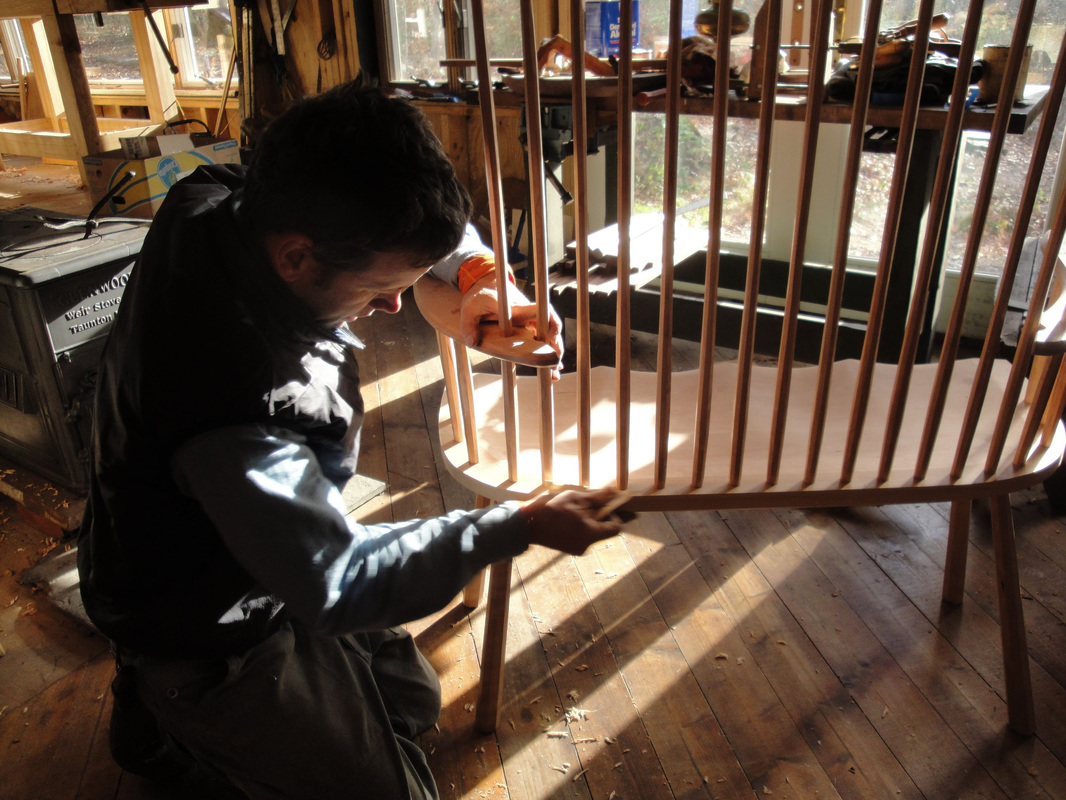 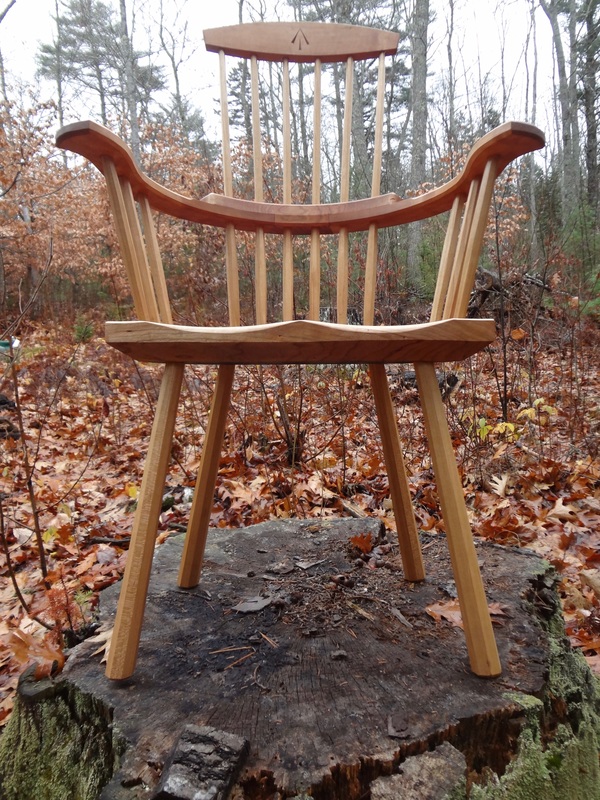 Just last week Kenneth completed a commission for one of his Welsh vernacular style Windsor chairs, that is one of the chairs he learned to make from his teacher, the late John Brown, in the rustic and distinctly handmade Welsh style. We’ll work on telling more about this Welsh lay person’s Windsor and about how Kenneth came to be John Brown’s “first and last apprentice”, so stay tuned for that. This current entry though will be something of a hands-on post about how Kenneth finishes his chairs. I have seen that his finishing methods change slightly from year to year, he’s always investigating best methods and making adjustments. So here’s what happened with his latest chair. -AK “I use a simple oil finish which wears well and is very straight forward to apply. Some finishes will yellow with the sun but I think that this finish doesn’t yellow as far as I can tell. And it doesn’t build up on the surface so you can really feel the wood through it. I’ve tried a lot of different oils, the Sam Maloof oil finish, Tried and True, Danish Oil Finish to name a few. But I’ve recently been liking the polymerized tung oil that Lee Valley is selling. They also have a polymerized tung oil sealer, which is basically the tung oil with more dryers added so it’s a lot thinner. You can put the sealer on your piece first and it helps the wood to not absorb quite as much oil. You can also add the sealer to the straight polymerized tung oil to thin it out a little bit to make it easier to wipe it on and off, but then since it’s thinner it takes more of it to build up the coats for a good finish. I usually apply the sealer first and after 24 hours, I apply the high luster polymerized tung oil. I do not dilute the oil. It’s generally thin enough that I don’t have any problem wiping it on and off again before the oil starts to tack up. After the sealer is dry, I give it a light sanding. I like the synthetic steel wool, the 0000 is a good variety. If the grain has risen in any place, which it does sometimes, I’ll hit it with 600 grit wet-dry sandpaper. If it’s really severe I might use something more like 400 grit wet-dry sandpaper, or 320 even. After this, I work back up through the grits, so that I finish with the 600 grit. I then wipe it all down with a tack free cloth, because once the sealer has dried you’ll get a white powder that needs to be removed. The white powder will form while sanding if the sealer or oil is dry. If you’re not getting the white powder you’ll know that the sealer and/or the tung oil is not quite dry. So after the sealer has dried and gotten a light sanding and been tacked off, I’ll start with a first layer of the high luster polymerized tung oil. I wear nitrile gloves and use a cotton rag that I fold up so that the lint doesn’t come off of it. Old T-shirts work well, just fold the corners in so that the cut edge doesn’t fray and leave lint on your piece. But it’s a really nice finish because even if you do get a little lint in there or a little dust or if something lands on your piece as it’s drying, you then just wipe it all off, again with a lint free cloth. 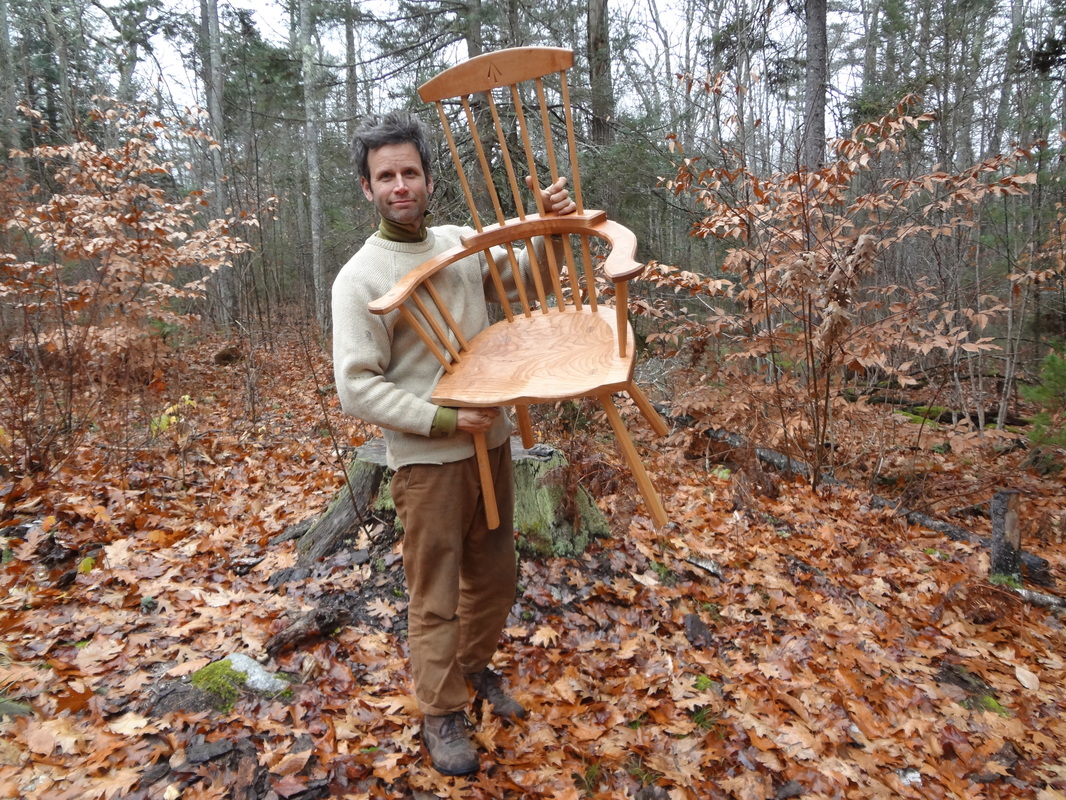 I let the tung oil sit on there at least 10 minutes, usually by the time you’ve finished applying the oil to one part of the chair, it’ll be time to start wiping down the parts of the chair where you started applying the oil first. I usually wipe and buff it enough so that it doesn’t feel like the rag is dragging any more, I really want to get all the oil off that isn’t soaked into the surface. I might apply a little bit more on the end grain to help that seal in. I let the first coat of high luster, polymerized tung oil dry for 24 hours. Usually I don’t have to use the sandpaper anymore, at this point I just use the 0000 or 000 grade synthetic steel wool, and I buff the oil. And then I do another coat - ideally I do 3 coats of oil like that. And then after all that’s dried, if you really want to buff it up nicely you can use a little bit of a paste wax finish on the chair. I usually just use the paste wax on the high wear areas, like the seat and the tops of the arms and maybe the comb. I don’t usually do the paste wax except on the high-wear areas because I find the paste wax is kind of hard to get off around all my spindles, especially since I leave the spindles faceted.  You can reapply the oil over time if the piece gets scratched or needs to be brightened up again. Or if you ever need to you can wipe the surface down with a little denatured alcohol, to get the paste wax off, and then you can apply more polymerized tung oil, maybe after giving it a light scuffing with some synthetic steel wool or some sandpaper and you can apply another coat in years to come. So it’s an easy to maintain finish over time, although I find that it seems to hold up well, even without doing that. It just gets better over time. I’ve used this finish on a very white birch chair and it looks lovely, the birch has mellowed a little bit, gotten warmer in tone over time, but the finish stays nice and clear and I haven’t had any trouble with it at all. 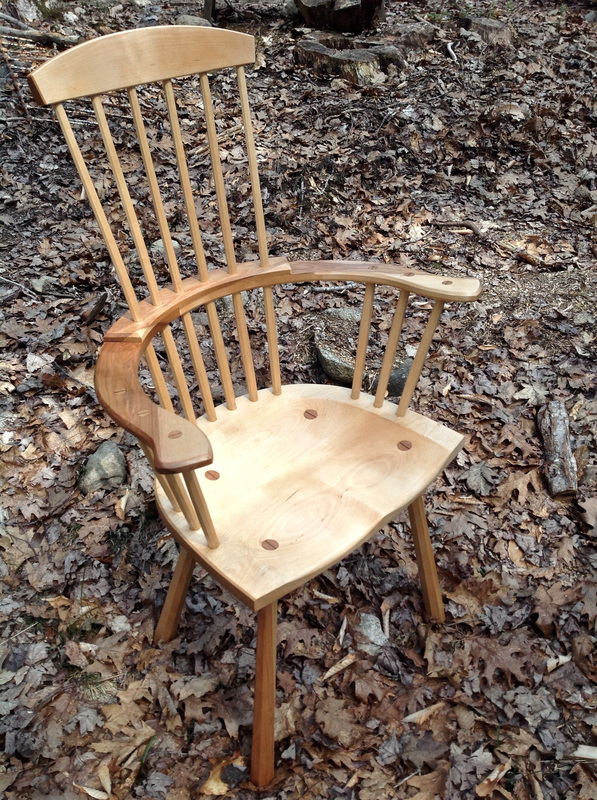 the birch Windsor One challenge I’ve had has been in the long term storage of opened cans of polymerized tung oil finishes. They will oxydize when exposed to air, as any oil finish will, so trying to store an open can of this stuff and not have it oxidize and set up in the can has always been a problem. I have tried something called "Blocksoygen", which is a can that sprays gas into an opened can of finish or paint to replace the oxygen (with something non-reactive). I have also had collapsible ridgid containers that are shaped like an accordian that you can push down to get the oxygen out. But even so, I’m always finding my tung oil sets up and gets wasted. A couple of months ago, I found these plastic ‘Stop Loss’ bags (from Lee Valley). They look a lot like a plasma blood bag that you might see used at a hospital for an IV. When I saw these flexible bags I was impressed and thought they may be a really good solution to my problem. You can compress them as you use the liquid so there is no air in the bag at all. So far they have been working great.” - KK 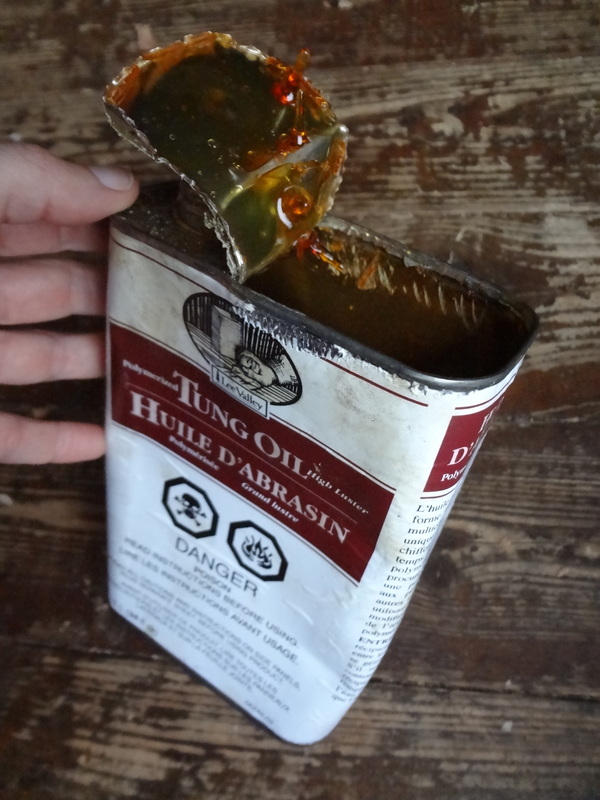 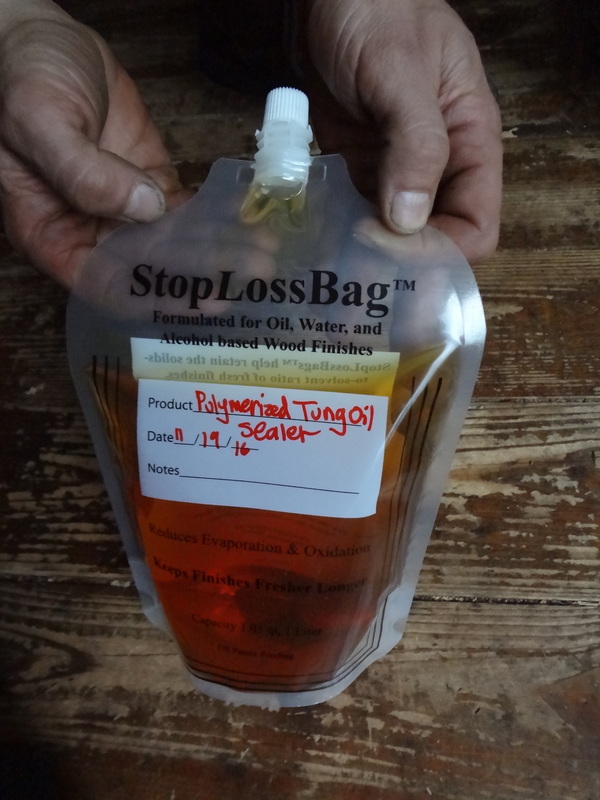 Next up: how Kenneth finishes smaller items like spoons & bowls, which is a similar but slightly different process. “Handmade work has soul, it has verve, a sparkle which a machine cannot reproduce.” DESIGNING AND BUILDING A CUPOLA FOR A YURT 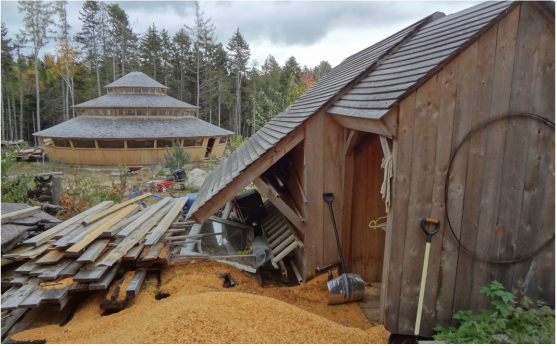 We went to visit our friends Melanie and Josh Wehrwein on the Blue Hill peninsula a few weekends ago. They are friends through Bill Coperthwaite, and have been building a three-tiered yurt which he designed for them over the past 3+ years. We participated in the initial construction phases of their home, spending a few weeks 2 1⁄2 years ago working with a group of friends to get the shell of it built. 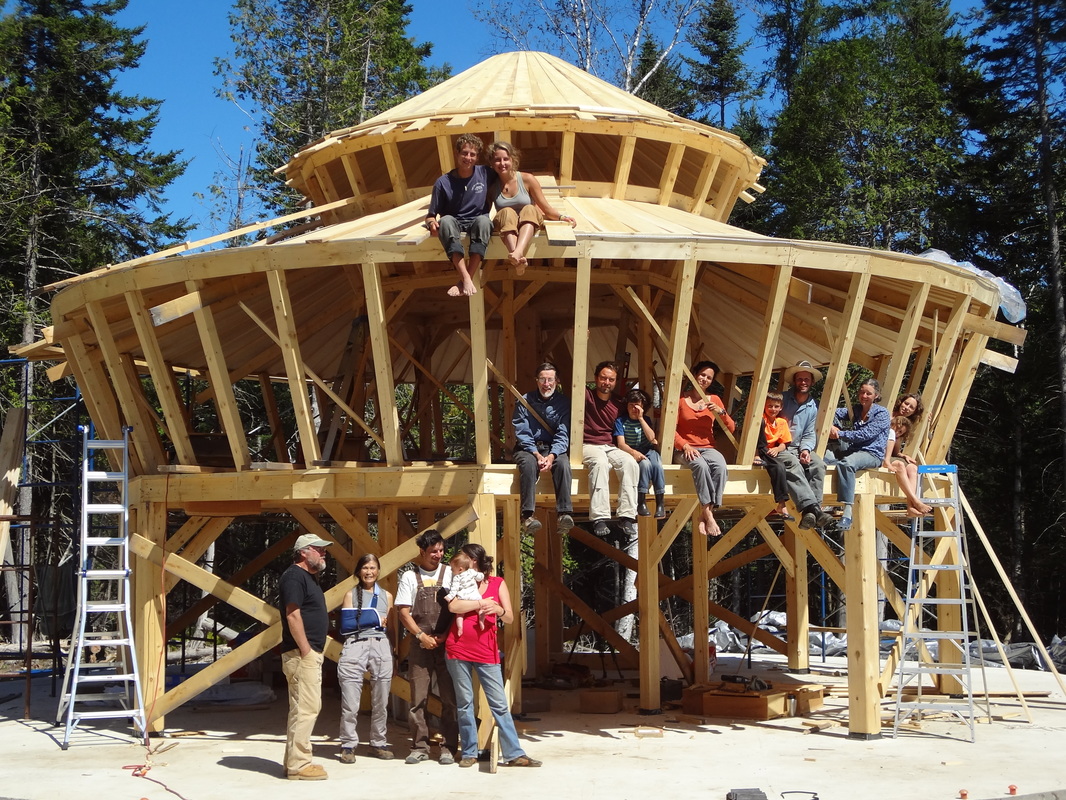 August 2014 Josh has been diligently working on all the details of finishing ever since, and finally their round home is almost ready for the family to move in. Check out Melanie’s blog, Circle In, if you’re interested in seeing more. Kenneth offered his assistance with a very special finishing touch, the cupola with a clerestory (or row of windows) which sits on the very top of the yurt. We were excited to help with this not just because it is such a nice bracket to helping with their project; to have started it and to now to help finish, but also because it was a good and tricky challenge to design and construct this little thing. So following is Kenneth’s description of how he, Josh Wehrwein and our friend Dan Asher created it together. "We started with the bottom ring of the clerestory window assembly. First we figured out the circumference needed by determining how it would look with the other three rooflines of the yurt. The size of the rough opening at the top of the highest tier (which they have had covered with plastic) gave us the minimum dimension. 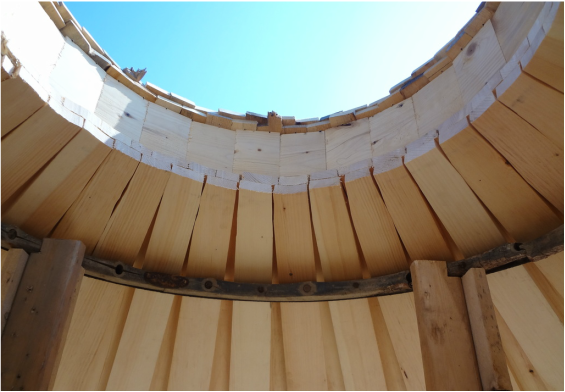 The rough opening at the top of the yurt, before the roofing was added. We decided that we didn’t want the ring of the clerestory to be too big because the windows wouldn’t show much if it was, and it couldn’t be too small since of course has to sit on top of the roof. So we made it only a few inches larger than the rough opening, to maximize being able to see the windows from inside the yurt. By making a full-scale drawing on a piece of cardboard, we could visualize how best to make this round thing out of straight, square cedar 2x2s, which Josh had milled up for us ahead of time. We drew the circle life-sized then divided it into 14 sections. By drawing a radial line from the center of the circle, we were able to get the angle of the butt-cuts for the 2x2 section pieces. Once we had cut all the pieces with the correct angle on each end, we butted them together and toe screwed them to one another to make the bottom ring. 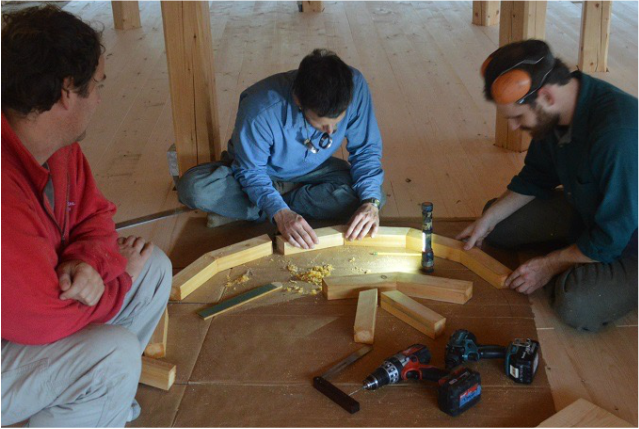 We repeated the same thing for the upper clerestory ring, drawing it full scale, getting the measurements and angles of the butt-cuts the same way. The top ring of the clerestory assembly is slightly larger though, it leans out a bit, mirroring the other windows in the yurt, so we were making two rings of different sizes. 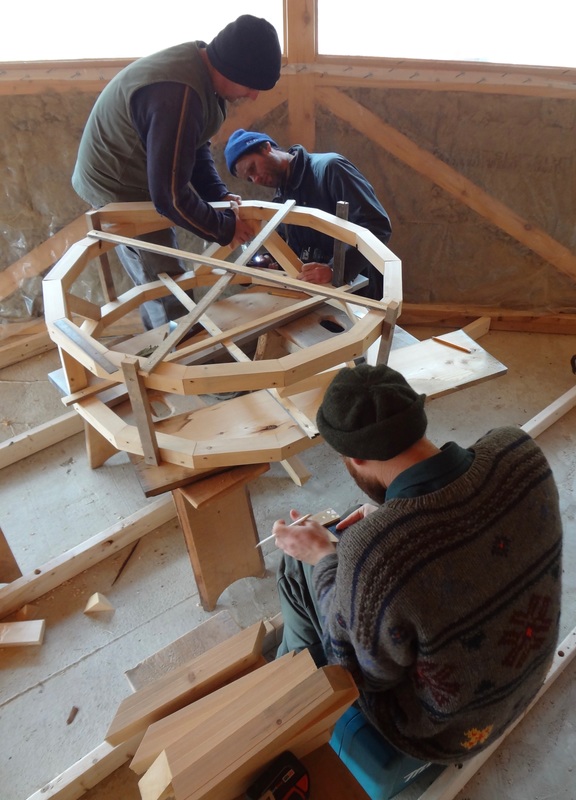 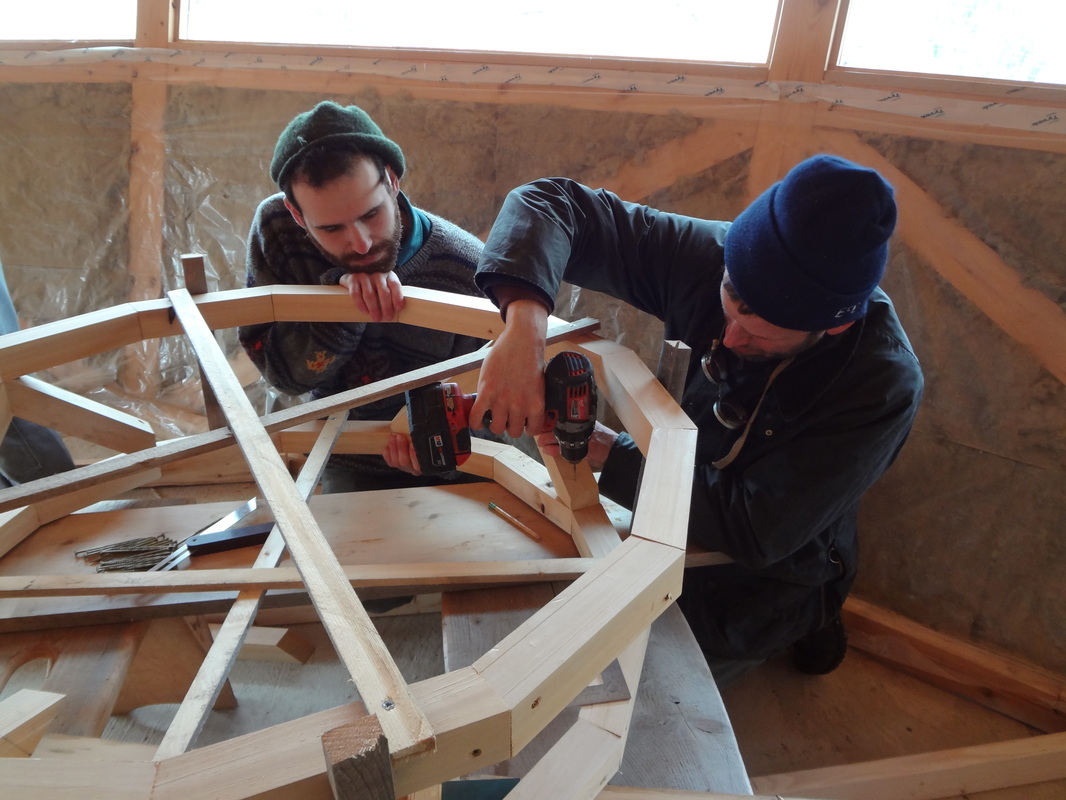 We temporarily connected the two rings together using 1x2s around the edge in four places. Then we began crafting the pieces that support the structure and which will border the glass windows. We chose to make triangular sections, which made for pretty complex cuts. I was glad that Dan was along with his boat building experience. He was able to scribe the sections with me and make sure, between scribing and visualizing the angles, that we were able to get all the pieces in accurately. We had the joints of the triangular sections end at the same butt joints as the clerestory rings. The pieces were miter cut, instead of having the ends come to a very abrupt point, thus the connections were bolder and made for a much stronger joint. 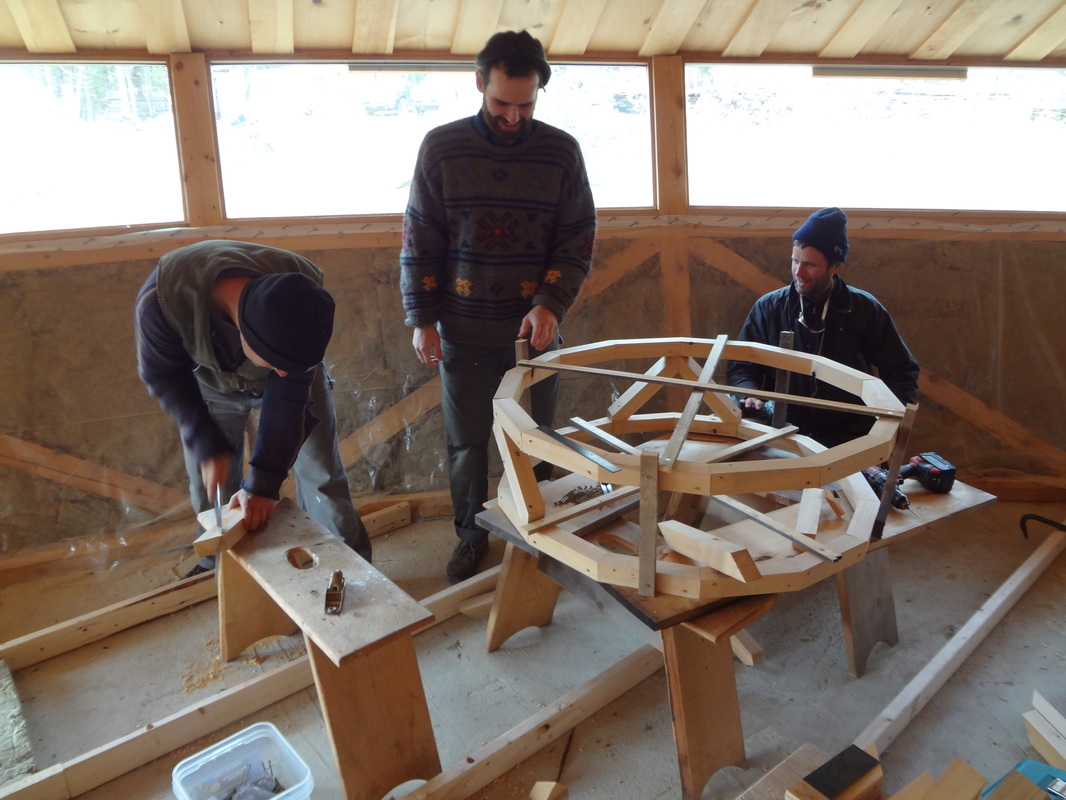 There was some head-scratching and re-making of pieces, this was definitely the trickiest part of the project. But we prevailed and in the end everything fit beautifully. Of course now Josh will have glass cut for the triangualr openings, but after his experience of doing all the trapezoidal windows in the rest of the yurt he should be able to get that done easily. These windows will be single paned, and they won’t open, so they are basically just for light. Next we needed to think about the roof on top of the clerestory windows. 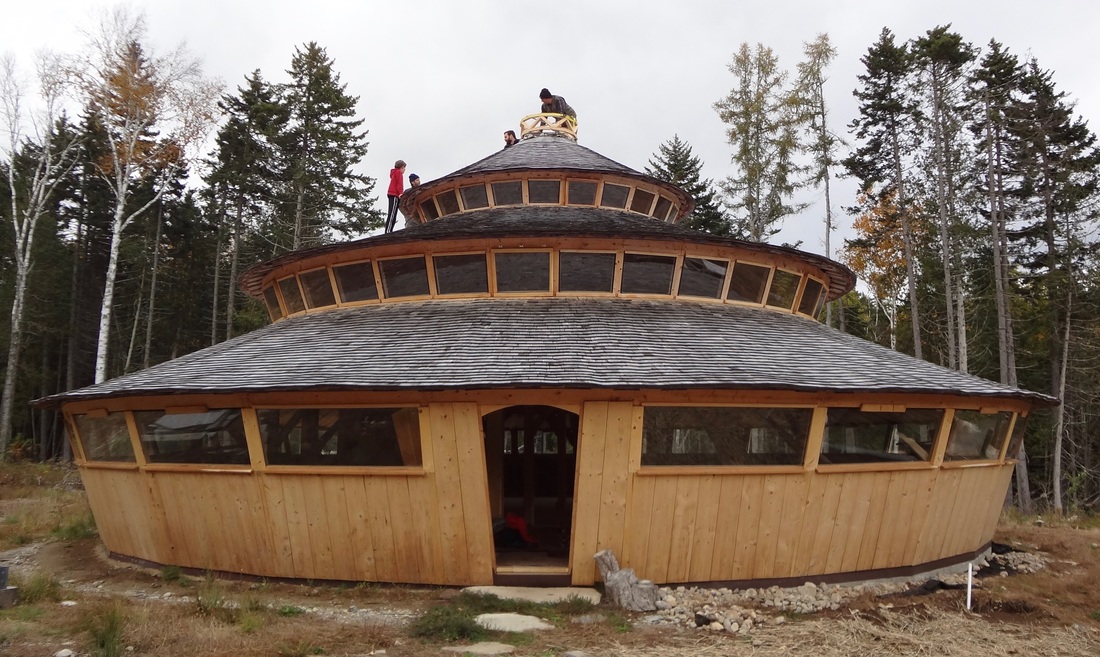 We brought the ring assembly up on the roof in order to visually determine the best height for this bit. Everyone was excited to get on the roof, especially the kids. Bill always liked concave curves in roofs, and he had described how he accomplished this to us during his “Yurt Design Symposium” just about a month before he died. It was fun to finally make one. We brought several sizes of circular things from home; a bicycle wheel, a piece from a bandsaw, a metal band from an old wagon wheel, since I didn’t know how big the cupola would end up being. The bicycle wheel turned out to be the right size for the middle ring on the inside of the roof section, this ring was going to be in tension and cause the concave bit of the curve. Josh had again prepared some cedar, this time they were strips about 4 feet long and a half inch thick. The very top of the roof section was smaller than we had anticipated, but luckily Josh had a metal bucket that was 9 1⁄2” which worked. We figured out how many strips would be needed to go around the top ring of the clerestory assembly and then made the top of the strips butt up nicely where we wired them to the metal bucket. Some of the boards needed some tricky fitting, in fact they needed to have something of a scalloped shape in order to allow them to be wired to the concave curve at the bicycle wheel. I used the table saw, but I could have used a draw knife and a spoke shave to do it by hand too. 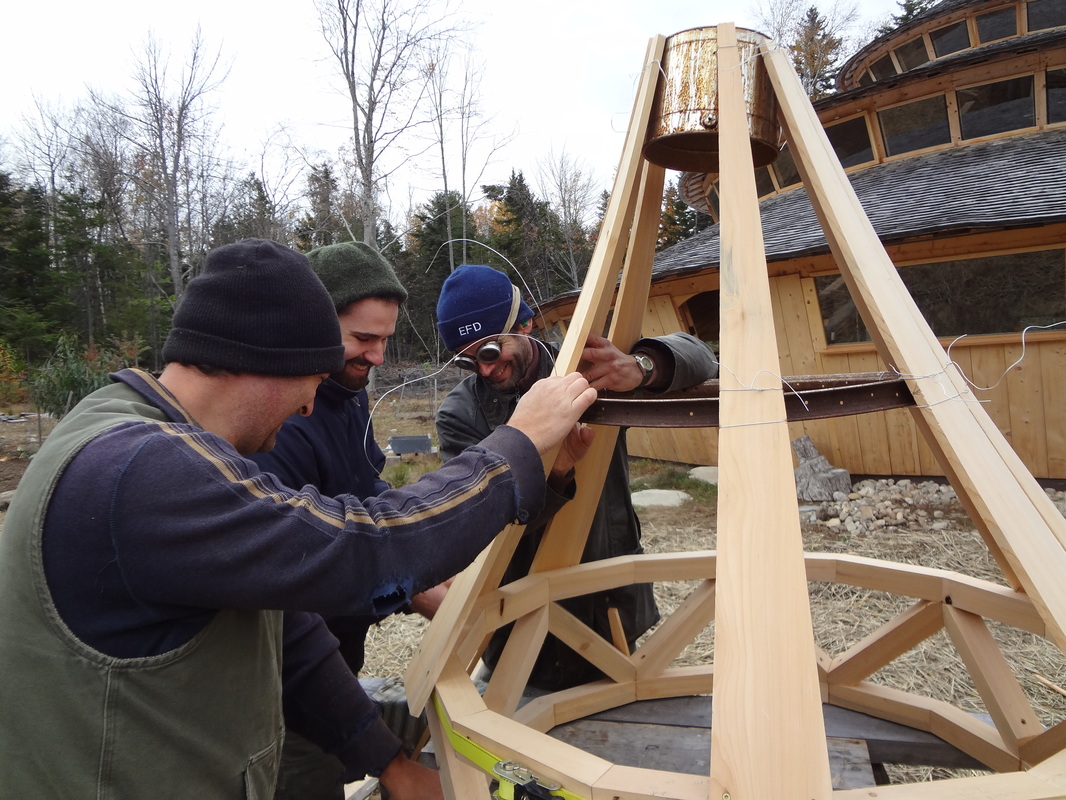 It takes two layers of strips (or roof sheathing boards). As you connect the two layers together you off-set the seams, and the two layers hold the curved shape under tension. Once we had the first layer of cedar strips all wired and screwed on, we added the second layer. These also had to be measured and cut to the taper, and with a scallop, in the same way as the first strips were. Unfortunately the cedar is so soft that any screws we were putting in were pulling right through the wood, so Josh is going to use copper rivets to attach the layers together, and then follow that up with some short screws. Ideally you wouldn’t have too many fasteners, or any fasteners at all showing on the inside, but these thin strips of cedar were so soft that the fasteners were basically just sinking right through the wood and the strips were not holding. Once the riveting and final shaping are done both the inner bicycle ring and the bucket can be removed by cutting the wires. The upper stays (around where the bucket is) will push tight together and you’ll have a strong compression ring formed by the edges of the boards touching each other." The Wehrweins will cover the very top with some kind of glass bowl to make a skylight (Bill was very creative in finding skylights, my favorite was from a front-loading washing machine), and Josh plans to shingle the cupola roof with cedar shingles to match the other three tiers. 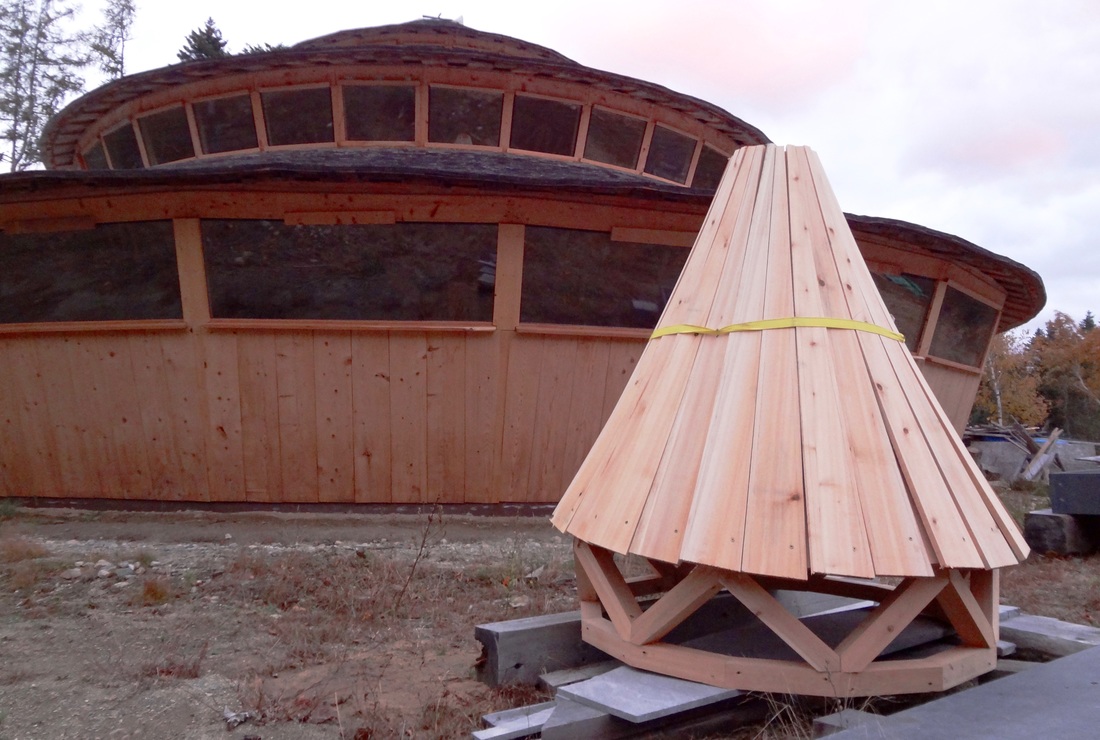 The concave curve will become evident once the two layers are riveted together.  The low bush blueberries were feeling the season on the Blue Hill peninsula. |
Authors:
Angela & Kenneth Kortemeier If you'd like to sign up for our email list, please follow this link:
The little button below (RSS feed) will allow you to
follow the blog without subscribing to the newsletter. Archives
March 2024
Categories |
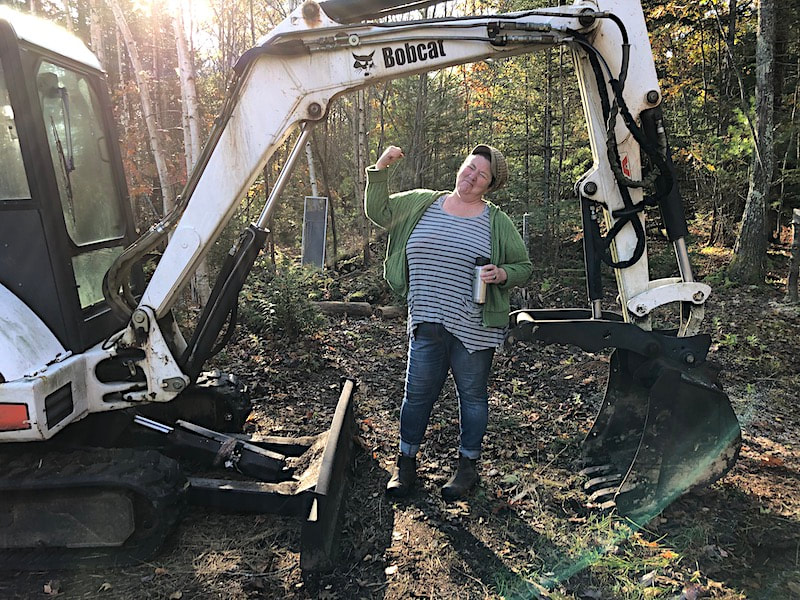
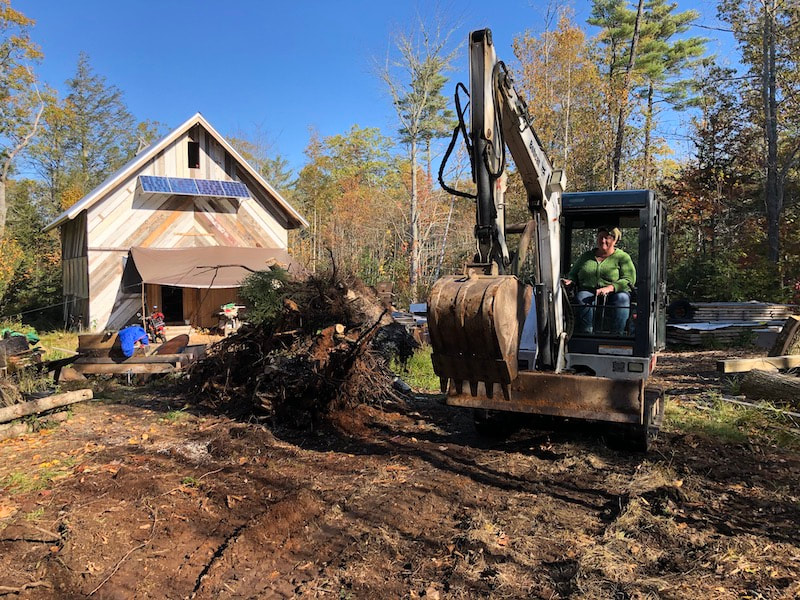
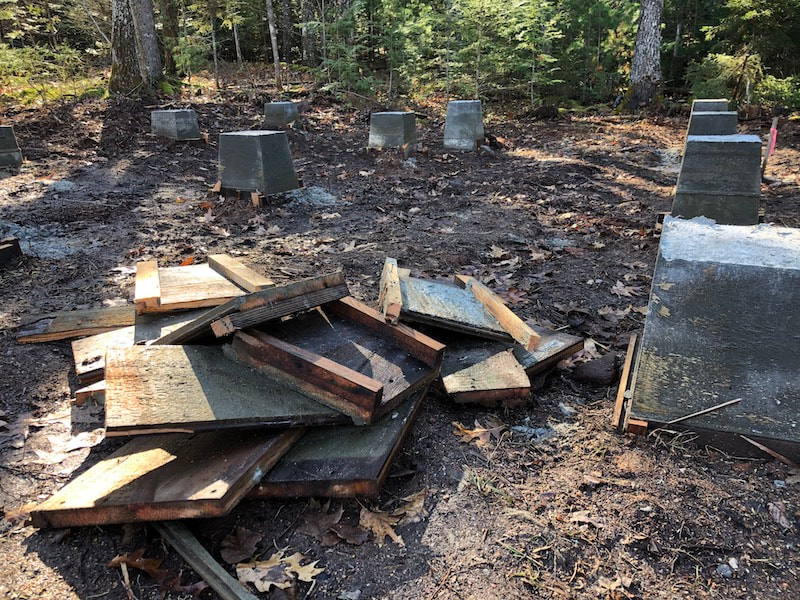

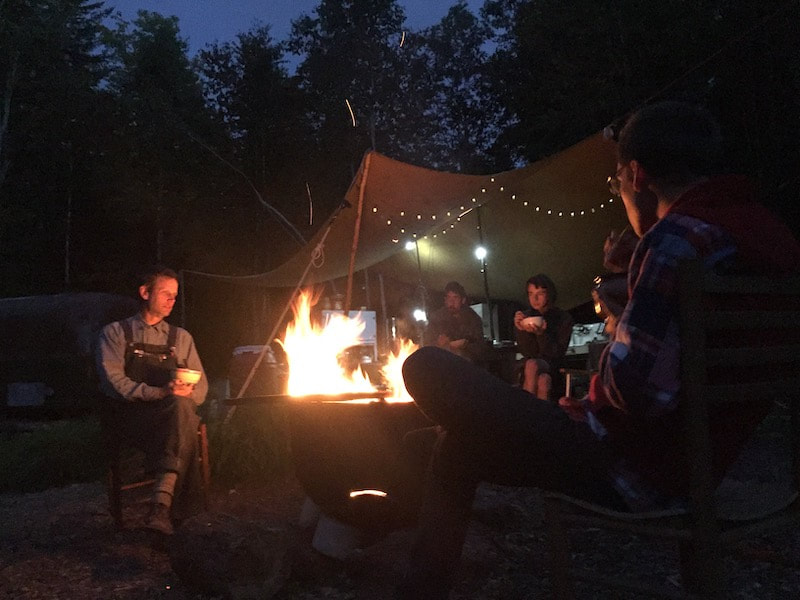

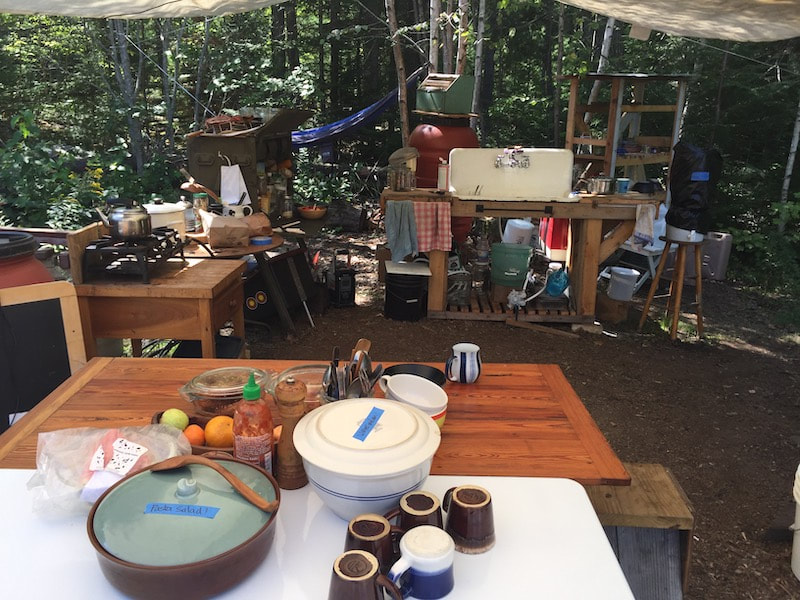

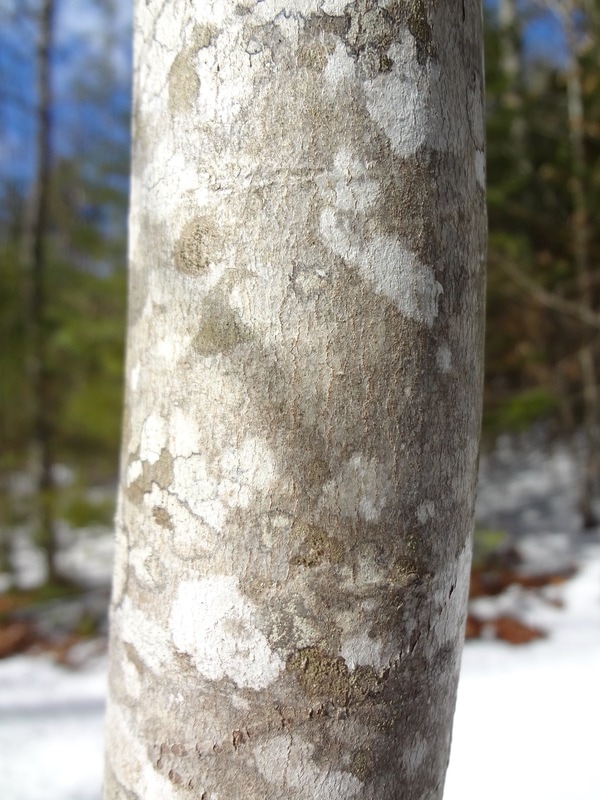
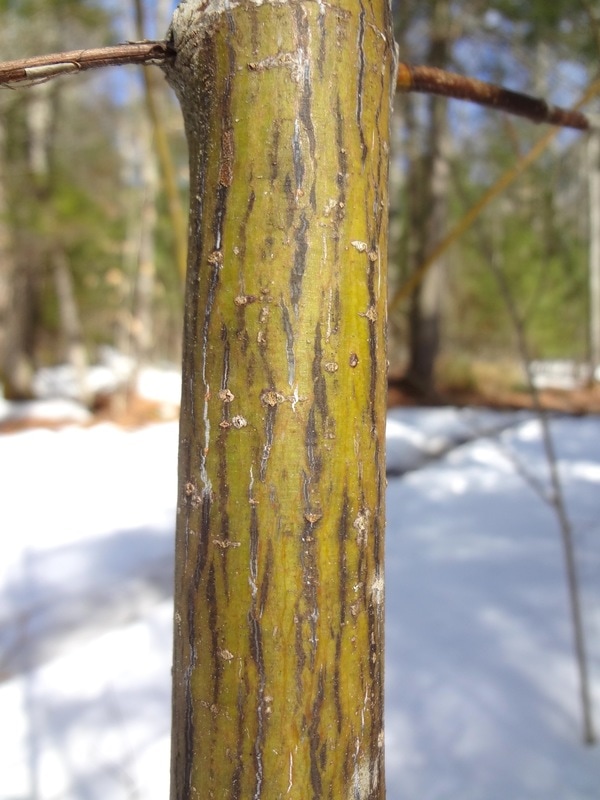
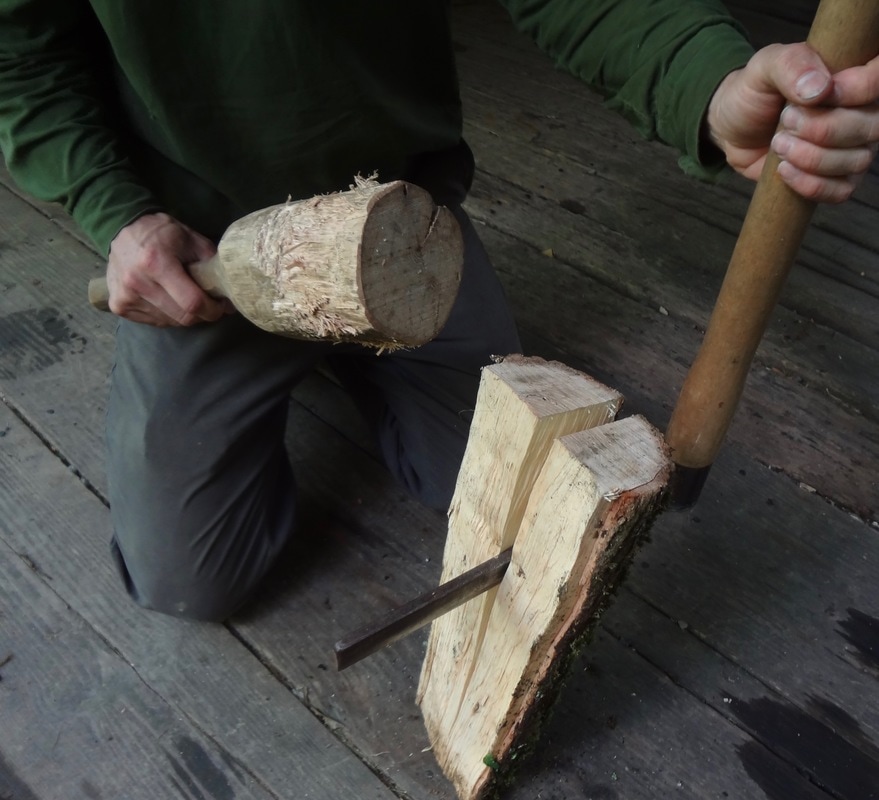

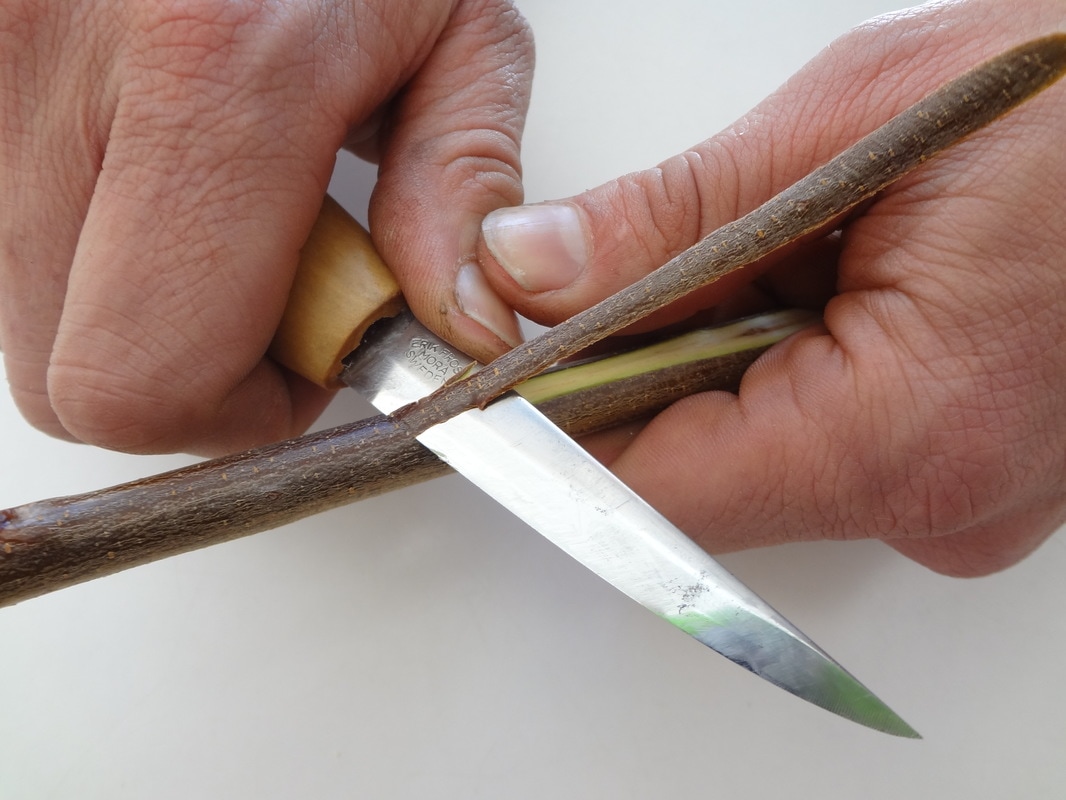
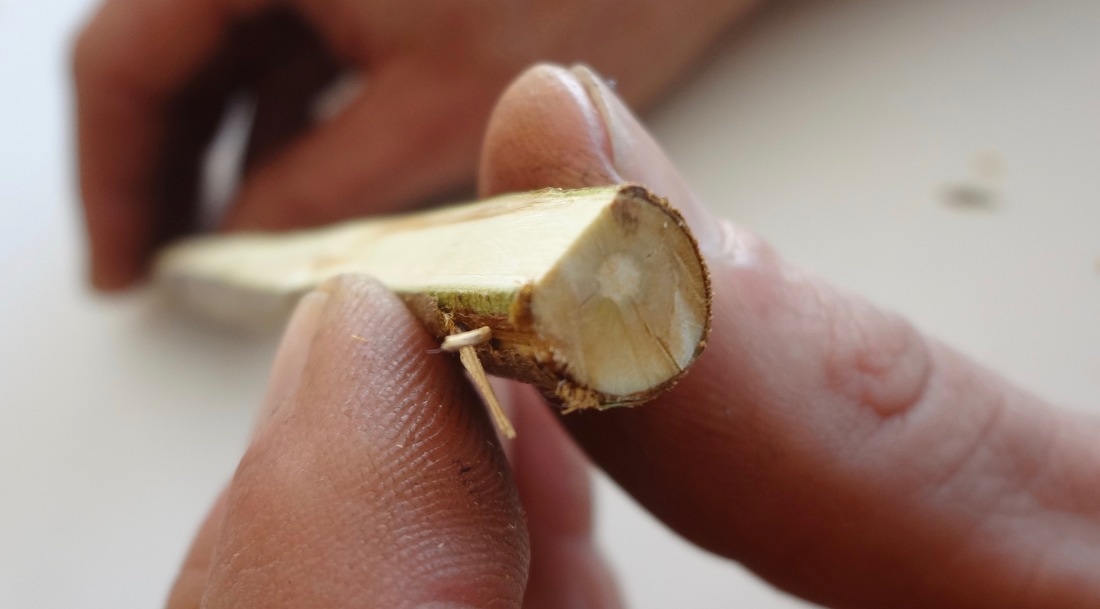
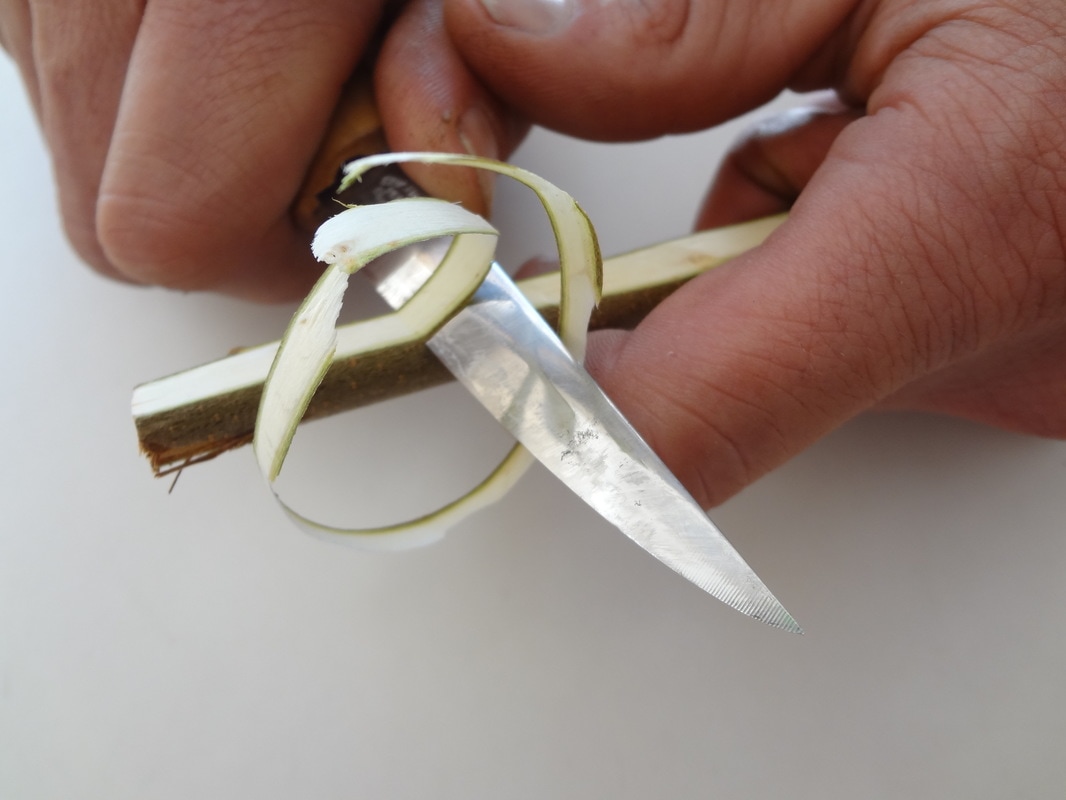
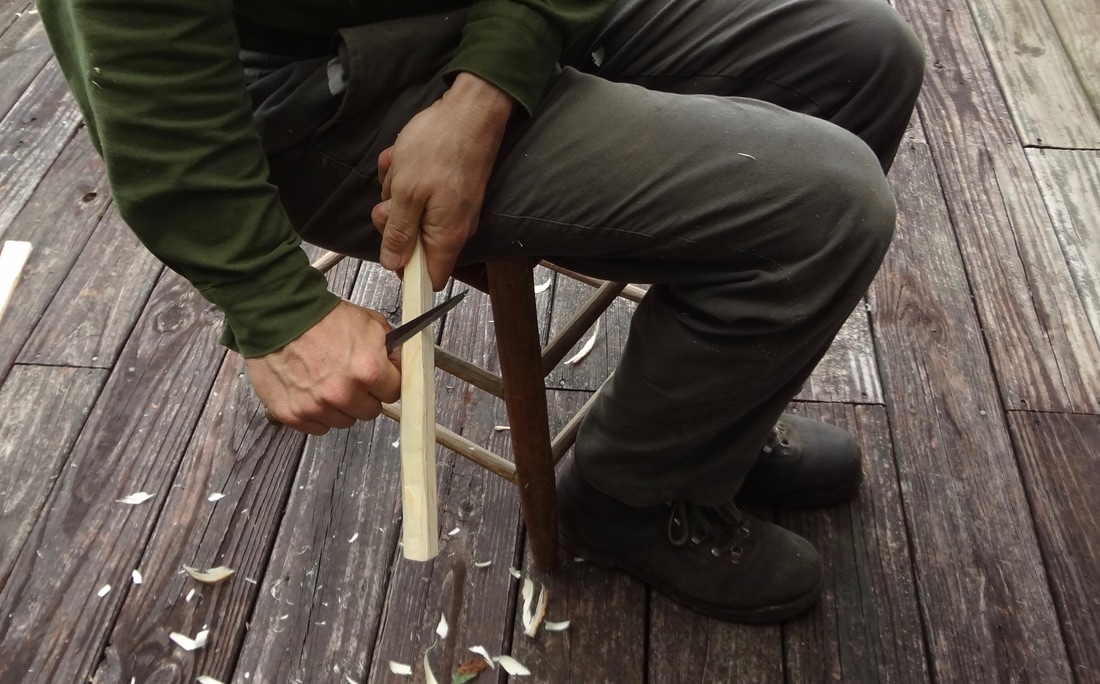
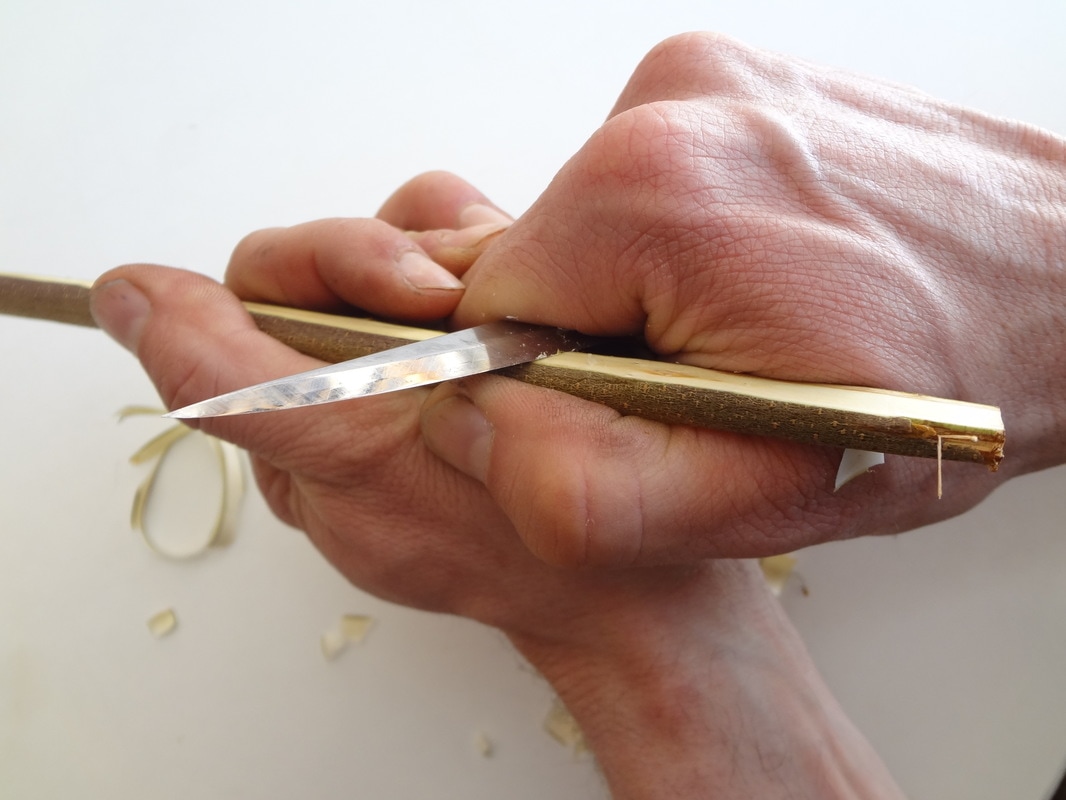
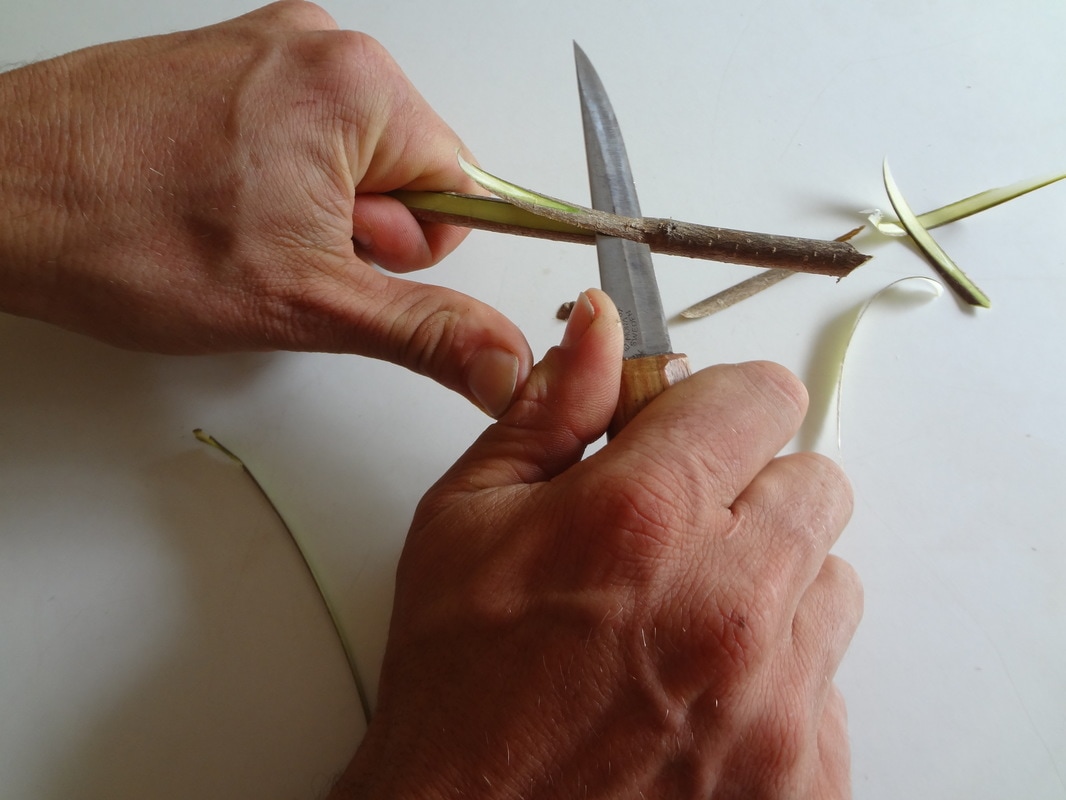
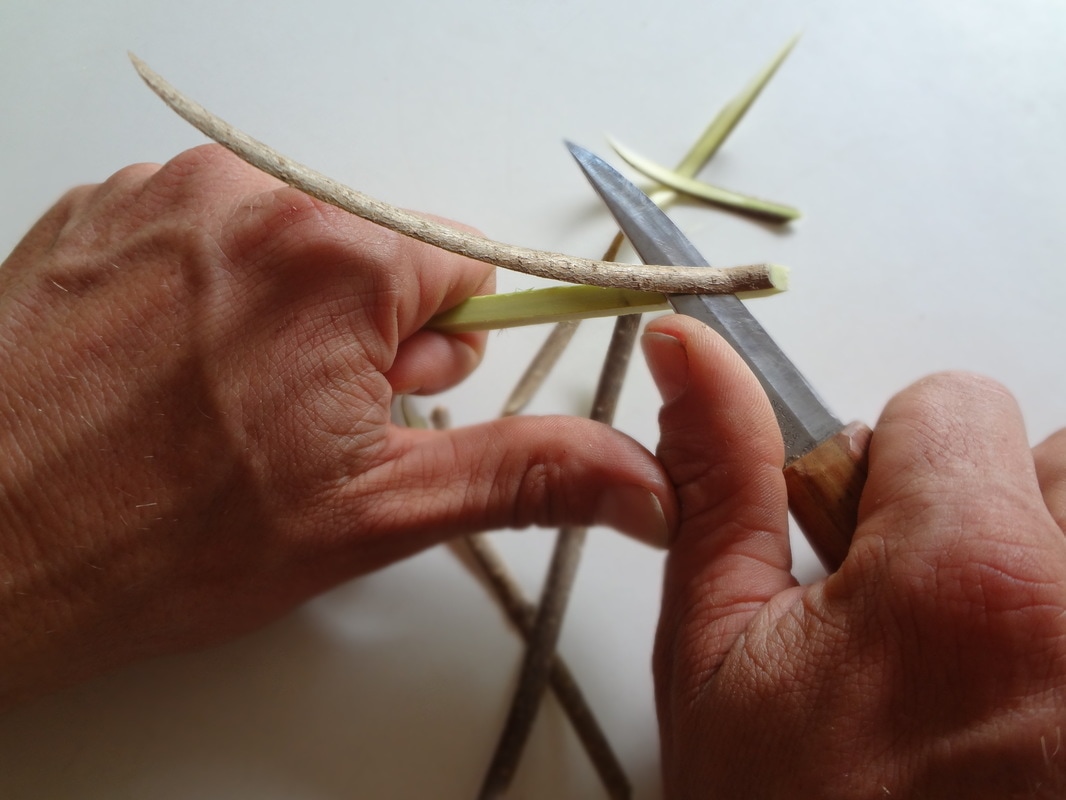

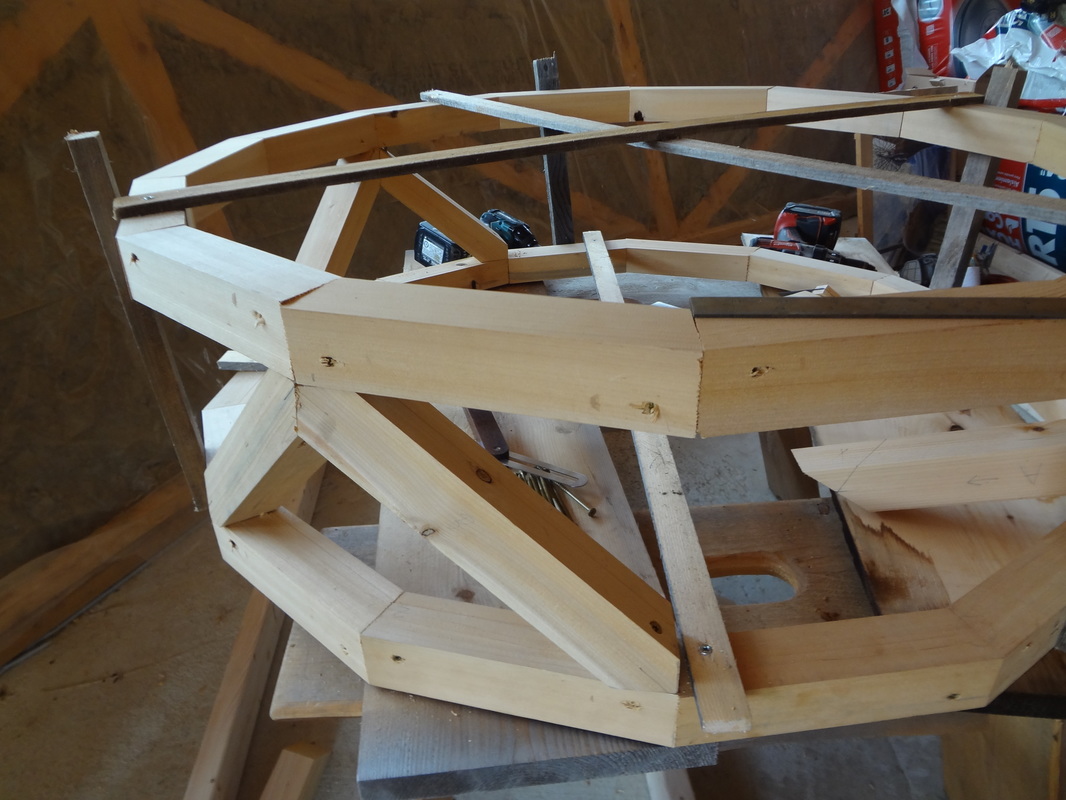
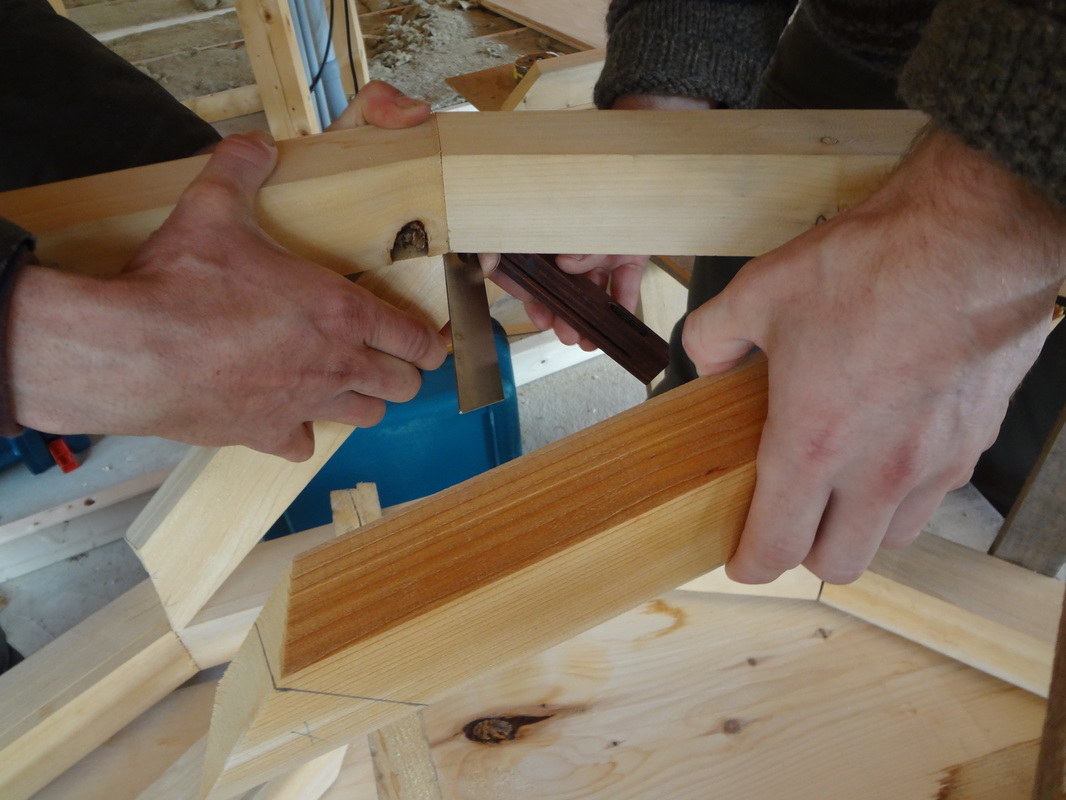
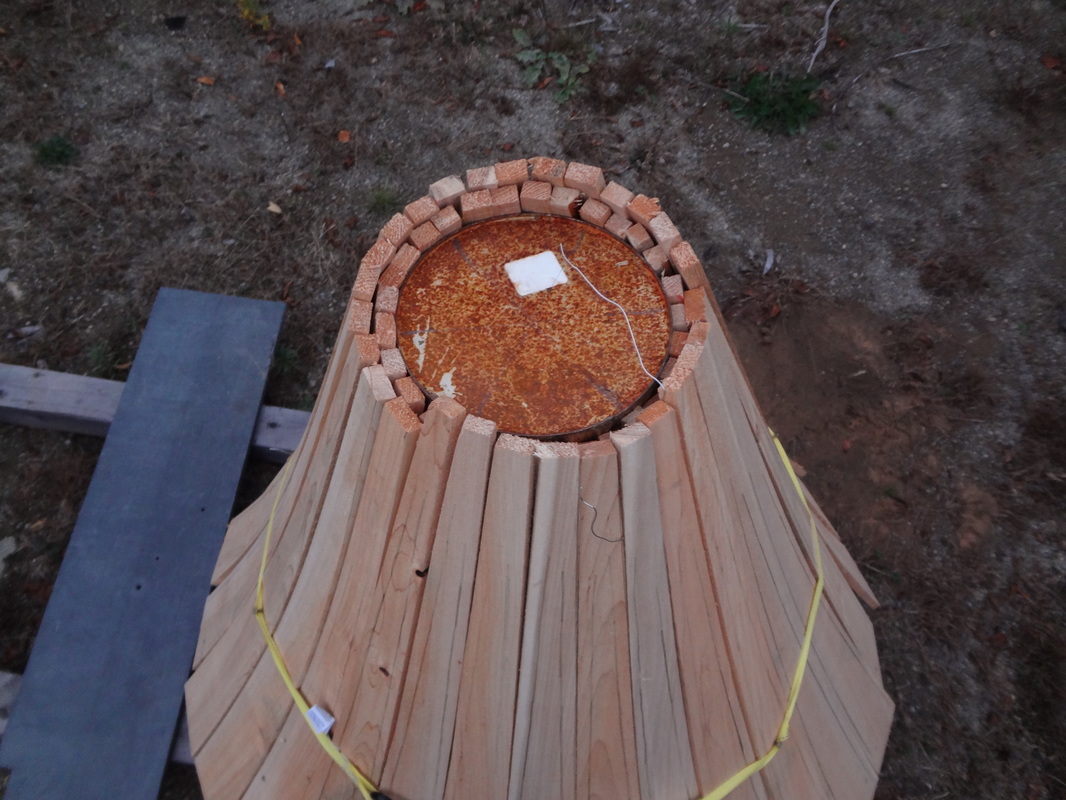
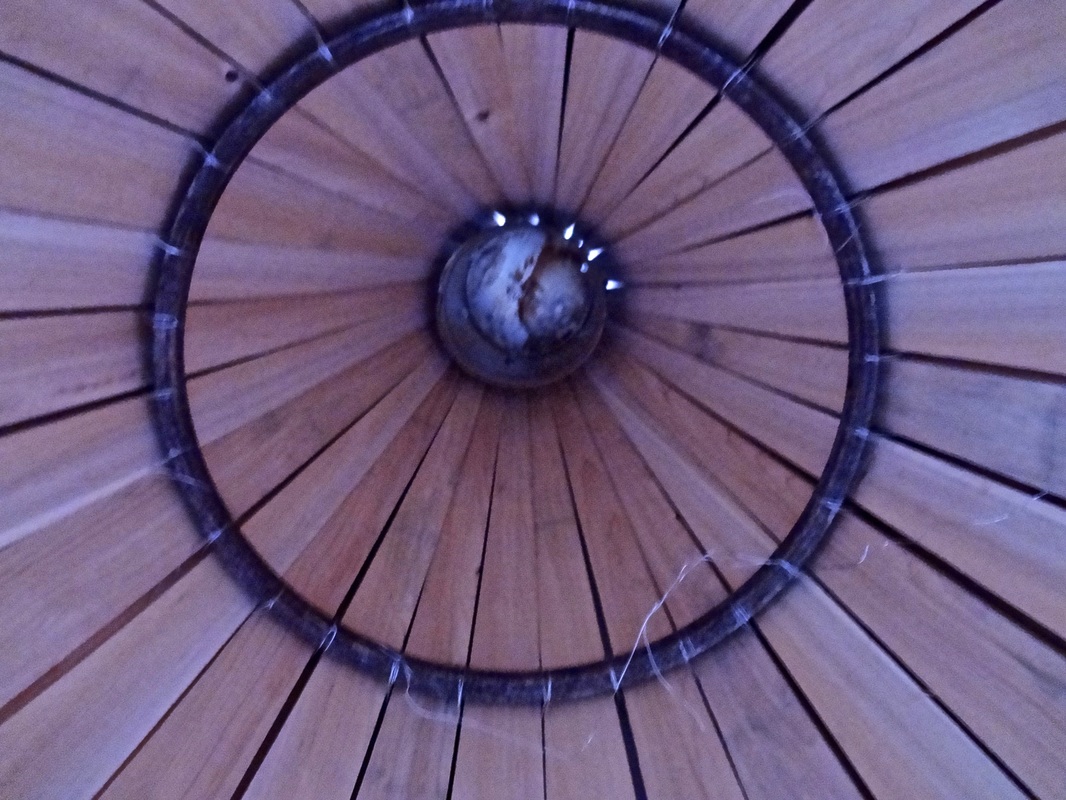
 RSS Feed
Proudly powered by Weebly