the Maine Coast Craft School

    blog

  • Home
  • classes
  • blog
  • Contact us
  • area amenities
  • class descriptions
  • Tool sales +

12/18/2016

An oil finish for hand-carved wooden spoons

48 Comments

Read Now
 
Picture
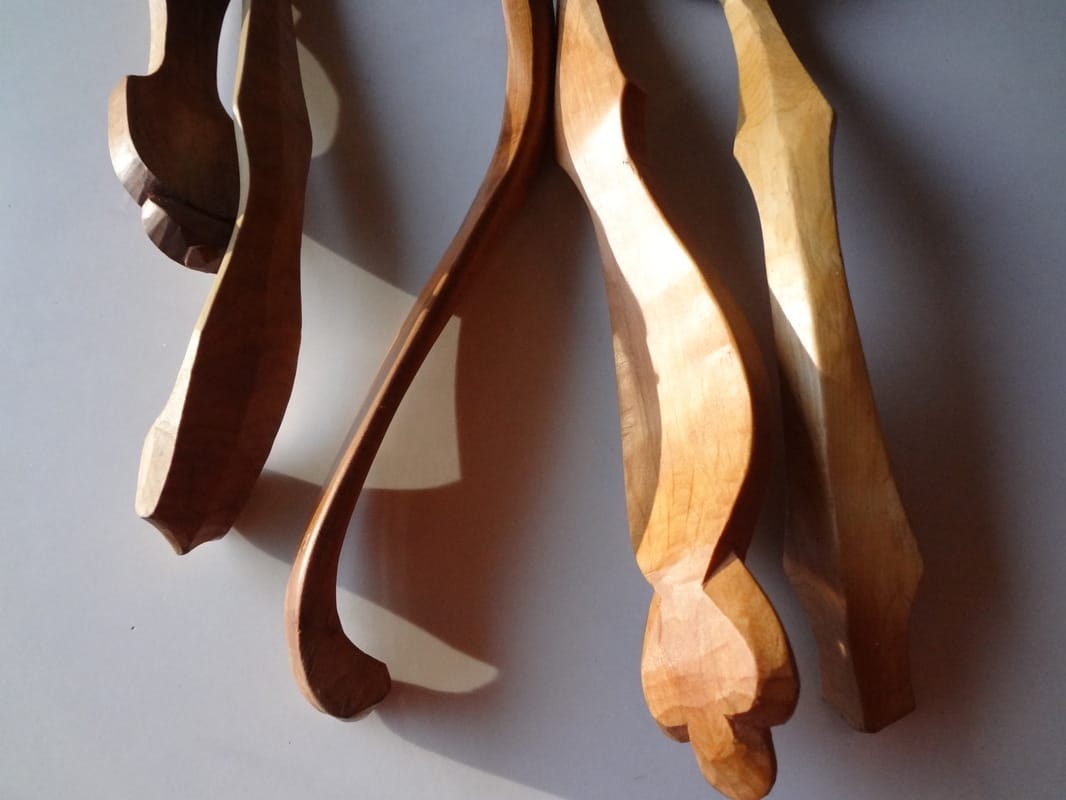
       In the last blog entry Kenneth detailed how he finishes his Windsor chairs.
This one is all about finishing his beautiful wooden spoons.
We publish it here as an addendum to our workshops, where there is time
to learn to make green wood items, but rarely time enough to do the
oil finishes that will protect and preserve them.
These blog entries are a guide to give complete information to our students
and others who are looking for details of how to finish certain handcrafts.
- AK


 I prefer to use raw tung oil on spoons, as opposed to the polymerized oil which
is the finish I use on chairs, the polymerized is a bit more expensive. It is available from Lee Valley. Many people like to use raw linseed oil on spoons and bowls, I like the tung oil because it hardens off to a more durable and hard protection for the wooden ware. Jögge Sundquist told me that he likes linseed oil over tung oil because he says he doesn't like the way the tung oil smells. I don't think he has used it with the Citri-magic which has a lovely lemon or orange smell. Linseed oil is also a more traditional finish for wooden ware in Scandinavia.
You can use polymerized tung oil if that’s what’s available, and I occasionally
use it for a touch up on spoons, it is a finish that builds up layers fast. It is expensive to get enough to soak the spoons in it.

For my standard spoon finishing, I cut the tung oil 50/50 with a citrus based
solvent called Citra-magic, which makes the tung oil dry faster and allows
it to penetrate better. Plus I think a natural solvent is a more pleasant way
to thin the oil, and it smells really nice, like oranges.
(I buy Citra-magic in bulk from the Shelter Institute here in Maine,
or the Milk Paint Company also sells it.) There are citris based household cleaners that might confuse you so make sure it is a solvent and not a household cleaner.

For my soaking mixture, I mix half raw tung oil and half solvent together
in a large jar. I will soak any smaller items like spoons or butter/jam
spreaders overnight with the jar’s lid on.

If the item I’m finishing is too large to fit entirely into the oil I’ll drape
a plastic bag over the top. Then I’ll invert the piece - I’ll do the bowl
one night and then I’ll flip it around and do the handle the next night.

Picture
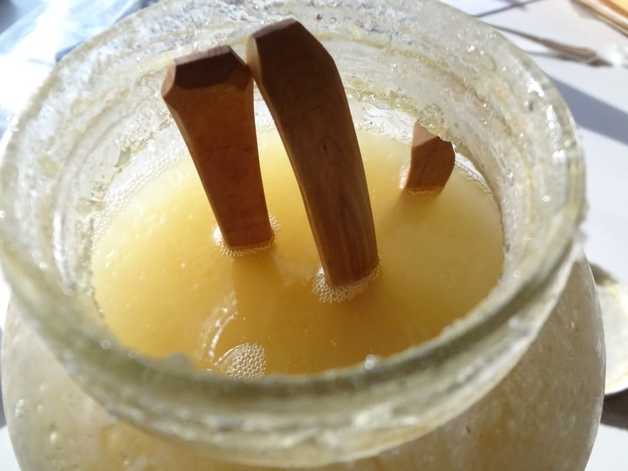
This overnight soaking is just for the first time, a really deep soaking,
for when I’ve just completed carving a spoon and the wood has dried
and I’m going to oil it for the very first time.

I’ll do the overnight soaking once on the whole spoon, then when
I remove it from the jar I use a small rag from a cotton T shirt to
wipe off as much oil as I can.

Then I take a second, dry rag and wipe off all the remaining oil with
the dry rag. You want to rub it with a dry rag until there’s no more
oil on the spoon. There actually is some on the surface, but you can’t
really wipe off any more of it.

important safety reminder:

I always put rags that have tung oil on them into our wood stove,
because when the tung oil oxidizes it gives off heat and if you have
just the right conditions it can actually self combust.

Because of this, I put my oily rags in our wood stove as a safety measure.
You can also put them in water or put them outside, spread out
(not wadded up). It’s mostly when they’re compressed and wadded up
that they heat up, but if you spread them out the heat usually dissipates
and they won’t catch fire, but either way they should NOT be left
around the house or the shop. They can burn your house down.
Picture
make sure to dispose of oily rags properly!
After the first application of oil has dried overnight, I like to wet the
entire spoon down with water, which raises the grain of the wood.

After that dries, I give the surface a light sanding to remove all the
wood grain that has risen, either with 600 grit wet/dry sandpaper
(you can even do a wet sanding with the oil to really finish it off nicely),
or with 0000 synthetic steel wool.

I will give my spoons just a light sanding between each coat of finish.
You want to be careful not to sand through the finish as you build those
coats, so don’t sand too aggressively or you might go back down through
the layers you’ve been trying to build.

After the initial soaking has dried, after raising the grain, drying the
spoon again and after the light sanding, I’ll  dip a rag in the oil/solvent
mixture from the jar, wipe the spoon down with it and let it sit
for 10 or 15 minutes. Then I wipe it off and repeat the process with
the drying, light sanding and the rubbing/polishing.

Picture
You can get away with just one or two layers of finish, but when you
start getting up to 3 to 5 coats it really starts to build up a smooth
surface and that’s the kind of finish that I appreciate.

I like the built-up tung oil surface because it makes the spoons perform
and look better over the long run. Using and cleaning wooden spoons
seems to go a lot easier when they have a nice slick finish on them. The water will literally run off the spoon when you wash it.

The other day I was at the Shelter Institute and a gentleman was
talking to me about how he’s been finishing his spoons using mineral oil,
but he wasn’t super happy with his results.

An important thing to know about mineral oil is that it never actually
hardens off. What happens is that it’s always washing off the surface,
every time you wash the spoon with soap and water or get it near hot
water, the finish washes off the surface and then the wood becomes
dry, and it will look it too. It really changes the way the spoon looks
and feels against your skin.

The pores of the wood and any indentations or marks from carving
will tend to hold food and dirt if it’s got this kind of soft surface.
It’s like putting olive oil or something similar on the wood.

I’ve found that the tung oil finish holds up much better than
mineral oil or similar kinds of oils that don’t actually harden off.
Picture
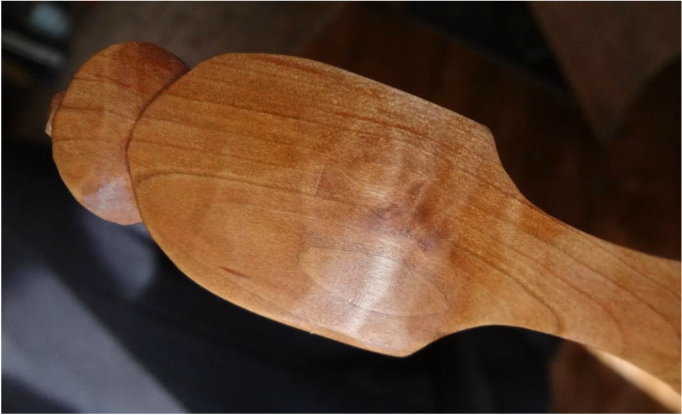
The idea of toxic finishes on spoons and bowls is a big concern for people,
of course. (I really appreciate the Citra-magic for that reason, it’s nice to know
that I’m not putting anything with strong chemical dryers on my spoons.)

My understanding is that almost any finish, when it’s totally cured and dried,
is going to be nontoxic and inert, especially if you wash your spoon with
soap and water after you’re completely done finishing it and after the
finish is fully cured.

When your wooden ware is in daily use, the finish has to be reapplied occasionally, not all that often, but it does seem to wear over time so I do
reapply the finish periodically. It’ll just build up more and more and your
spoons will benefit from more protection.

I think you’ll find with a finish that hardens off like tung oil does, you’ll
be able to build up a surface that doesn’t require maintenance as often.

some thoughts about containers -

I have found that a large jar is the most durable, reusable and easy to
seal container for the tung oil finish, but there are other ways to hold
oil finish for spoons.

Drew Langsner (at Country Workshops) was using a tray which he had made
out of a big rectangular olive oil can by cutting the top off and leaving a lip
about 4” high. He would pour his oil in there (he also uses tung oil), set spoons
in it and then place a weight on top of the spoons to push them down below
the surface. Once he was done soaking the spoons or butter spreaders,
he’d pour the liquid back into a jar to re-use it later.

If you don’t happen to have a jar or a can that’s large enough to do a really
big spoon, I discovered an alternative this past summer which may help.
You can use a large plastic bag instead and fill it with the tung oil/Citra-magic mixture, place your item to be oiled in the bag, squeeze the air out, seal it
up and just let it soak there for a day or two.

Then you can pour the finishing liquid out into a jar when you’re done in
order to store it longer term.

Unfortunately you’ll end up wasting some because you can’t really get it all
out of the bag. But if you squeeze all of the air out of the plastic bag and seal it up, free from air, you can re-use your plastic bag quite a few times.
Picture
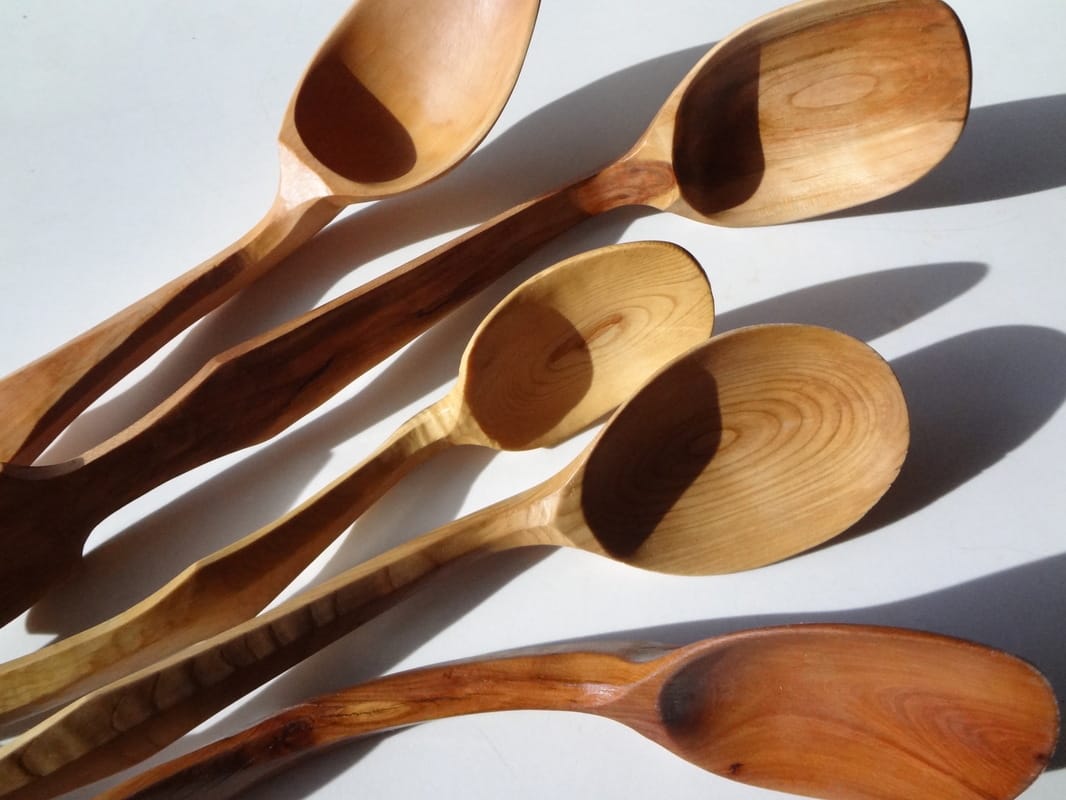
And finally, here’s another type of finish I like a lot -
I used to finish my spoons with a polymerized linseed oil finish called Tried
and True, there's one that has beeswax in it, it’s the ‘original’ Tried and True finish.

I would coat the spoon with that, then I’d put it in the microwave for 5 to 10, maybe 15 seconds on high, until the spoon was really warm. The microwave would heat the spoon up from the inside and draw the oil and beeswax mixture into the wood. I used that finish on a lot of spoons.

But now we live off the grid and we don’t have a microwave, so I switched.

I think the finish soaks in better with the overnight method, and the
tung oil creates a harder, less permeable finish on the wood as compared to linseed oil and so that is now definitely what I prefer.” - KK

Share

48 Comments
Rev. Mary Bettencourt
3/4/2017 02:37:15 pm

I like the jar method too, and CitraSolve is great. Sometimes I add some liquid clove oil to it too.....great aroma and natural. I look forward to visiting or participating in a workshop in the future.

Best of luck beginning you craft school!
Mary

Reply
Kenneth Kortemeier
3/7/2017 05:02:46 pm

Thanks Mary, I have not tried the clove oil myself but it sounds and I bet smells, lovely.

Reply
Steven
3/7/2017 02:47:20 pm

Thanks Kenneth, I've found this to be very useful advice for someone just starting out doing this kind of work. Thanks for your clarity.

Reply
Kenneth Kortemeier
3/7/2017 05:04:12 pm

Hello Steven, I am so glad you found the information helpful and that you are carving more spoons!

Reply
Jamey
7/22/2017 05:18:00 am

What wood types do you find are best for making spoons?

Reply
Kenneth Kortemeier
9/2/2017 09:32:51 am

Hi Jamey - check out our blog post about finding wood, it has some suggestions for wood species - http://www.mainecoastcraft.com/blog/finding-green-wood-for-carving

Reply
Mitch
8/29/2017 11:01:10 pm

How long does the process of finishing a spoon with this method usually take? After the first soak, drying, wetting, drying and standing stage, how long does each subsequent layer take to cure in general? My pieces seem to retain a small amount of oil after a day or so. Enough that I notice it on my hands after picking up the piece. Any thoughts? I've also considered storing the curing pieces in a container with descicant bags while adding layers of finish. Would this be helpful in your opinion?
All the best

Reply
Kenneth Kortemeier
9/2/2017 09:29:14 am

If the spoon is thoroughly wiped dry of the oil finish when it comes out of the solution, it should dry within about 24 hours without any additional procedures. Try fine sanding with 600 grit or 0000 steel wool to see if it is dry, it should make a white dust if it is dry enough. It sounds as if you may not be wiping the spoon completely dry after each application of the oil. Sometimes it will take two or three sections of a dry rag to get it completely oil free. It should be completely dry to the touch after wiping.

Reply
Mitch
9/3/2017 07:39:14 pm

Great, I will try to be more thorough with wiping down the wood after applying the finish.

Thanks

Christie Hauck
1/16/2018 02:54:03 pm

I am having a hard time locating Citrasolve. Tried the Shelter Institute and the Milk Paint Co. to no avail although they do sell a half Tung Oil/half citrus oil product for butcher block. Citra-Solv keeps coming up but it’s a degreaser-cleaner. Any advice?
Thx

Reply
Angela Kortemeier link
1/19/2018 11:10:09 am

The product name has been changed to Citra Magic and can be purchased through the Shelter Institute. Gallon buckets cost $39.99 and $10.95 for a quart.
The product is not listed on their website but customers can call in an order and the Shelter Institute can ship it.
The Shelter Institute
873 US Route One
Woolwich, ME 04579
207-442-7938
207-442-7939
info@shelterinstitute.com
www.shelterinstitute.com

Reply
Christie Hauck
2/14/2018 04:37:34 pm

Thank you. I ended up getting the 50:50 solution from the Milk Paint Co. Went through the process and put 5 coats on the spoon. Let it cure for 3 weeks and noticed a crusting on the finish and some splotchy spots on the finish. Where did I go wrong?

Reply
Kenneth Kortemeier link
2/18/2018 01:42:58 pm

Well I am sorry about that, it sounds very frustrating to get such poor results after a lot of work.
I have not used the “half and half” solution myself, but I would guess that you may not have allowed your spoon to cure completely between coats.
One way to tell that it is completely cured is to sand it with a fine sandpaper.
If it is dry, you should get a fine white powder.
(Don’t sand through to the wood when sanding between coats, the idea is to build up coats. Too much sanding will be like one step forward/two steps back; use 400-600 grit sand paper only.)
If you don’t get a fine powder then it is needing more time to cure before the next coat.
When you wipe it off between coats you should switch out your rags so the last wiping should leave the rag dry and basically free of any residual oil.
If this doesn’t seem to work you could check with the Milk Paint Company’s technical support staff.
You may need to wipe off the uncured oil with a solvent and let it dry until you can sand and get a fine powder. I would give the whole thing a good sanding with fine sandpaper to get a fresh start after you wipe it down with solvent. You could use the citris based solvent for the wiping down.
Hope this is helpful, Kenneth

Reply
David Halter
2/21/2018 05:59:37 pm

I’ve been using mineral oil and beeswax on wooden utensils, but want to try a non-petroleum oil. Using tung oil do you ever have to renew the finish? If so, do you use the same process?

Thanks,
Dave

Reply
Kenneth Kortemeier link
2/26/2018 07:20:21 am

Hello Dave,
Yes, to renew the finish I simply repeat the original process. I often will lightly sand the spoon with 400-600 grit wet dry sand paper before I start to apply the tung oil mixture. This sanding removes any wood grain that has risen and smooths out any bumps or dings that may have damaged the surface since the last time it was oiled. Be careful not to sand through the original finish and only lightly sand to prep the surface for re-coating. Because tung oil hardens when it dries, I think you will find that the finish is more durable than the mineral oil you have been using.

Reply
Vee link
3/7/2018 03:17:39 pm

Hi. I am completely new to this… I see many articles talking about oiling and finishing but I can't find anything about what to do immediately after carving and sanding… can you help please?
Many thanks
Vee in England.

Reply
Kenneth Kortemeier link
3/15/2018 08:50:03 am

Hello Vee,
I am not sure what you have seen already on this subject, but I usually go ahead and oil as soon as I finish carving and sanding. I don’t think there is another step needed. That said, if you sand your spoon, raising the grain before oiling is helpful. To “raise the grain” one would thoroughly dowse the spoon with water and then let it dry. The water will cause the grain to raise as it dries. One then follows this with some additional sanding to remove any wood fibers that have risen. You can also work with any risen grain after you have applied the first coat of oil. Because I usually wet-sand between coats of oil, I have found that this also smooths any remaining fibers that may raise up.
Hope this is helpful, Kenneth

Reply
Damie
11/7/2018 06:08:56 am

Hi Kenneth, thanks for sharing your knowledge of wood work with us. I would like to ask, is this finishing process also great for cutting boards? I tried it for my spoons and it was wonderful, but with the cutting boards, I’ll need a lot of tung oil and citrus solvent to soak them. Is there another process for cutting boards that doesn’t require a lot?

Reply
Kenneth Kortemeier
8/6/2019 05:07:12 pm

Hello Damie,
Sorry this took so long to respond, we missed your comment/question somehow.
I agree, I think soaking would be difficult due to the size of cutting boards. I would recommend applying 3-5 coats with a brush or rag and wiping off and drying between coats as usual. I use this with larger items myself. Good luck!

Reply
Tom
2/24/2019 10:10:39 pm

Great write up! I will try the soaking method with the chopsticks I am making. My question is, how does a tung oil finish hold up with heat? I am thinking that I will use my chopsticks for some cooking in simmering pots and pans. are there other finishes suited for this sort of thing?

Reply
Kenneth Kortemeier
3/27/2019 08:08:50 am

Hello Tom,
I don't really know how well it will hold up with high heat over time. I do not know of any scientific studies on this and I am not a scientist, just commenting on what I have used and observed first hand. I think heat will definitely break the finish down sooner than not using with heat. I don't know how soon. I use my tung oil-coated spoons for regular daily household cooking. I do try to keep them from getting excessively hot when possible. After a year or so, they do get dull-looking and show signs of wear. When this gets too much for us, I apply a fresh maintenance coat of tung oil, about once a year or so. The spoons are all hardwood and many have been in service for up to 10 years now. Sorry, I do not know of other high heat finishes that are natural oil.
Hope this is helpful and good luck.

Reply
Thomas Rominski
3/27/2019 09:29:38 am

Thanks for the thoughtful reply. Yes I think that answers my question - general household cooking will wear them out over time. I want to make wooden utensils as presents for people and I don't want to say "by the way, you need to re-oil it once a year!" so the longest lasting finish is the goal for me.

Jim
8/6/2019 06:24:37 am

Kenneth, please comment on Tried and True mixed with the citrus product. Thanks!

Reply
Kenneth Kortemeier
8/6/2019 04:30:21 pm

Hello Jim, The Tried and True I never mixed with citri-magic. I only used it straight and would thin it with heat to help it penetrate the wood. Although I have never tried it, I don't think there would be a problem to thin it with citri-magic. I know they sell a Danish Oil finish that they recommend using to mix into their other oil finishes to thin them. .

Reply
matthew
12/1/2019 08:29:25 am

Hello, thank you for this post. How long do you let the spoon cure after the last coat of oil is applied?
Thanks!

Reply
Kenneth Kortemeier link
12/2/2019 07:49:25 am

Hello Matthew,
At least 24 hours.

Reply
Ben
4/4/2020 01:01:44 am

Hey, I use pretty much the same method as you for green woodworking, I was just wondering how long you leave carved green wood spoons out to dry before you finish with tung oil. Thank you.

Reply
Kenneth Kortemeier
4/13/2020 04:49:25 pm

Hello Ben,
I like to leave the green wood carved spoons out to dry for at least a day or two. This would depend upon how thick the spoons are and the relative humidity. Mine are thin and inside with a wood stove this time of year. Wrap in a t-shirt if it is really dry. They should be good and dry before applying oil. So, let them dry three or four days if you have the time. A low-tech way to tell is that they should feel dry when you touch them to your lips.
Hope this helps, K

Reply
Stephen
6/10/2020 06:05:47 am

Hello Kenneth, really enjoyed reading about your process. I'm new to spoon carving and have a question regarding oil application. Some of my finished carvings (made using greenwood from a local park) look great before oiling but once the oil is applied they begin to develop grey patches. Another carving didn't go grey but some parts (which don't appear to be any different from the rest of the wood) go a darker, unattractive shade than the rest of the wood. I'm using organic hemp oil. I suspect it has something to do with my carving process (I take a relaxed approach and carve over the course of 7-10 days) Any ideas? Do I need to carve and seal quicker? Thank you

Reply
Kenneth Kortemeier
6/30/2020 05:45:38 am

Hello Stephen,
I have not used Hemp oil before. I would guess what is happening is that some places in your wood are softer or more dense than other parts and the wood is absorbing the oil at different rates. Another possibility is that when the wood dries and the outer surface is exposed to oxygen it has changed color. Usually this is only a surface deep situation and can be removed by shallow cuts and resurfacing the dry spoon with a sharp knife. Essentially doing a final surface carving to remove the discoloration.
I don't think carving over an extended period of time is a problem, I usually do that as well. Rough caving as much as I can while it is wet and then going back over it again once it is air dried for the finish carving.
One of the interesting and wonderful things about wood is that it is somewhat variable. Different trees will take oil differently. Even trees of the same species can behave differently depending on internal stresses, location of the spoon blank within the tree, grain orientation, wood decay, etc..
Hope this is helpful and sorry for the delay in responding to your question.
-K

Reply
Mason
7/27/2020 01:33:09 pm

Hi, after the initial soak, wipe, wipe, dry overnight, water, dry, sand ... when you're adding coats 2-5, do you let the spoon dry overnight each time? Or just wipe on, dry for 10-15, wipe, apply over and over on the same day?

From this sentence comes my quesiton: "Then I wipe it off and repeat the process with the drying, light sanding and the rubbing/polishing."

Reply
Kenneth Kortemeier
7/31/2020 11:36:16 am

Hello Mason,
Sorry that the sentence is not more clear about time between coats. The oil needs to dry well before the next coat is applied. Each coat of oil needs oxygen and without it will have trouble drying properly. If multiply coats are applied over each other without drying between, you will get a mess because the top coats will keep the first coats from getting oxygen and they will not dry. This mess of partially cured oil will then have to be removed and this is sometimes difficult to accomplish.
Yes, let each coat dry overnight at a minimum, it may need more time if it is cold or very humid. Check dryness of each coat by lightly abrading (with fine steel wool or fine sand paper) the surface, you should see a white chalky powder forming if the oil is dry. If you don't get powder, it is likely not dry yet and needs more time.

Reply
Mason link
8/2/2020 05:55:40 am

Thank you for your answer Kenneth. That makes perfect sense. I think I need to have multiple spoons in rotation so I have something to do while I wait for one to dry.

Chris Pederson link
9/23/2020 08:34:25 am

I have never used a wooden spoon before but my wife says they are the best utensils to cook with. Her birthday is next week and she really does love to cook but we don't have a wooden spoon. I think I'll find one that can be easily cleaned so I'll need one with a slick finish like you said so the water runs off it easily.

Reply
Jeannette Tetz
10/5/2020 02:41:59 pm

I've been using the Tried and True Danish Oil (so no beeswax), the result is OK but I am not getting the kind of water resistance I would like. Will soaking, as you describe, yield a better result? Should I use the kind with wax in it (read something about hot liquid damaging the wax...)? Should I try the tung oil as you describe? Mostly I happened to have the plain polymerized linseed so that is what I went with, but I want the most durable spoons possible.

Reply
Kenneth Kortemeier
10/6/2020 06:54:06 pm

Hello Jeanette,
I have used the Tried and True products several years ago before I switched to only using Tung oil on my spoons. The reason being that the tung oil produces an much harder finish than linseed oil. It is fine to keep using the polymerized linseed oil, it is a very good finish and very traditional in scandinavia. It is less expensive than tung oil and it sounds as if you already have it. Jogge Sundqvist told me that he does not use tung oil because it is not part of his tradition and he does not like the smell of tung oil.
If you want the hardest natural finish, tung oil dries to a harder surface than linseed oil. I use 3-5 coats of tung oil and have not found a better natural finish for spoons and bowls.

Reply
Karen J.
10/27/2020 03:12:26 pm

Kenneth,

I found your blog from a search on how to seal hand carved wooden spoons. I have a spoon my grandfather carved for my mother in 1966 because she kept breaking her wooden spoons. My mother never used it and it always hung on the wall in the kitchen. I have no idea what kind of wood he used, my guess would be birch as it's abundant in Alaska. Nor do I know if the spoon was ever sealed. I used mild soap and water to clean off grime, but I would like to seal the spoon. However, I am nervous as it is old. Both my grandfather and my mother have passed on. My husband has created a shadow box out of African Mahogany to place the spoon for keepsake. Is Tung Oil safe to use on unknown wood and unknown if sealed?

Thank you for your assistance.

Reply
Kenneth Kortemeier
12/22/2020 03:11:35 pm

Hello Karen,
Sorry for my delayed response to your question. I missed it somehow.
Yes, the tung oil will be just fine on birch or any other wood. If it has a previous finish, a light sanding with fine sandpaper or 0000 steel wool will help. Also consider using a rag to wipe it down with some solvent such as denatured alcohol this will help with any wax and residual grim. The shadow box sounds lovely and such a tribute to your late grandfather.

Reply
Howard Pruden link
12/16/2020 05:58:40 am

Just started making spoons,. I have used a beeswax. Finish and I’m wondering about using tung oil. Question, I suspect I will have to re sand before applying the tung oil, or can I nausea soap s and water?
Also, because Christmas is.barring down on us is there away to speed up the process on this batch. In future I’ll try your method. Thanks for your informative responses.
Cheers,
Howard

Reply
Kenneth Kortemeier
12/22/2020 03:00:43 pm

Hello Howard,
Glad you found the spoon finishing post helpful. Yes, Christmas deadlines are tough, I have heard that if it were not for deadlines, nothing would get done.
Yes, you are correct, the beeswax will prevent the tung oil from penetrating and possibly even from sticking at all depending upon how much wax is still on the spoons. Using soap and hot water to remove the wax is a good idea. If you have any solvents such as denatured alcohol they will work better. To apply, start with a dry spoon and rub with a solvent soaked rag. Any solvent will increase the effectiveness of the wax removal.
For speed in curing, you could try Japan Drier. When added to the tung oil mix, it speeds curing of all oil based finishes. I am not sure about toxicity of the drier. I believe that once the finish is dry and you wash it with soap and water, it would be food safe. You may want to check this out first because I don't know for sure. Fewer coats of oil and a warm place to dry will also speed curing.
Hope this is helpful and good luck with your deadline!

Reply
Garrett Linck
1/14/2021 10:55:32 am

Regarding the Tried and True microwave method, after doing what you describe, would you do additional coats with the same method? And what is the ballpark drying time after? (Or in between coats if you did multiple).

Thanks for the great article.

Garrett

Reply
Ash
1/15/2021 08:37:37 am

Hi Kenneth, thank you for the article! My question is, can Goo-Gone substitute for Citra-Magic? It's a similar citrus-based solvent, right?

Reply
Howard
2/3/2021 09:11:58 am

Hi Kenneth, thanks for your response in my earlier inquiry. I have ordered a citrus based solvent called Citra-Solv. I see it’s a Concentrate, do you use full strength or dilute it? Also I have a couple of coats of tung oil on a group of spoons, is it possible to soak these in the 50/50 solution or will the existing finish prevent any absorption?
Cheers,
Howard

Reply
Kenneth Kortemeier link
2/4/2021 05:53:52 am

Hello Howard,
  Yes, I use the solvent full strength when diluting tung oil. It will not do any harm to soak spoons that have been finished previously. They may absorb less oil than a new wooden spoon but periodic reapplication of the oil is a part of maintaining the tung oil finish, especially in spoons that get a lot of use. I typically reapply finish about once a year and I just wipe it on rather than soaking the spoons. I usually only soak them the first time I apply the finish to a newly carved spoon. 

Reply
Tom Kirk
6/12/2021 07:36:46 am

Hi, thanks for the blog, I'm about to try carving some spoons for our (soon to be) first child. I live in the UK and I'm struggling to find citrasolv. The only thing I can find is a degreaser/cleaner, is that the correct type?

Reply
Ray Branch
11/24/2021 05:15:53 am

Can basswood be used for spoons or is the wood too soft? Advantages vs disadvantages?

Reply
Forest Decor link
3/21/2022 08:21:03 pm

You have shared very nice article!
In my opinion, Wooden spoons made of all natural materials. Also, making these spoons doesn’t require the use of artificial substances or chemicals.

Reply
Marilyn link
4/20/2022 10:42:53 am

Hi, I read on the SDS sheet that citra-magic is toxic. Are you sure we should be using that to mix with tung oil for spoons???

Reply


Leave a Reply.

Details

    RSS Feed

    Authors:

    Angela & Kenneth Kortemeier


    If you'd like to sign up for our email list, please follow this link:
    subscribe to our email list & newsletter

    The little button below (RSS feed) will allow you to
    follow the blog without subscribing to the newsletter.

    RSS Feed


    Archives

    December 2019
    June 2019
    September 2018
    May 2017
    April 2017
    March 2017
    January 2017
    December 2016
    November 2016

    Categories

    All

Proudly powered by Weebly
  • Home
  • classes
  • blog
  • Contact us
  • area amenities
  • class descriptions
  • Tool sales +